When In Doubt, Bracket!
Enjoy the summer!
All LibRaw Products and Bundles - 25% off
Our Special Prices are valid until July 30, 2026.
On any photographic forum, it doesn't take much effort to find old or new discussions on how to set the “proper” exposure while shooting, and even what exactly “proper exposure” is.
Figure 1
The question of setting exposure was and is one of the most commonly-discussed topics on forums and blogs. Newbies (and not) bring it up again and again and receive all sorts of explanations – long and short, deeply “scientific” and completely “practical”, starting with advice to use the in-camera histogram, “zebras,” manual exposure mode, corrections and compensation, special camera modes to increase the dynamic range and increase the reliability of the histogram and other overexposure indicators, a separate exposure meter, Adams’s exposure formula, metering the incident light, spot measurement, a grey card, the back of one’s hand, green grass, an ExpoDisk, the sunny 16 rule, Magic Cube, etc., etc.
The number, volume, and force of the emotions present in discussions about correctly setting exposure for each shot, the number of gadgets and tricks to achieve the result, as well as the number of articles written on this topic create the impression that the one and only purpose of a photographer is to shoot based on the principle of “one shot, one kill.” The ability to immediately nail the exposure for each shot is viewed by some almost as an indicator of a photographer’s skill.
But if one thinks through the internet fury, the sheer amount of contradicting advice and the number of gadgets indicate that there is no sure way to set the exposure “correctly” for a general case, especially when the light is not particularly good, and the contrast in the scene is high (often referred to as “high dynamic range”). The logical choice seems to use exposure bracketing, however the use of exposure bracketing by a photographer is often viewed as a “dirty trick”, bordering on bad taste – mauvais ton, the last resort, where it should be the exact first one.
Often, an experienced professional photographer will, upon hearing the question of how one should choose exposure while shooting, respond that you should “Bracket your shots when the lighting conditions are complex. Or, even better, bracket all of your shots. I do it all the time.” That’s because problems with exposure are not something that only a novice can encounter; of course if one is not a full-time pro, he has more of those.
One of the reasons why is that the camera won’t show you what a raw converter can do in terms of highlights recovery or noise reduction. Worse, even if you are shooting raw, camera will still display a JPEG, and on a rather tiny screen. Essentially, for the aforementioned reason and for others (choices of cropping and the final size being some of those), we know for sure that exposure is good or bad only while processing the raw on a computer.
To illustrate this article, we decided to perform an experiment. It was a sunny day, we set the camera to aperture priority, matrix metering, and the bracketing was set to 5 frames, in a progression 0 EV, -1 1/3 EV, -2/3 EV, +2/3 EV, +1 1/3 EV. To keep the experiment “clean”, the camera was given to a complete novice, the shooting time was limited, and we intervened only once (we will explain why and how a little later).
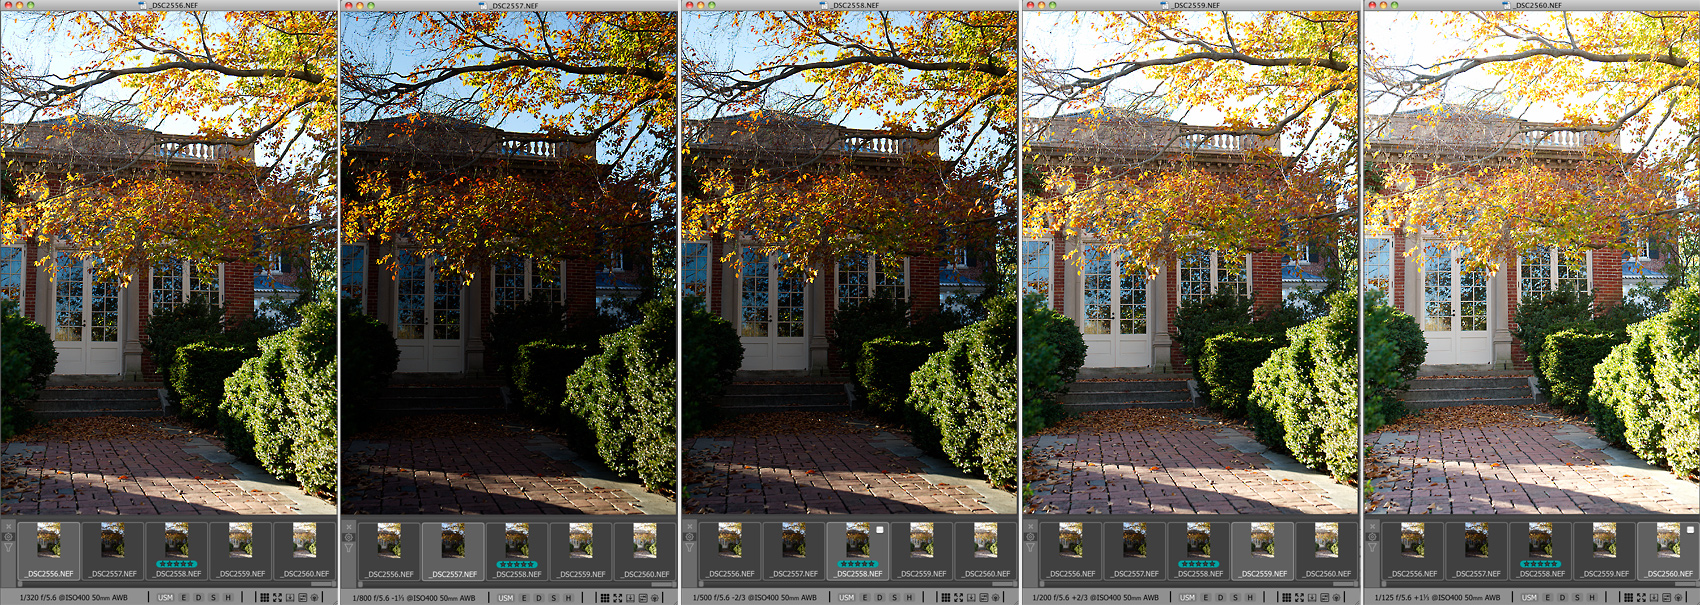
Figure 2. Series 2556-2560.
On scene 2556 (to the left, auto-exposed with 0 exposure correction), the sky is already blown out and has no color; for shots 2559 (+2/3 EV) and 2560 (+1 1/3 EV) the clipping in the sky is obviously worse.
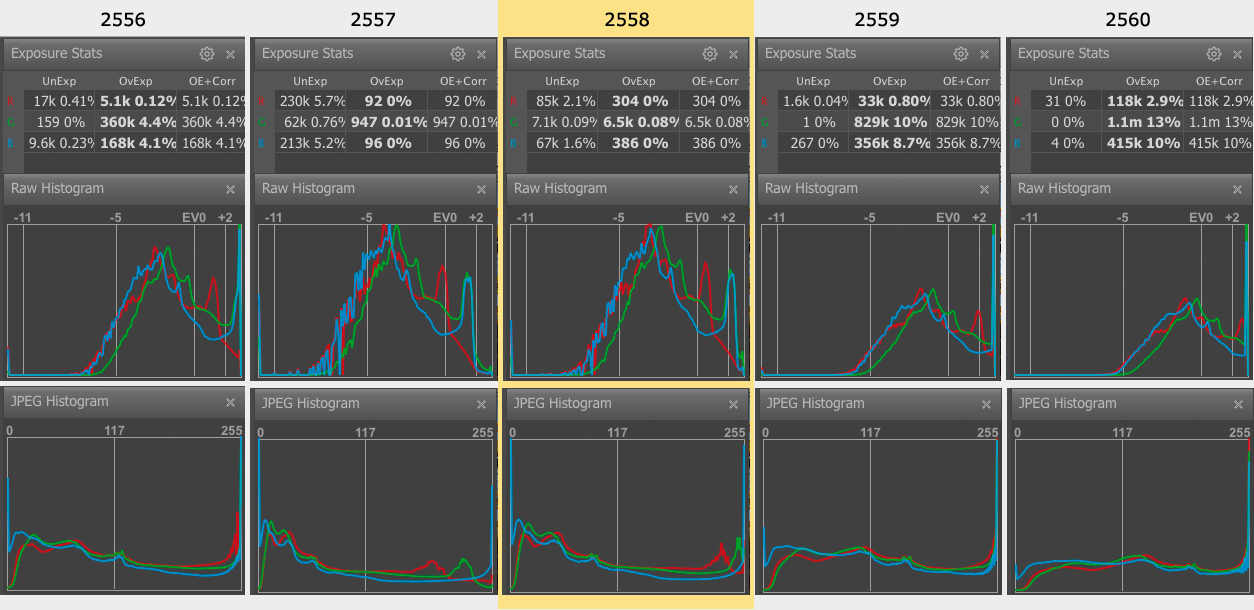
Figure 3
Shot 2557 (-1 1/3 EV): according to the RAW histogram and RAW exposure statistics there’s a bit more underexposure in the blue and red channels than would be desired. Notice that the histograms of the embedded JPEGs don’t point to a single useful shot – they’re all underexposed and overexposed at once, according to the JPEG histograms.
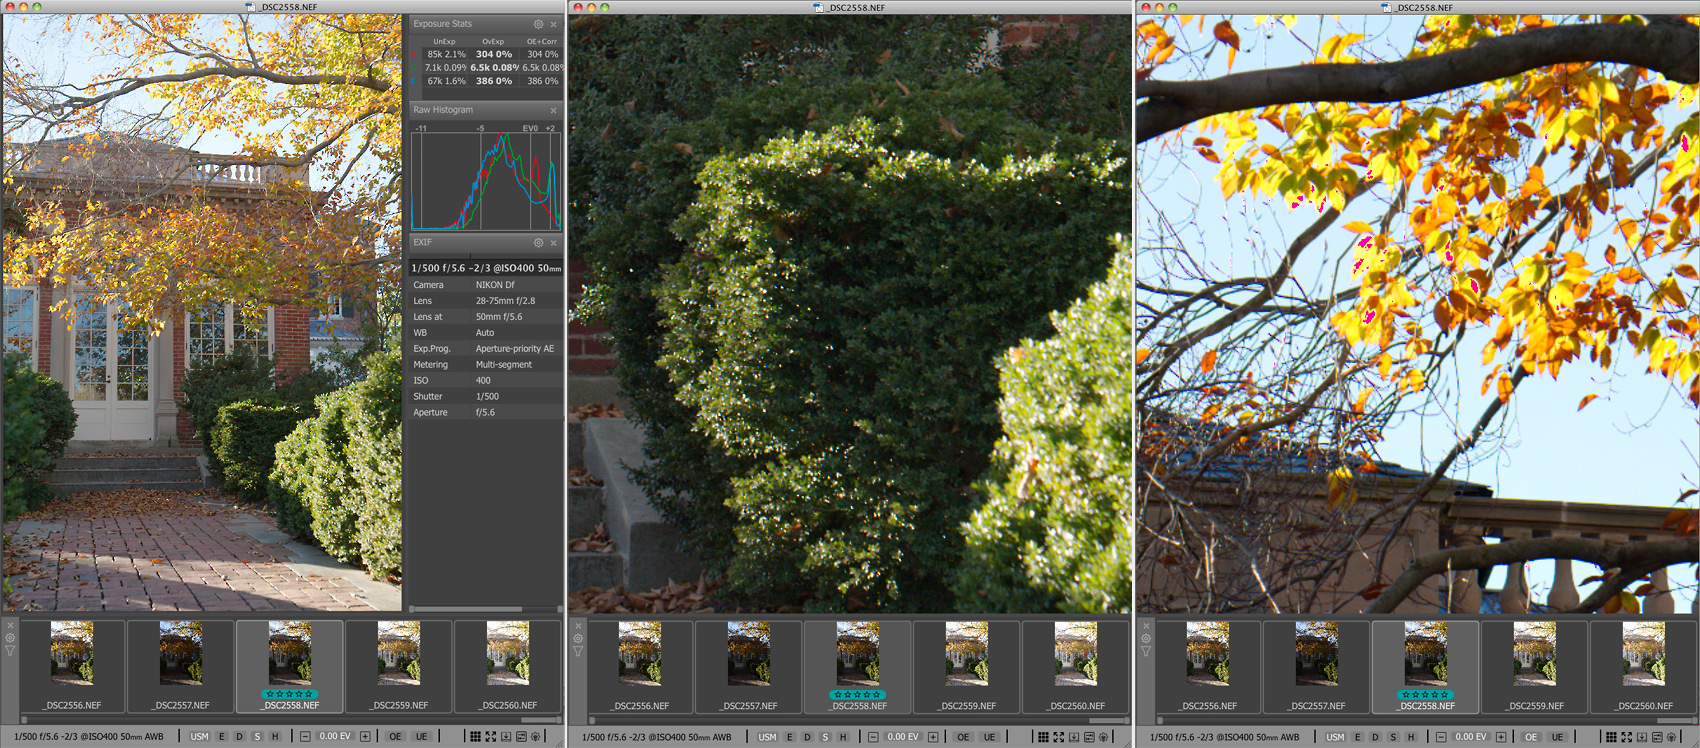
Figure 4
The best-exposed shot of the scene is 2558 (-2/3 EV): using Shadow Boost, we can see that the details in the shadows are well-preserved (see the image on the left) and that the shadows don’t have much objectionable noise (see middle image); furthermore, the sky and highlights are intact, with only a few overexposed pixels on some of the leaves (see the image on the right).
In reality, the idea of “one shot, one kill” is, in photography, quite often an artificial constraint, especially considering that, on the one hand, “once in a lifetime” shots generally don’t need excessively precise exposure, and on the other hand the frame rate of cameras is constantly being improved. At a speed of 5 frames per second and more, with ever-expanding flash card volumes, the possibility of missing a moment because of bracketing falls (and is certainly less than the possibility of missing it due to the waste of time while chimping). And when shooting landscapes and landmarks, this probability to miss The Shot because of bracketing falls practically to 0.
Furthermore, exposure bracketing and the review of the results thereof allows one to gain experience over time and learn how to set more accurate exposure immediately when the situation necessitates it. However, despite this hard-won ability to set accurate exposure off the bat, professional photographers continue to use exposure bracketing when the shooting situation permits – if for nothing less than the peace of mind.
During the time of film photography, a professional “wage laborer” photographer knew that he had to turn in useable shots from every shoot. Different organizations had different standards, demanding somewhere between 10 to 30% of useable shots. As a result, as soon as bracketing became possible with cameras, photographers began wasting less time trying to guess or calculate optimal exposure (despite the fact that film and development cost money, with good film and good development costing a pretty penny), and professionals used the results of the exposure meter but often used bracketing as well (especially if the shot had particularly complex light) – that is to say, he’d take several shots above the recommended exposure value and several shots below. After development, he’d pick the best shot. Yes, the number of shots for development and the culling grew, sometimes the price for film (and processing) bracketing demanded came out of the photographer’s pocket, but this way of doing things guaranteed a higher amount of useable shots, better pay, and better career prospects.
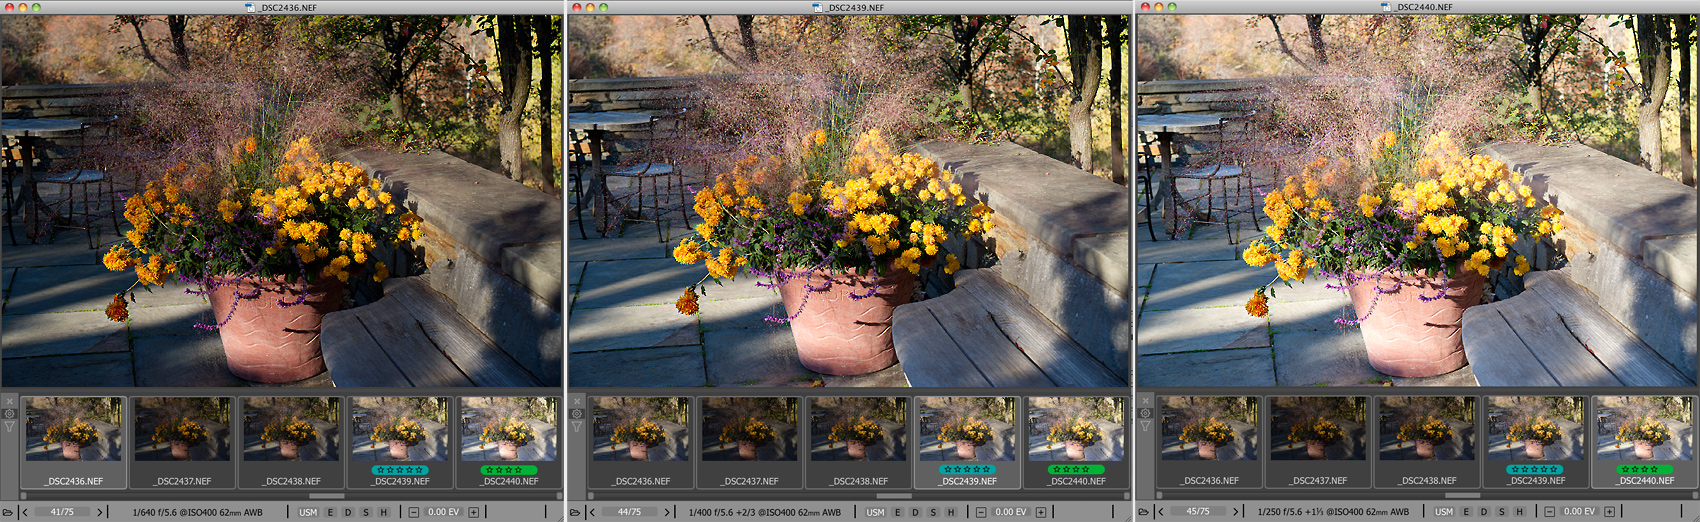
Figure 5. Series 2436-2440: the images shown are 2436 (autoexposure) - left, 2439 (+2/3 EV) - center, and 2440 (+1 1.3 EV) - right
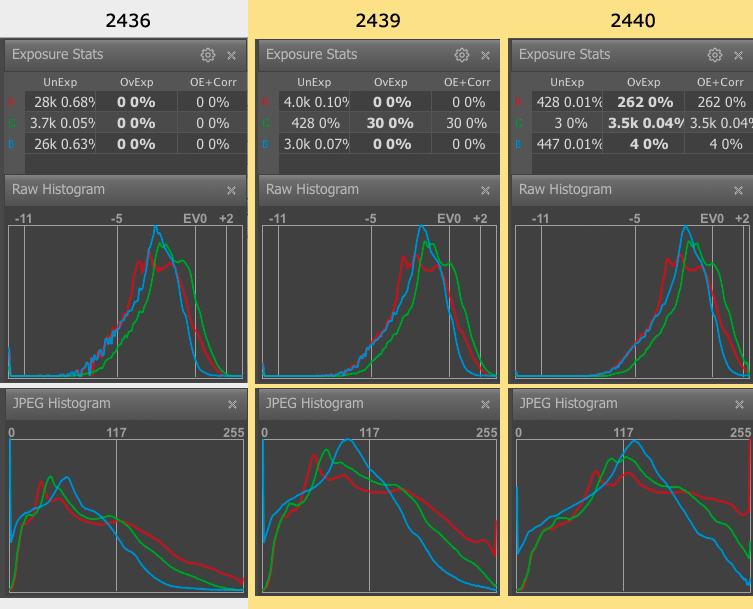
Figure 6
The RAW histogram and RAW exposure statistics show that shot 2440 is exposed almost perfectly, however the histogram for the embedded JPEG insists that it’s underexposed in all channels and is VERY underexposed in the blue channel. The same situation is visible with shot 2439. So much for trustworthiness of JPEG histogram! Depending on the how the image is going to be displayed (in terms of size, media, etc.), and the quirks of the converter being used, one could choose either of the two shots.
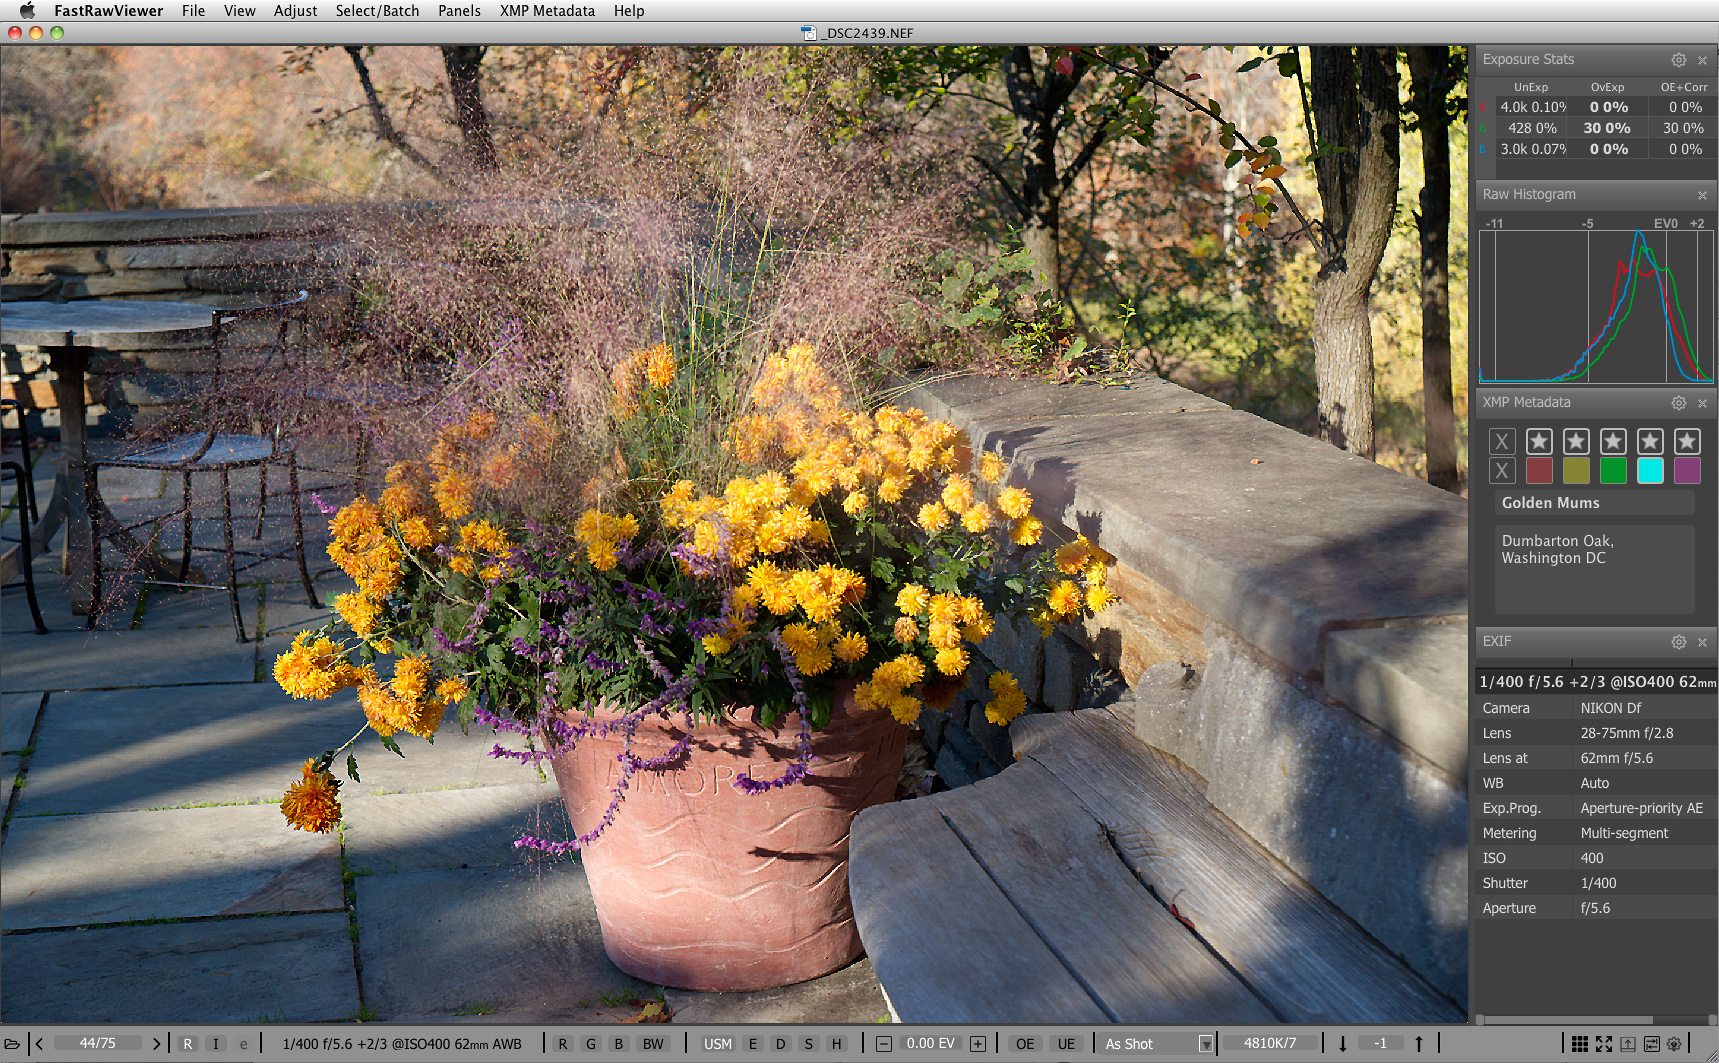
Figure 7
We chose 2439, because we wanted to completely save all of the details on the illuminated chrysanthemum petals (areas that were blown out in shot 2440) and didn’t want to risk those details being poorly reconstructed in a converter. However, as we noted above, depending on the circumstances of conversion and display, shot 2439 could also be chosen.
Furthermore, sometimes the shot picked out of a bracketed series wasn’t the one the exposure of which was the best technically speaking, but rather one that was a bit “over” or “under” exposed, because it better reflected the moment or the photographer’s analysis of the scene.
In many places that trained pro photographers, the iron-clad lesson used to be that one always bracketed, even with wide format and expensive film.
With the development of digital cameras having the screen on the back of the camera, photographers got the idea that the problems that came into being on film cameras were a thing of the past: one no longer needed to take film to be developed to see just one photograph – now, one could look at the camera screen, instantly see the image, and understand whether the exposure was correct or not. This led to the idea that bracketing was unnecessary.
However, let’s consider a situation where you’re not shooting in a studio, but rather in a crowded or uncomfortable place, with changing light, changing scenery, etc. Instead of shooting, shooting, shooting, and then later looking at the images, you’re taking one shot, looking at the screen (damn, the sun has completely covered everything up and you can’t see anything, have to turn or move, which means the composition is now lost and needs to be found again), you’re being pushed around by people walking past you, you’re trying to understand what part of the exposure isn’t what you want, you’re frantically moving the various settings, and finally having set everything “just right” you realize that the scene is gone – the crowd left, or the opposite happened and a crowd blocked your view of something, or the light is different, or that pretty bird flew away… While you were looking at intermediate shots and changing settings, nothing was left to be photographed. When shooting, it’s better to not take away your eye from the viewfinder and have it ready to shoot, not to be in playback mode.
And now let’s remember the sad fact that photographers (and even then, not nearly all) only recently began to realize, that the camera screen shows an already-processed in-camera JPEG and its histogram and not raw, and that the difference between a raw histogram and a JPEG histogram is quite dramatic. Judging one by another is close to impossible, and “optimal” exposure for raw and “optimal” exposure for JPEG almost never coincide and can differ by a stop or more.
Even if by some miracle you manage to quickly judge the quality of the in-camera JPEG by the screen of the camera, and very quickly correct the exposure according to what you saw, the correctness of the exposure of the raw image is still going to be suspect.
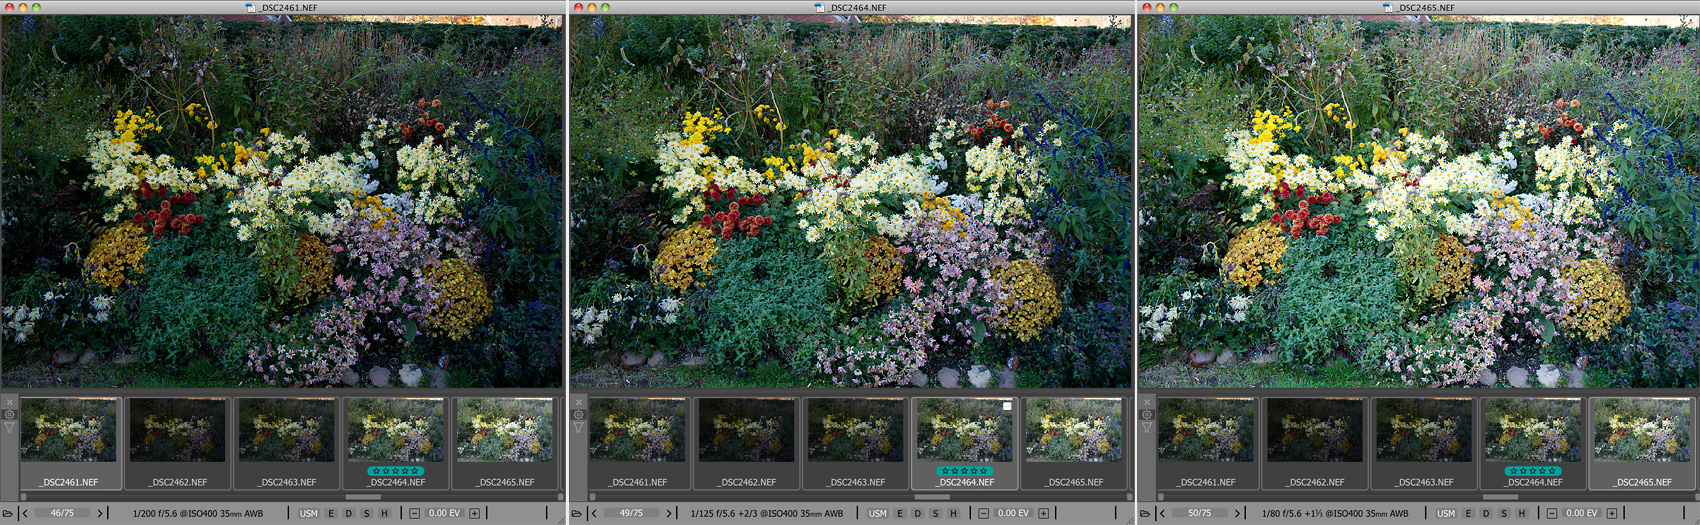
Figure 8. Series 2461-2465. The images shown are 2461 (autoexposure) - left, 2464 (+2/3 EV) – middle, 2465 (+1 1/3 EV) – right
For this scene, we’re going to choose the shot with completely preserved highlights on the elements of the scene that we deem to be the most important – the bright chrysanthemums. It’s easier for a converter to deal with restoring highlights in the sky, than trying to restore small illuminated details that got overexposed.
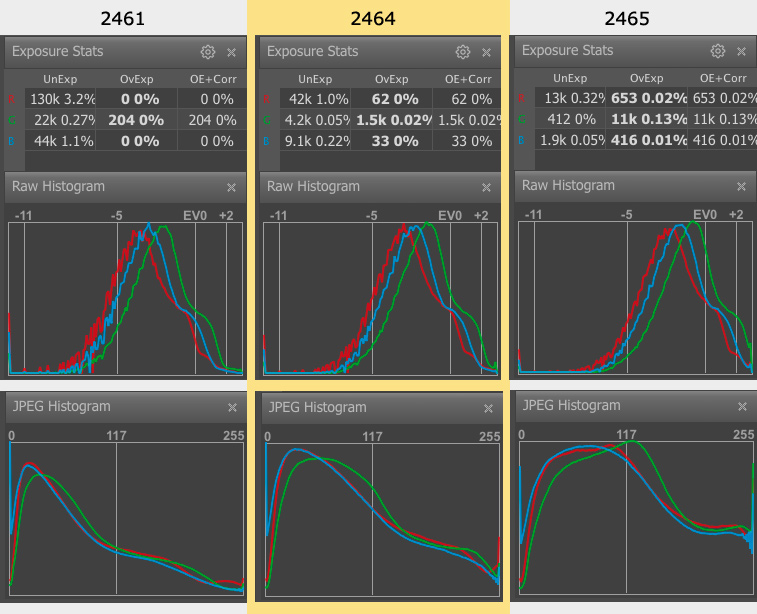
Figure 9
The details on the chrysanthemums in shot 2464 are completely preserved (though the JPEG histogram shows an impressive amount of overexposure in the highlights).
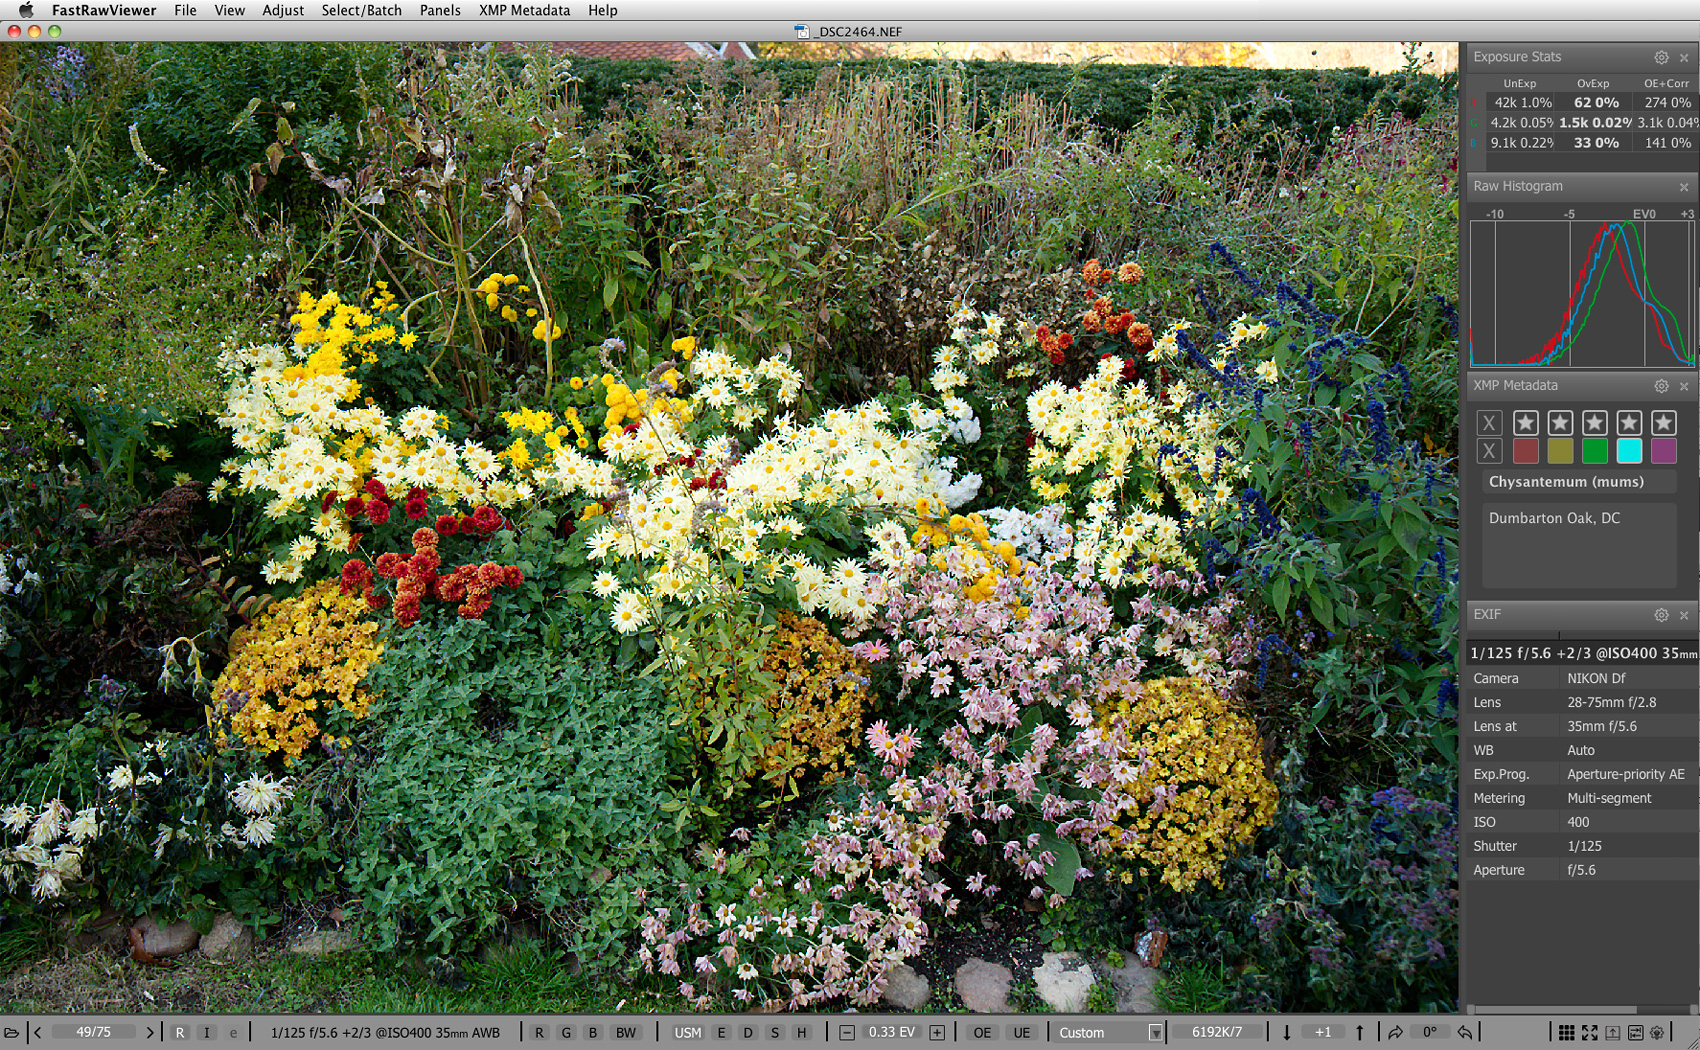
Figure 10
While converting shot 2464, we can apply an exposure compensation of 1/3 EV and not worry about any blowouts at the top-right corner of the image – we were going to crop it off anyway.
Some photographers say that, for their camera, they’ve already calculated the delta between optimal exposures for raw and JPEG, and therefore by looking at the JPEG, they can, considering this delta, set optimal exposure for raw. Unfortunately, this delta can change depending on the ISO setting, the distribution of brightnesses in the scene, white balance, and the colors present in the scene. And this also means that instead of taking pictures, the photographer is spending his time doing math problems in his head and playing with settings.
We sometimes tend to forget that the correctness of the exposure, in the overwhelming majority of cases, can only be judged afterwards, in the comfort of your digital darkroom – for example, all of the highlights are alright, but the shadows are so dark that any attempt to raise them reveals noise, color blotches, stripes. This will only be seen in a converter.
Furthermore, different converters deal differently with raising shadows and recovering highlights, and different cameras are differently noisy, and even differently depending on the ISO speed set for them.
Another consideration is that those shots that converters can’t deal with today because of their exposure “issues” might become quite doable in a few years – converters with their recovery algorithms and noise reduction methods most certainly progress.
Finally, different noise-suppressing programs have different results, and with different sizes on the display or during printing, the noise can look different. The visibility of the noise is also affected by the texture of the paper. We’ll repeat: exposure can be evaluated when preparing a shot for demonstration, and a shot can’t always be re-taken.
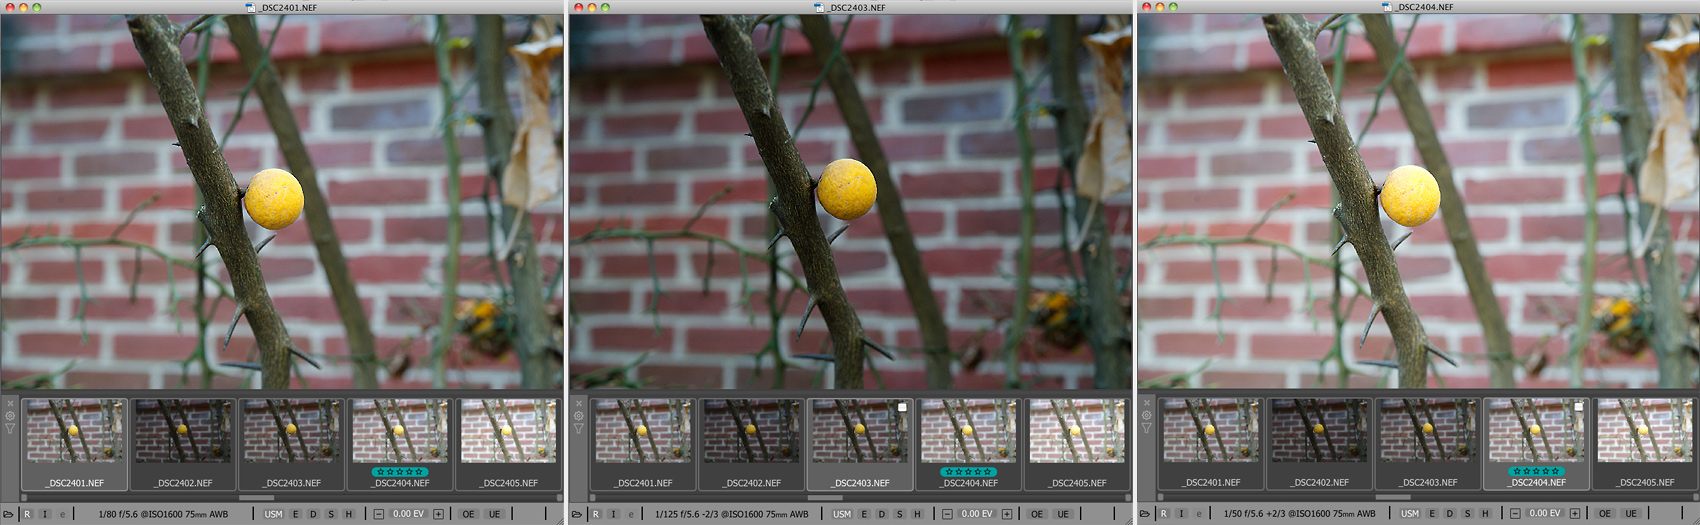
Figure 11. Series 2401-2405: the images shown are 2401 (autoexposure) - left, 2403 (-2/3 EV) – middle, 2404 (+2/3 EV) – right
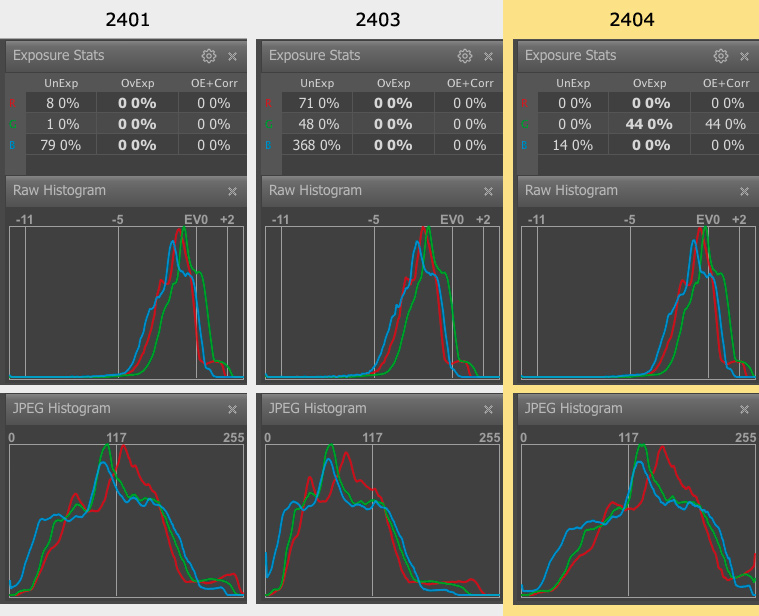
Figure 12
Based on the RAW histogram and statistics, the shot that we like the most is 2404, which is exposed almost ideally to the right (the JPEG histogram, as usual, shows overexposure and slight underexposure).
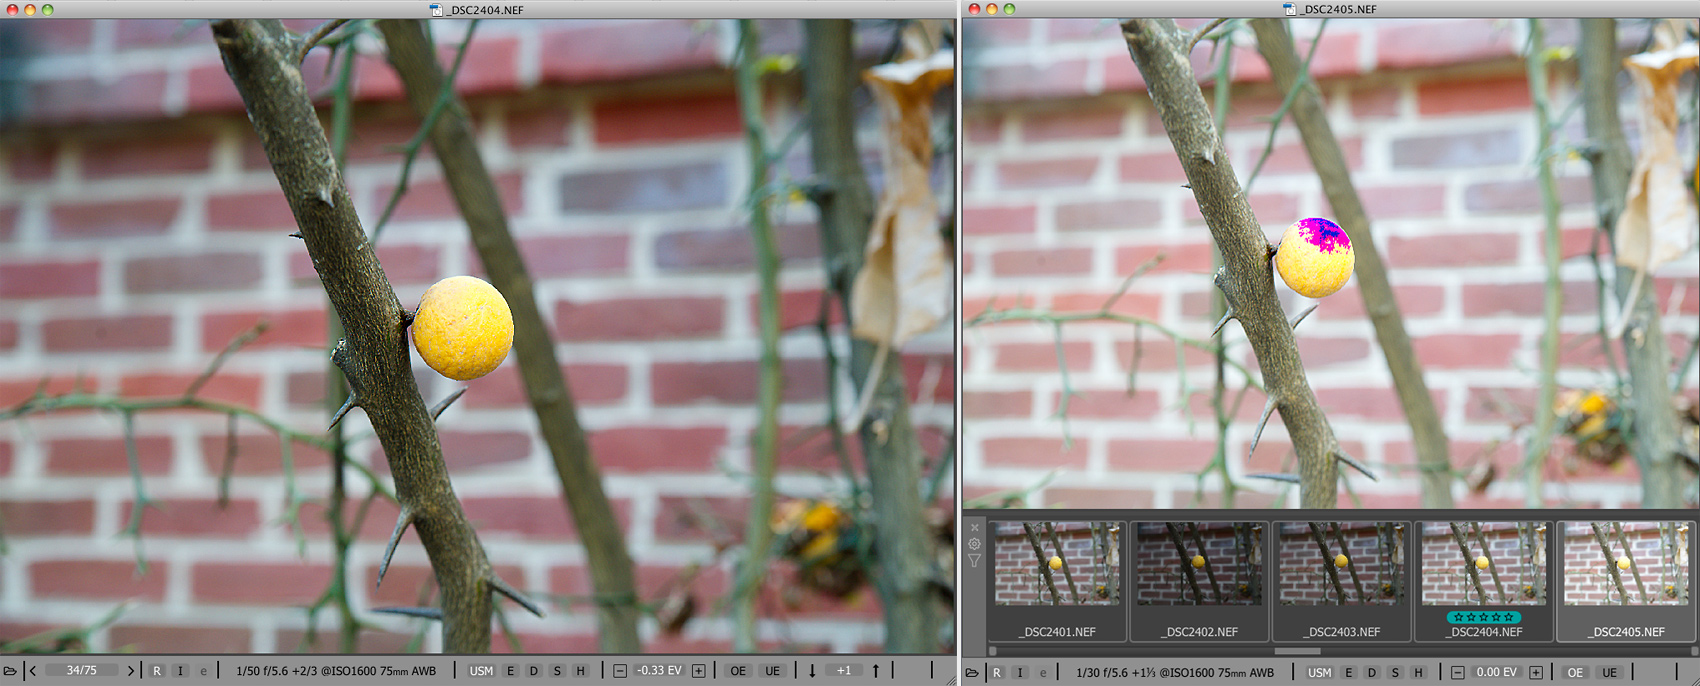
Figure 13
Although the last shot in the series (2405, the shot on the right) is exposed much more to the right, we won’t use it because it already has some pretty serious overexposure on the orange, the texture of which it may be impossible to restore in a converter. Shot 2404 can, if we want, have an exposure correction of -1/3 EV applied to it in the converter (shot on the left).
Knowing the light sensitivity of a material isn’t enough to set optimal exposure, because exposure changes for different parts of the scene depending on how they’re illuminated in the scene and the reflectivity of the objects in the scene. The camera’s AI is powerful, but it can’t read minds. It doesn’t know what the photographer’s intention is, and what shadows / highlights in the scene the photographer is willing sacrifice.
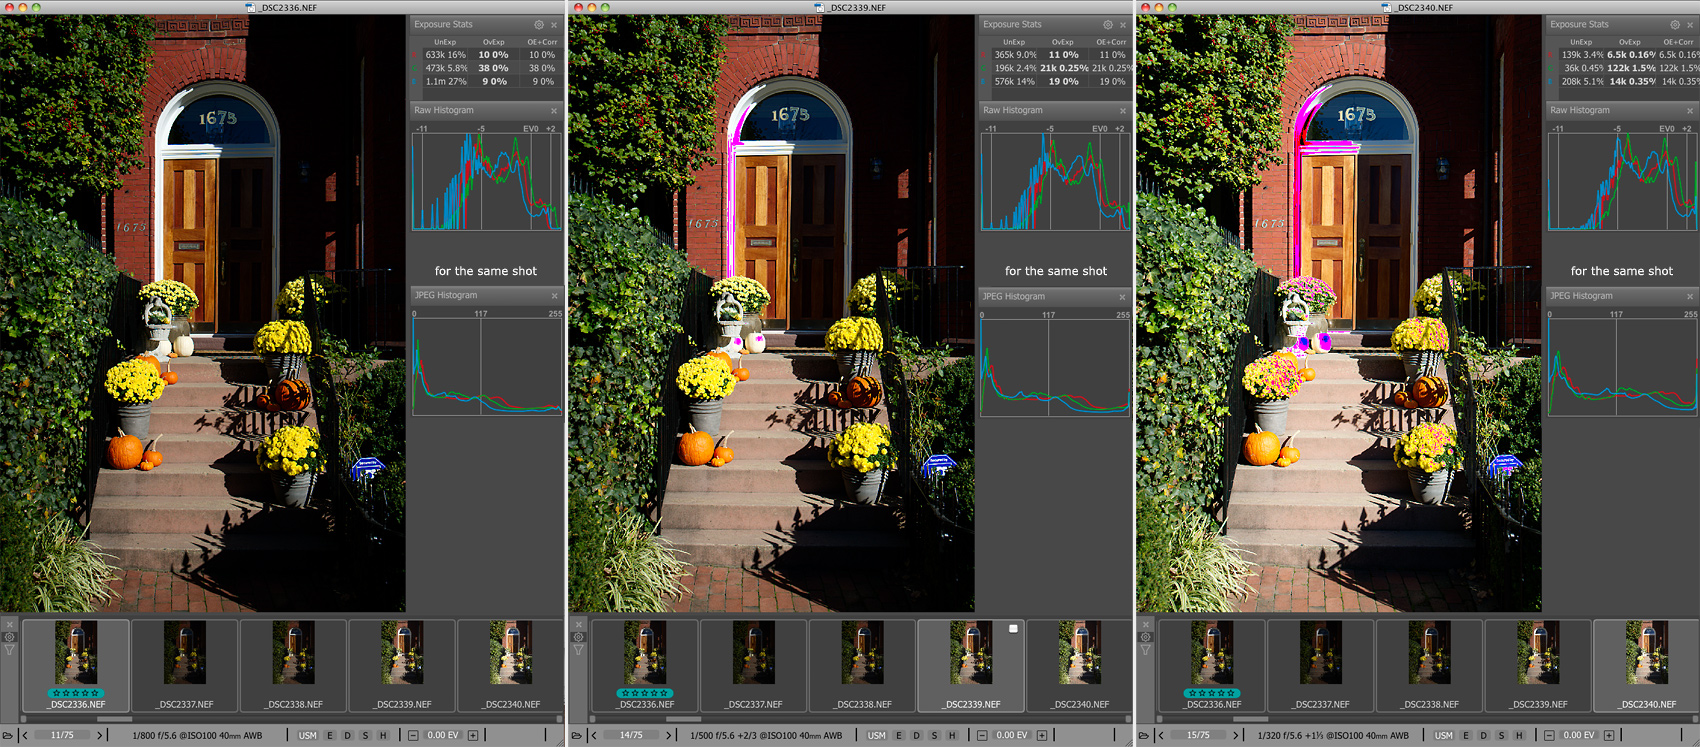
Figure 14. Series 2336 – 2341: shots displayed are 2336 (autoexposure), 2339 ( +2/3 EV) and 2340 (+1 1/3EV).
Shot 2336 is the best, since the blowout in the highlights in the other two shots turns to the doorframe into a white stain.

Figure 15
Shot 2336 – Shadow Boost lets us see that the details in the shadows are well preserved (shot on the left), Focus Peaking shows us that the shadows in the foreground have no noise (shot in the middle), and an Exposure Correction of 1/3, preformed during conversion, will not cause blown out highlights (shot on the right).
In general, for scenes like this, it makes sense to put a bracketing step that’s a little smaller – around 1/3 EV. However, again, during a shoot, you don’t know how the converter that you’re using today is going to recover highlights and decrease the noise in the shadows, much less the one that you’re going to use in the near future. Therefore it’s a good idea to not throw out slightly overexposed images. Furthermore, while converting and editing with the use of the “crop” tool, often one manages to remove problematic parts of the shot.
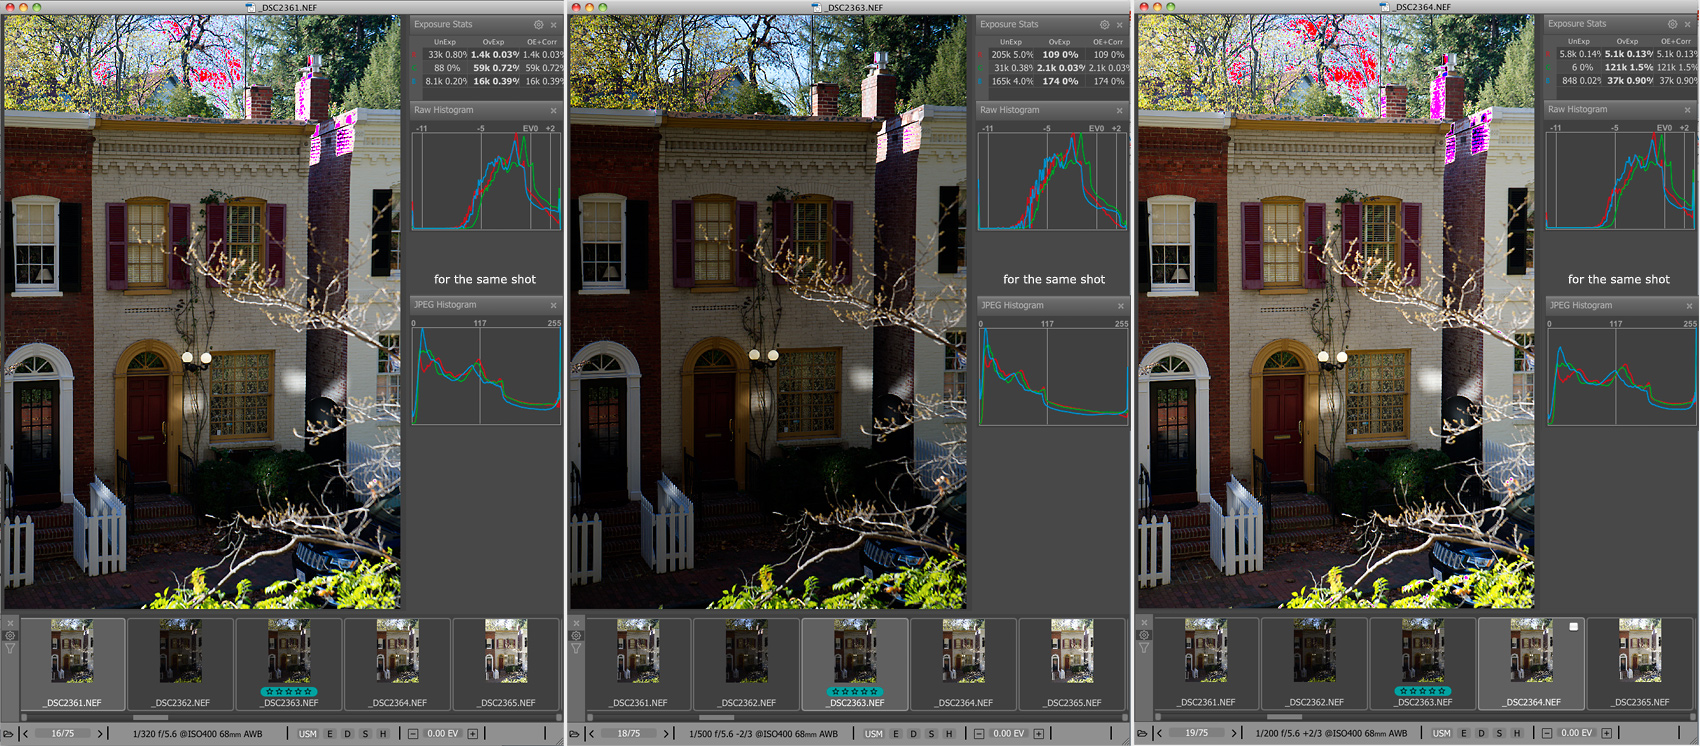
Figure 16. Series 2361 – 2365: shots shown are 2361 (autoexposure)- left, 2363 ( -2/3 EV) - center and 2364 ( +2/3 EV) - right
In this series, we’re still looking for the shot with the most preserved highlights in the sky.

Figure 17
2363 is the best, Shadow Boost allows us to see that the shadows have enough details (shot on the left) and that even in some of the deepest shadows there is very little noise (shot on the right). Highlight Inspection confirms that all of the details and highlights in the sky have been preserved.
The problem of exposure becomes especially unpleasant when the dynamic range of the scene doesn’t fit in the useful dynamic range of the camera. How do we find this out? Some would say that it’s obvious! All we need to do is measure the entire scene with the spot-meter (preferably the one in the camera) and calculate the difference between the minimum and maximum values. If it’s less than the useful dynamic range, you can confidently set the exposure about 3 stops above the spot-meter’s maximum value. Indeed, that works. But what if the range of the scene is more? Furthermore, try preforming this exercise and realize how much time it takes (camera manufacturers, we’re looking at you – you could give us the results instantly, it’s known inside the camera, but why exert yourselves eh?).

Figure 18. Series 2531-2535. Overexposure Indication shows the change in the overexposure in the highlights
As a rule, scenes with a dynamic range that exceeds the dynamic range of the camera and are similar in composition to the photographs below require careful treatment of the highlights. Blown out highlights ruin the atmosphere of such a scene. If there are thin, dark details in the foreground of such highlights, they lose their shape and turn into a mess. As regards to shadows, when making shots such as this one must know their camera and their converter very well, to understand what level of “underexposure” in the shadows will allow one, after conversion, to get shadows with a minimal amount of noise. And of course, it all depends on the size of the shot and the medium on which you’re going to demonstrate it.
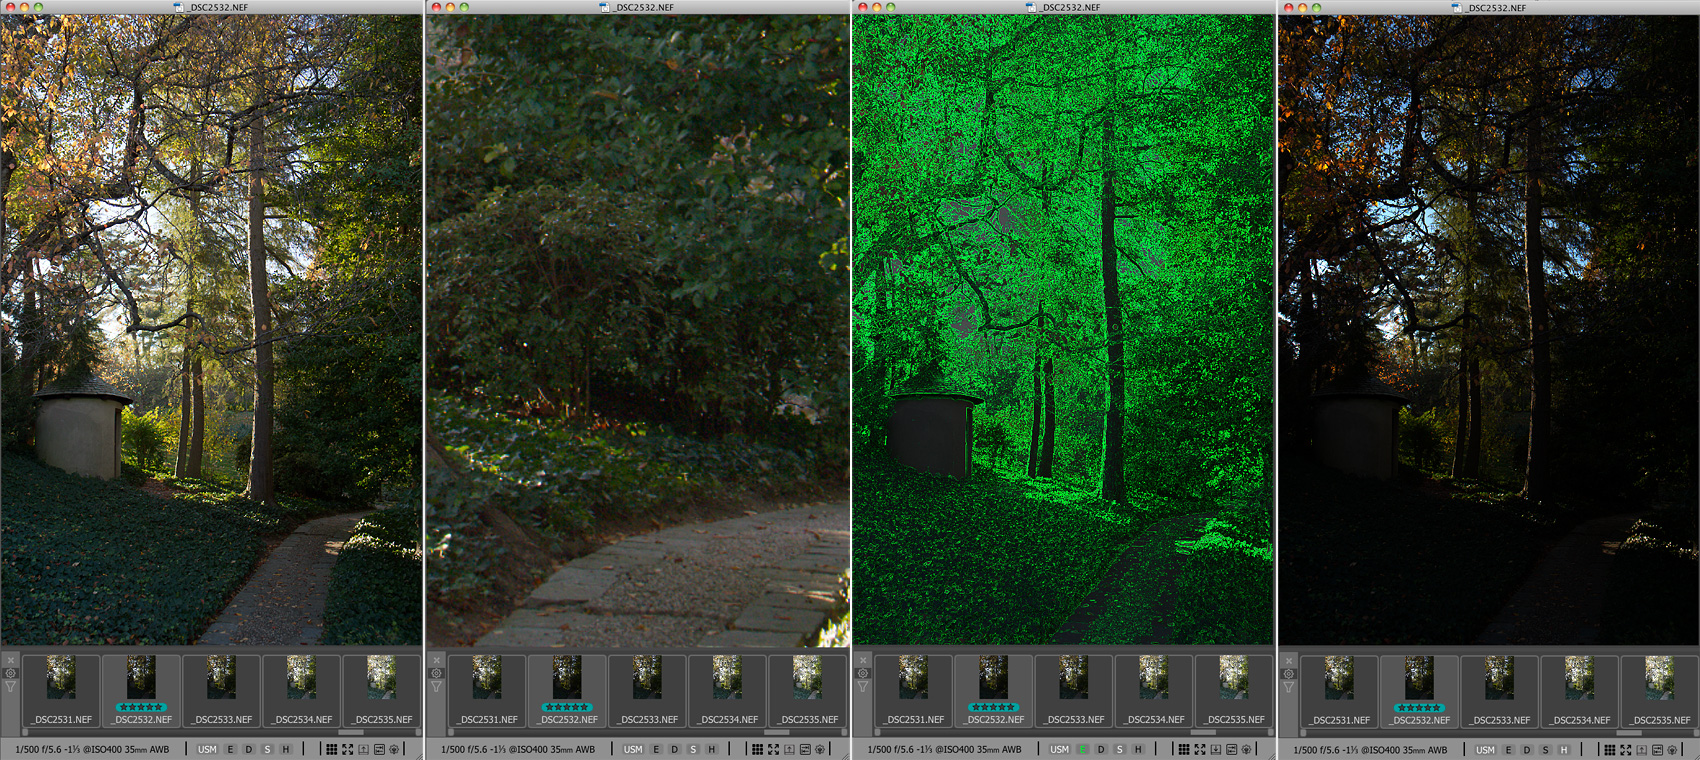
Figure 19
We have chosen the shot 2532 (-1 1/3 EV) with the least overexposure in the sky. Shadow Boost – there are details even in the deepest shadows, and not much noise is visible (two shots on the left); Focus Peaking – all of the shadows have well-developed details (shot that is third from the left, green overlay represent in-focus detailed areas of the shot); Highlight Inspection – the sky is completely preserved (shot on the right).
In reality, optimal exposure is the exposure that allows you to preform the conversion of the shot with sufficiently high quality.
The job of a photographer doing exposure bracketing is to decide whether or not they should correct the auto exposure, and if so, by how much, and what bracketing step and spread they should use. Furthermore, it sometimes makes sense to increase the ISO.
The following series is the one where we got involved in the shoot. It was quite obvious that this scene has a very high contrast, so we were sure that autoexposure won’t be a good start at all. That is why we advised to use negative exposure compensation on the camera, -1EV, and it started the bracketing series from that point, resulting in a series -1EV, -2 1/3EV, -1 2/3EV, -1/3EV, +1/3EV. Note, that for some scenes exposure compensation on the camera might go down to -2EV.
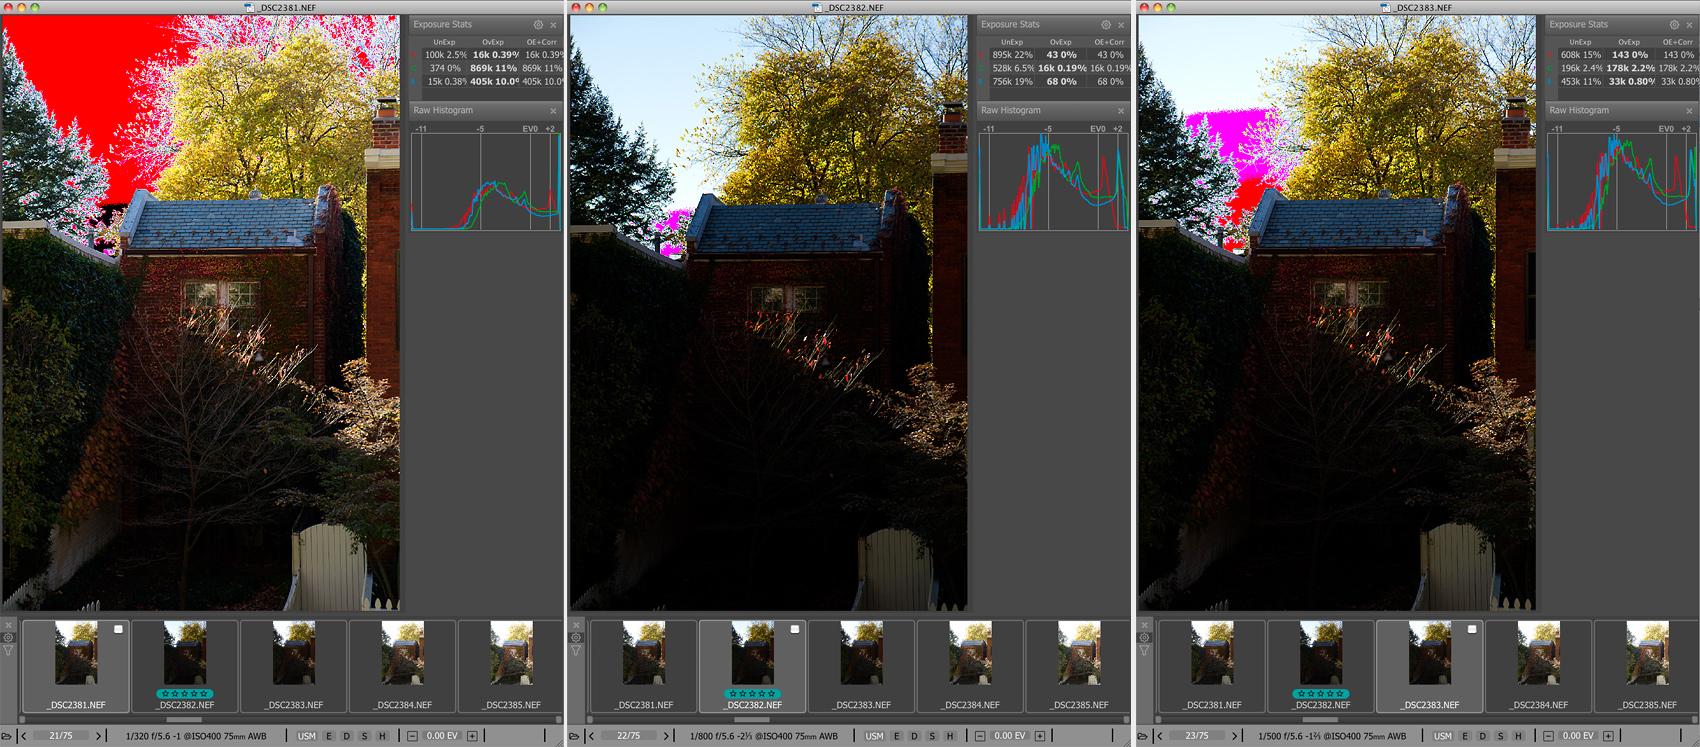
Figure 20. Series 2381 – 2385. Shots shown are 2381 (autoexposure – 1 EV) - left, 2382 (autoexposure – 1 EV – 1 1/3 EV) - center and 2383 (autoexposure – 1 EV – 2/3 EV) - right
We are looking for a shot with the most preserved highlights in the sky. 2382 is the best in this series, but the exposure value is equal to autoexposure – 2 1/3 EV.
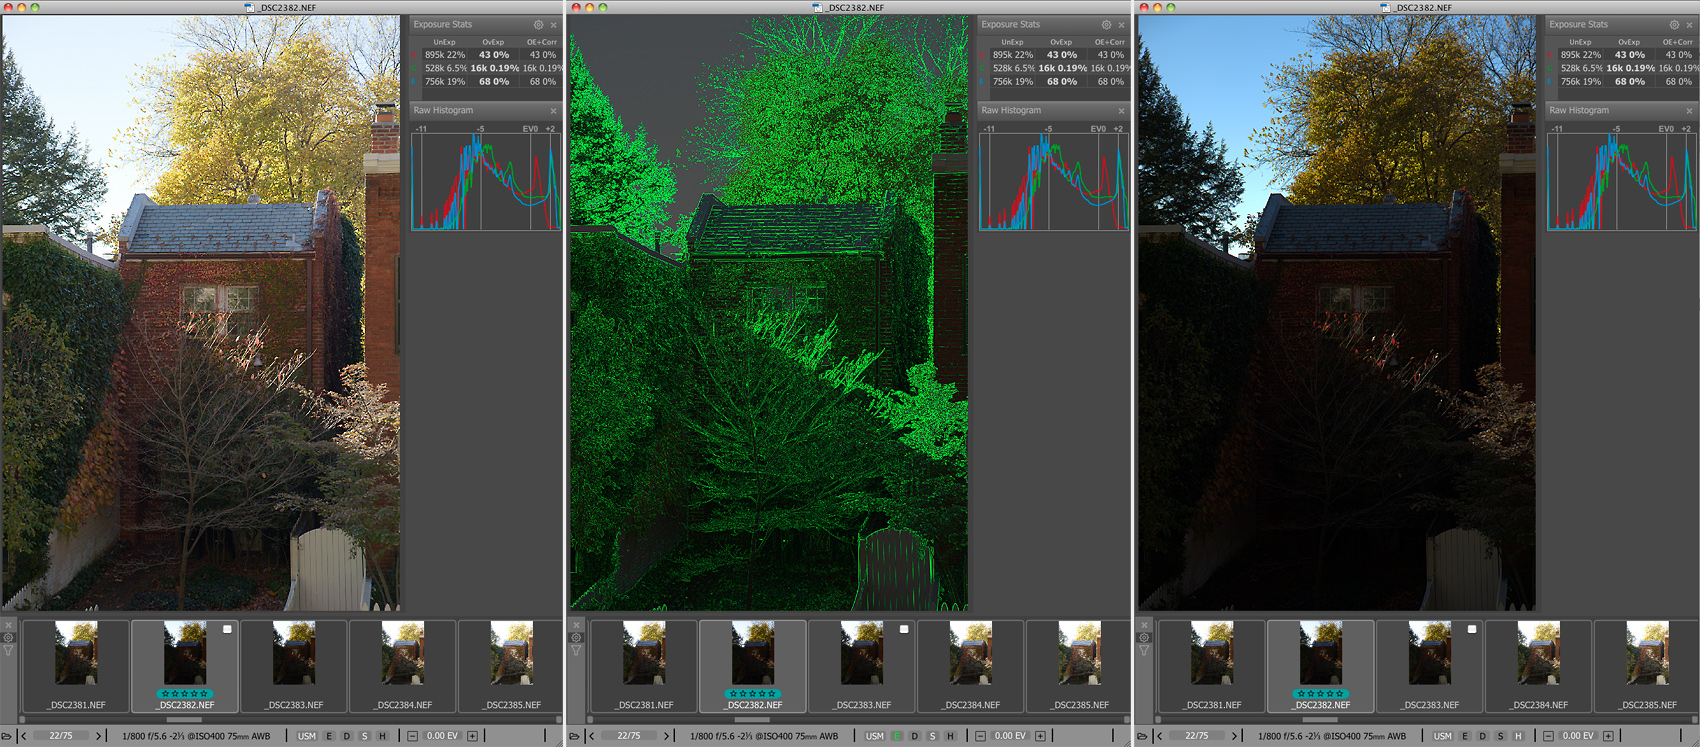
Figure 21
Once again Shadow Boost (we have increased its amount in Preferences) shows that even deep shadows are not so noisy (right); Focus Peaking confirms that we have a lot of details in shadows (center), and Highlight Inspection demonstrates that our highlights are quite safe (left).
We would like to bring up one last argument in favor of exposure bracketing.
Almost all modern cameras have some bracketing mode. We find it doubtful that camera manufacturers have great nostalgia and include (and even improve) this mode just to follow the tradition and for the sake of their deep respect for their old film cameras. Furthermore, many manufacturers ardently suggest using bracketing on their websites, both as a technical and as an artistic move. This is one more piece of evidence that there is no magical recipe for setting “correct” exposure for any scene while shooting. And no matter how much you may want to turn to yet another “expert” that suggests that his particular batch of serpent-derived animal byproduct will guarantee that long-expected miracle to happen and you will reach those perfectly set “correct” exposures for every shot, remember that maybe it’s not worth it to forget and replace the tried-and-tested proven method of guaranteeing good results, namely exposure bracketing, with some weight-loss-supplement science-seeming-but-actually-wrong methods and suggestions.
And don’t depend too much on the image on the camera back. Culling based on embedded JPEG (whether during the shoot or after it), as we have shown many times both in this article and prior, can be and usually is very, very unreliable. And the saddest thing is that, as Murphy’s Law dictates, it will definitely fail you right when the shoot was the most important for you and can’t be repeated (re-done).