Is it Worth it to Cull with a RAW Converter?
Enjoy the summer!
All LibRaw Products and Bundles - 25% off
Our Special Prices are valid until July 28, 2026.
"After shooting a series of images, I copy them all to my computer, then import them all to Adobe Lr for sorting, organizing, and editing. Yes, serious sorting - with full size high quality previews. This way, it often takes several hours only to build a catalogue, but at least I can make my choice based on RAW data and not on an embedded JPEG preview, and estimate the potential of every shot. However, I wonder if there are some tricks and tips on how to "tune" a RAW converter to improve its performance or somehow correct use of it to simplify and speed up culling?"
According to Adobe, Lightroom is, "your go-to app for organizing, enhancing, and sharing your images." Adobe Camera RAW is described in the following way: "If you work with raw format photographs in Photoshop or Bridge, you use the Camera Raw plug-in to get the same kinds of editing results you'd get with Lightroom 5." Not a word about browsing or culling, and this is for a reason: both Lr and ACR are RAW converters and editors.
Can one find tricks and tips on the most bearable way to use John Deer tractor for preparing flowerbeds in one's small backyard? Probably yes, and probably a lot of them. But is it worth to use Jonh Deer for this task at all? Definitely, not. Same situation is with culling with a RAW converter. The best trick here is to simplify and speed up your culling procedure is to use an application that is designed to be a culling tool for RAW shots.
You Will Convert Everything to Choose Just a Few Keepers "for Further Conversion"
RAW converters are not designed for culling. Instead, RAW converters are supposed to work with a relatively small number of "keepers," which have already been chosen for conversion and further processing. The main purpose, and therefore the modus operandi, of any RAW converter is to render the best possible conversion of a RAW file to some image presentation format, chiefly TIFF or JPEG, and not deal with a plentitude of RAW images while culling.
With modern computers, the conversion time here is not a huge factor as we are processing a limited number of images; but the situation changes dramatically if a RAW converter is forced to sift through the number of RAW images, which exceeds the scope of the converter design. Now the cataloguing, building previews, and conversion time starts to be a huge factor for a user who opted to do the culling with a RAW converter. It is not fair to blame developers of RAW converters for a winding path one has to take when trying to use a RAW converter as a culling tool - using the wrong tool never provides the most efficient way to fulfill a task. When one uses even the most advanced screw driver for nailing, there is very little sense in complaining about the possible inconveniences and "side effects" of such an adventure.
No Tools for Culling - Only Conversion
RAW converters don't have tools for fast evaluation of RAW shots. It is quite difficult to evaluate quality of a RAW shot by just looking at its default display in a RAW converter. To use an analogy, the quality and potential of a film negative is hard to assess without looking directly at the negative itself with a magnifying glass. A set of index prints made with some auto setting (in case of RAW shots, previews, rendered by RAW converter with default settings) does not tell much about the grain, details in the shadows and highlights, or overall exposure. Over- and underexposure indicators, sharpness, noise, even the histogram, displayed by a RAW converter, are all based strictly on the given conversion parameters, and not on pure raw data. So if one is using a RAW converter to assess and evaluate quality of RAW shots, one needs to get off of auto mode and start manually, often painstakingly, adjusting a large number of settings for each RAW shot, every time rendering a new preview of this shot.
Let's look at an example. We will use the same series of shots that was presented in the article "Why Bother Shooting RAW if Culling JPEGs?" This series was taken using the following rule: we start with the exposure value at which the in-camera histogram shows no sign of overexposure, and repeat shots, each time increasing the exposure by 1/3EV. Since it is nearly the exact same scene in all shots of this series, we will try to choose the best one using ACR, based on simple technical analysis only, considering exposure and dynamic range. Basically the only technical tools ACR provides are a histogram, a sampler, and over- and underexposure indication. We will try to use these to choose the shot capturing the widest dynamic range, which shows the smoothest histogram slopes in shadows and highlights, and minimal perceived surface under OE and UE warnings.
Note, that the histogram and warnings ACR displays are based on the current render of the RAW data (which is controlled by the current status of sliders) and NOT on the RAW data itself. By default, ACR renders RAW shots using some default settings to make them more similar to embedded JPEGs, at least in terms of overall brightness. When the file is opened for the first time, ACR applies some certain White Balance (depending on your defaults), and Baseline exposure compensation, which is a silent, behind the scenes, non user-adjustable parameter, defined by a combination of the exact camera model and ISO setting for the shot, as well as many other parameters that determine the presentation of the shot on the screen. Changing any of those parameters, and most importantly for our culling task, White Balance and Exposure settings, will result in a new render; consequently, a new histogram and different warnings are displayed for the same shot.
As such, we do the following:
- Open all RAW files from the series in ACR with the default settings (taken up to several seconds to render each preview)
Then, to be able to more or less reliably evaluate what we have in RAW, for every shot in the series we have to:
- Choose some reasonable White Balance
In our case Daylight is quite a usable starting point, but imagine the shots were taken in the evening at Time Square, where the color of the light is changing every second. It means that we would need to painstakingly iterate to choose the correct White Balance for each shot.
- Gradually adjust the Exposure, and after each adjustment evaluate the resulting histogram and over- / underexposure indicators to come to a conclusion about the shot.
This recurring procedure may take a while.
Note that every time we change settings, we have to wait up to several seconds until the new render is done.
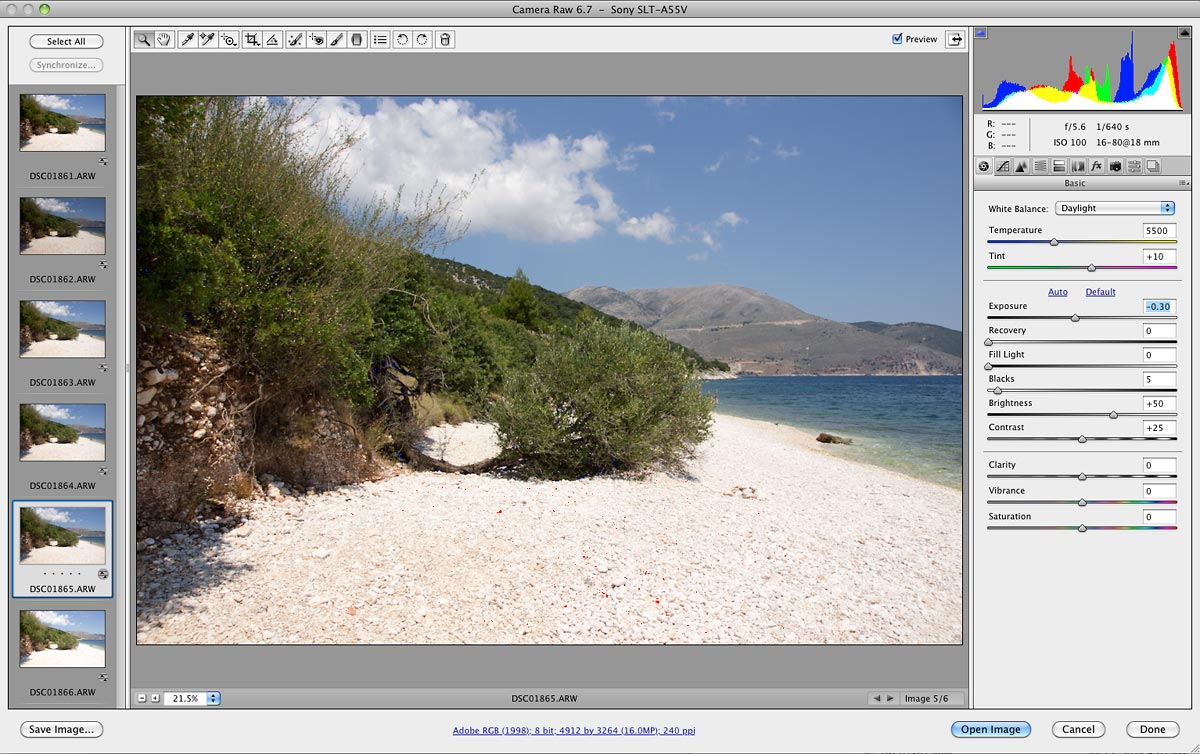
We start with shot #1861
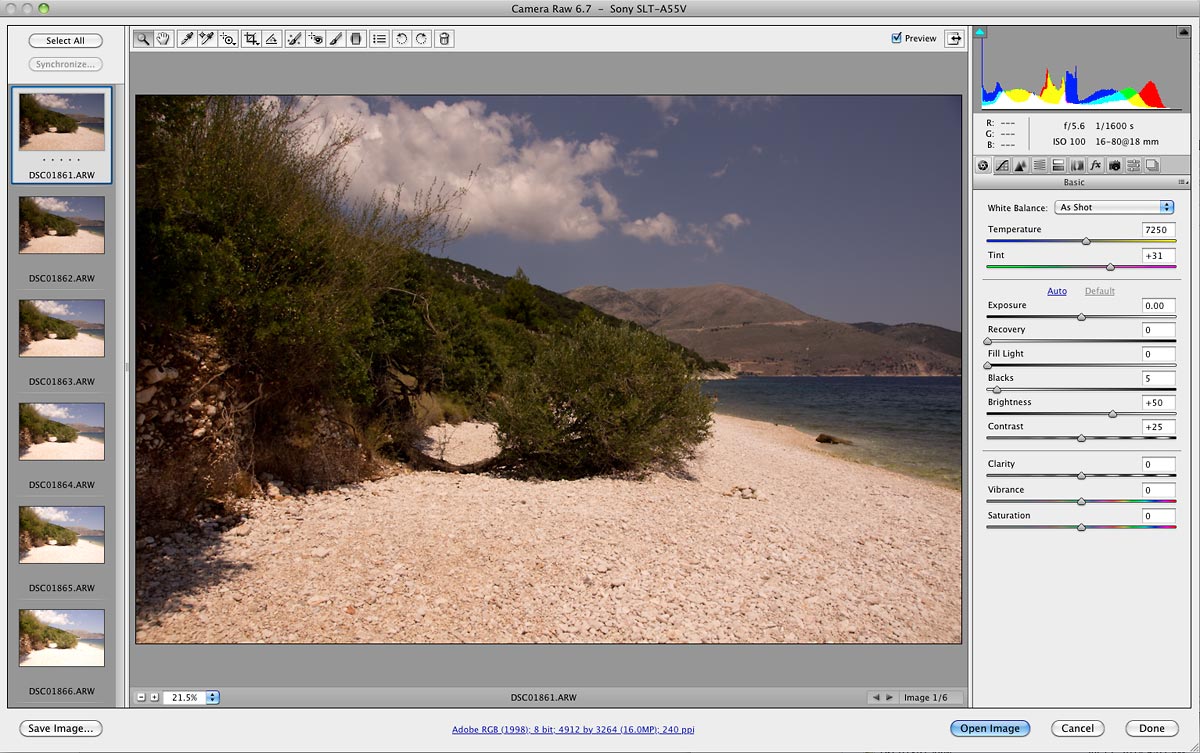
Default render.
The White Balance definitely needs to be changed, because with the current WB setting the histogram is unreliable: pinkish highlights cause a shift to the right of the histogram of the red channel, suggesting "better" exposure than there is.
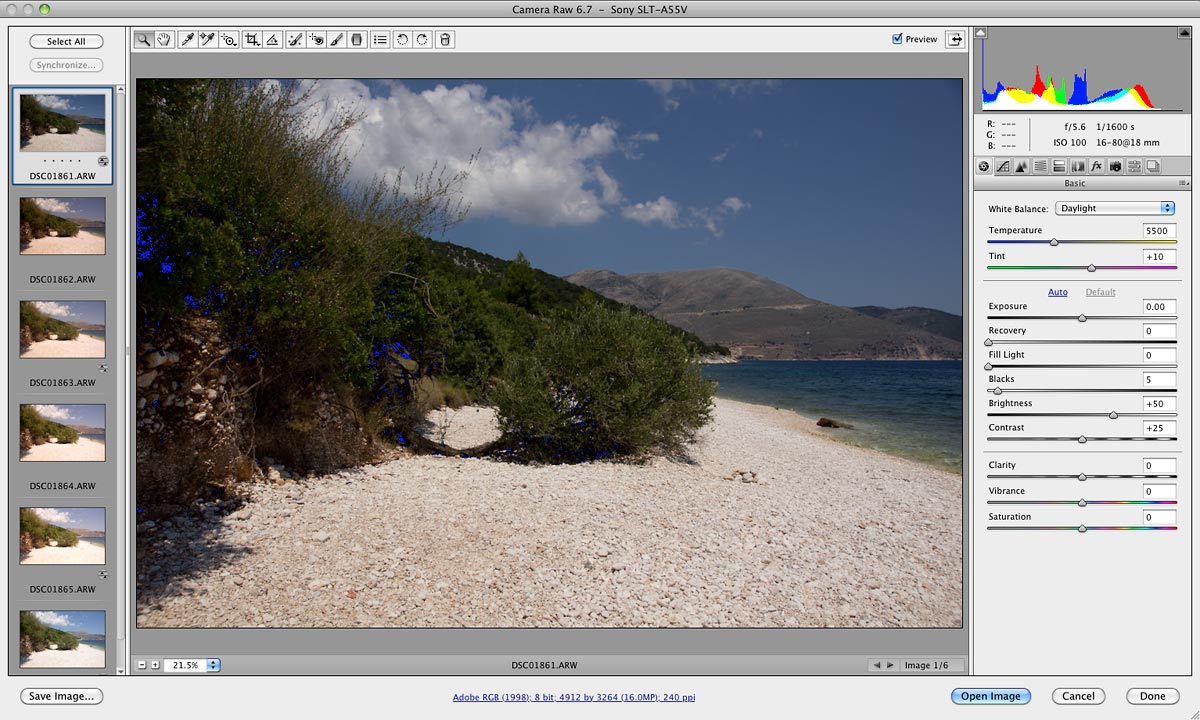
White Balance applied.
The color channels in highlights are now aligned better, and our judgement of the overall exposure is more accurate. Now we see a big gap on the right side of the histogram (in highlights) and a sharp peak on its left side (in shadows).
Despite the in-camera (that is, embedded JPEG) histogram was showing otherwise, this shot is heavily underexposed.
So, let's move to the shots with higher exposure value - shot #1863
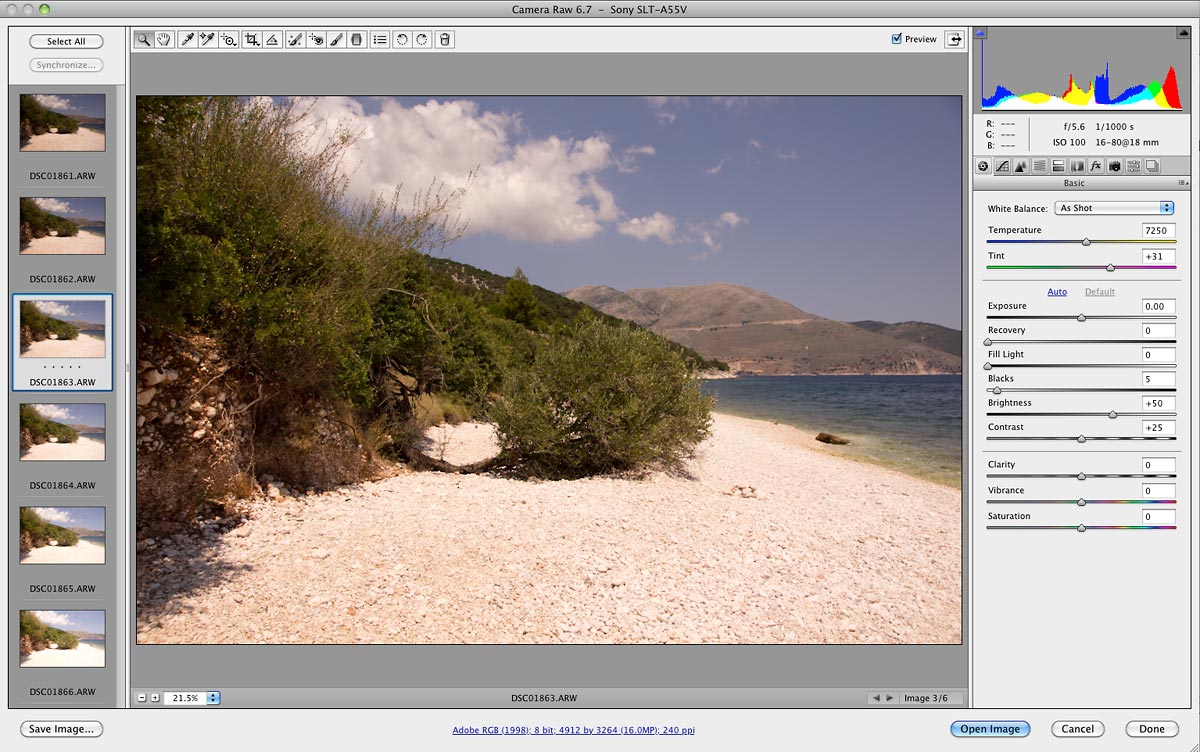
Default render.
The histogram shows that this shot is overexposed.
Let's change the White Balance and see what happens.
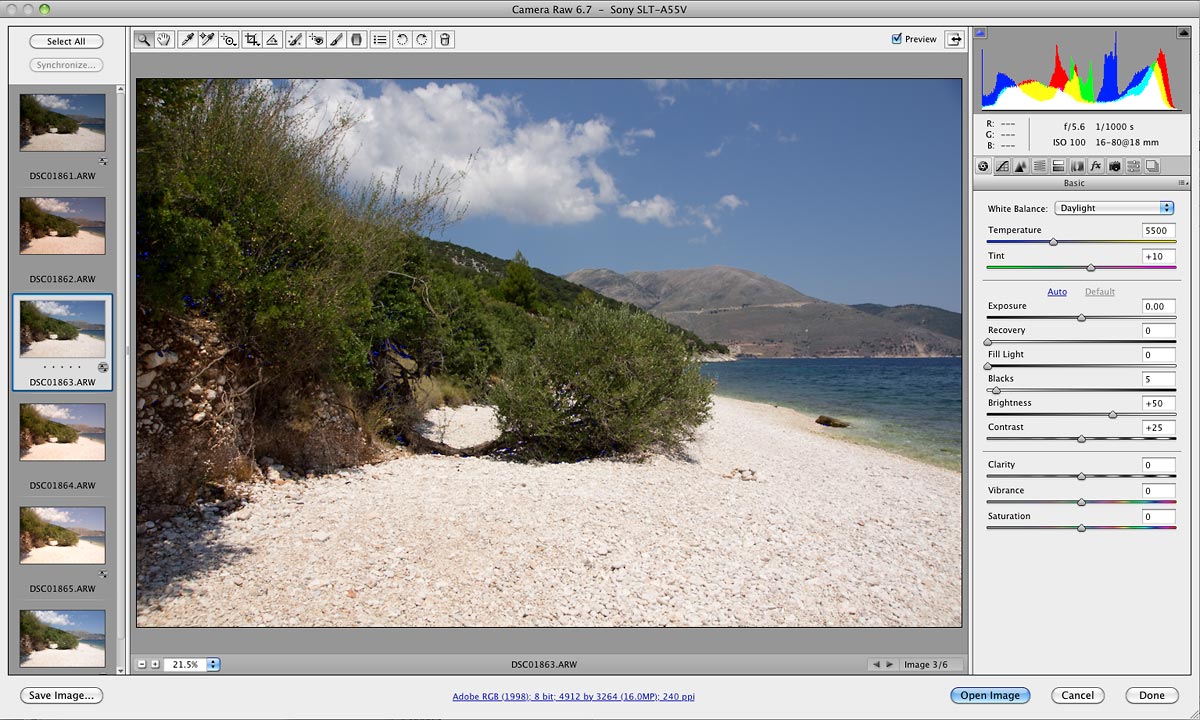
White Balance applied.
Now we see that as a matter of fact this shot is also underexposed - we still have room in the highlights (the right side of the histogram) and we still have a sharp peak in the shadows (the left side of the histogram), indicating that the shadows are plugged.
Moving further, exposure again higher at 1/3EV - shot #1865
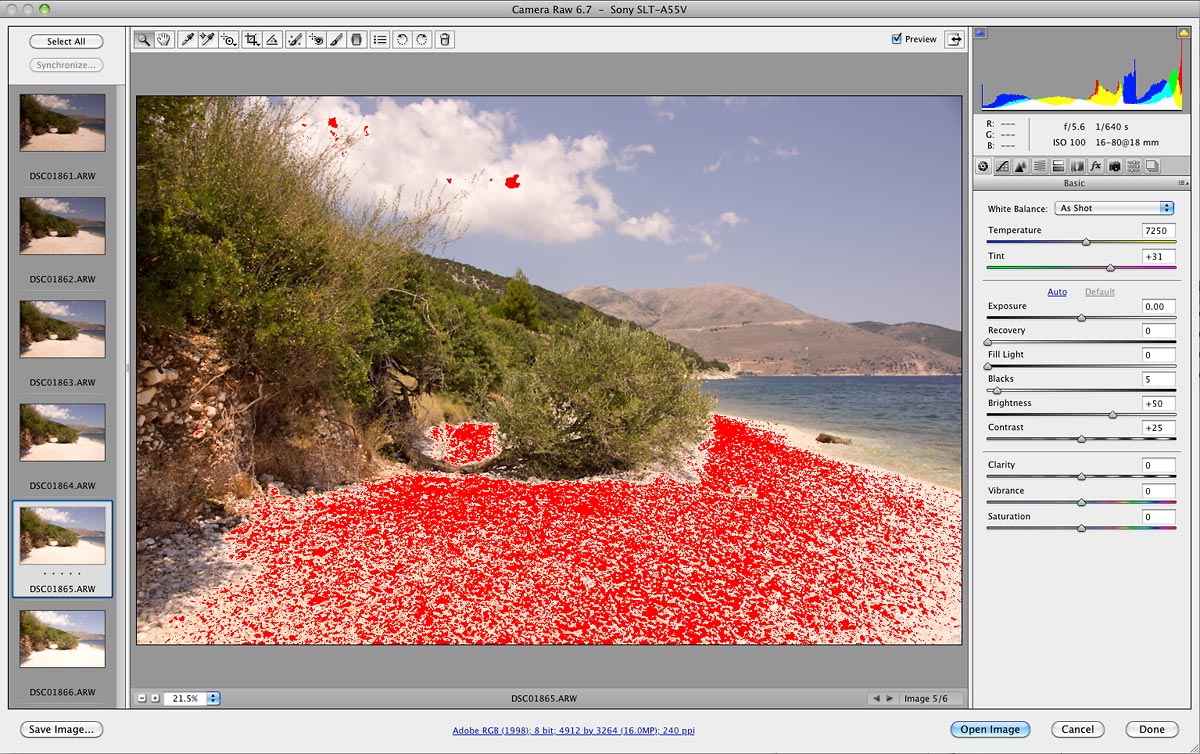
Default render.
The histogram and overexposure indication show that this shot is heavily overexposed.
So let's change the White Balance and see.
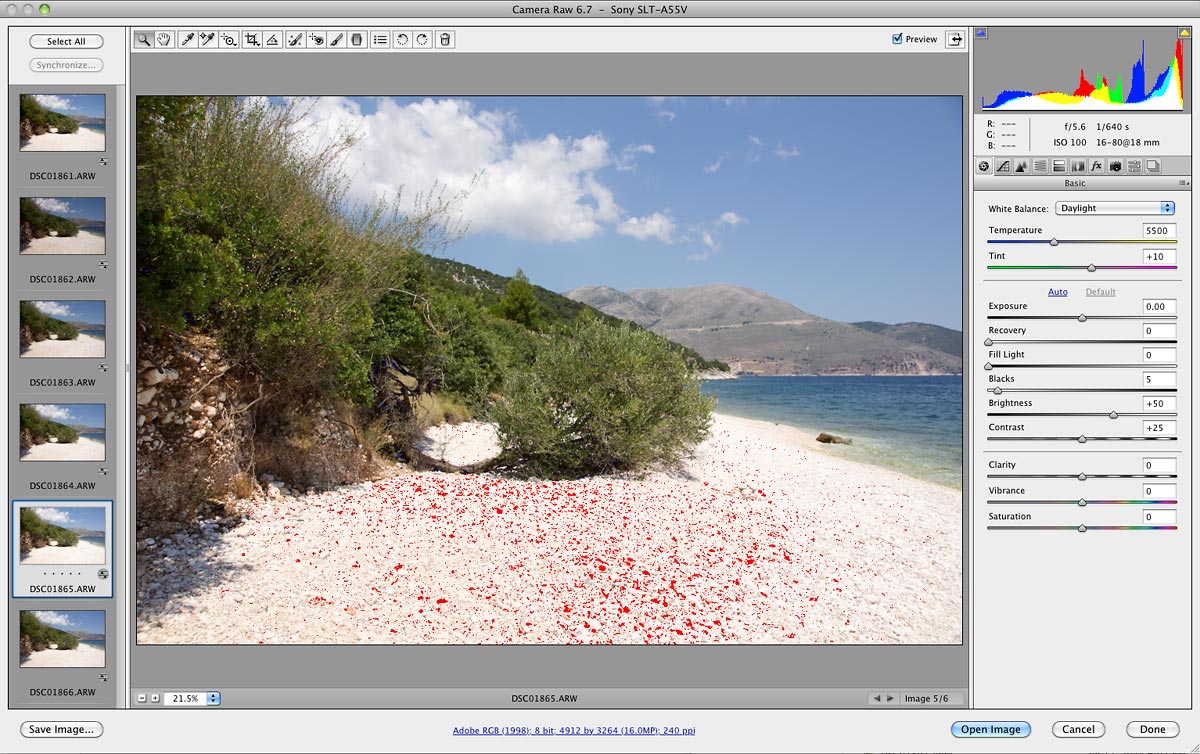
White Balance applied.
We see that this shot seems to be slightly overexposed in the highlights, but still underexposed in the shadows.
Here we recall what default baseline exposure compensation is, and try to get rid of it by moving the Exposure slider to the left, decreasing exposure (by "decreasing exposure" here, of course, meant "decreasing overall brightness" of the shot) until, according to the histogram, we don't have overexposure in the highlights.
White Balance and Exposure adjustment applied.
Yet again we have underexposure in the shadows.
Of course we can try to do something about it by playing with other sliders, but first let's try the next shot, which was exposed even hotter.
Shot #1866.
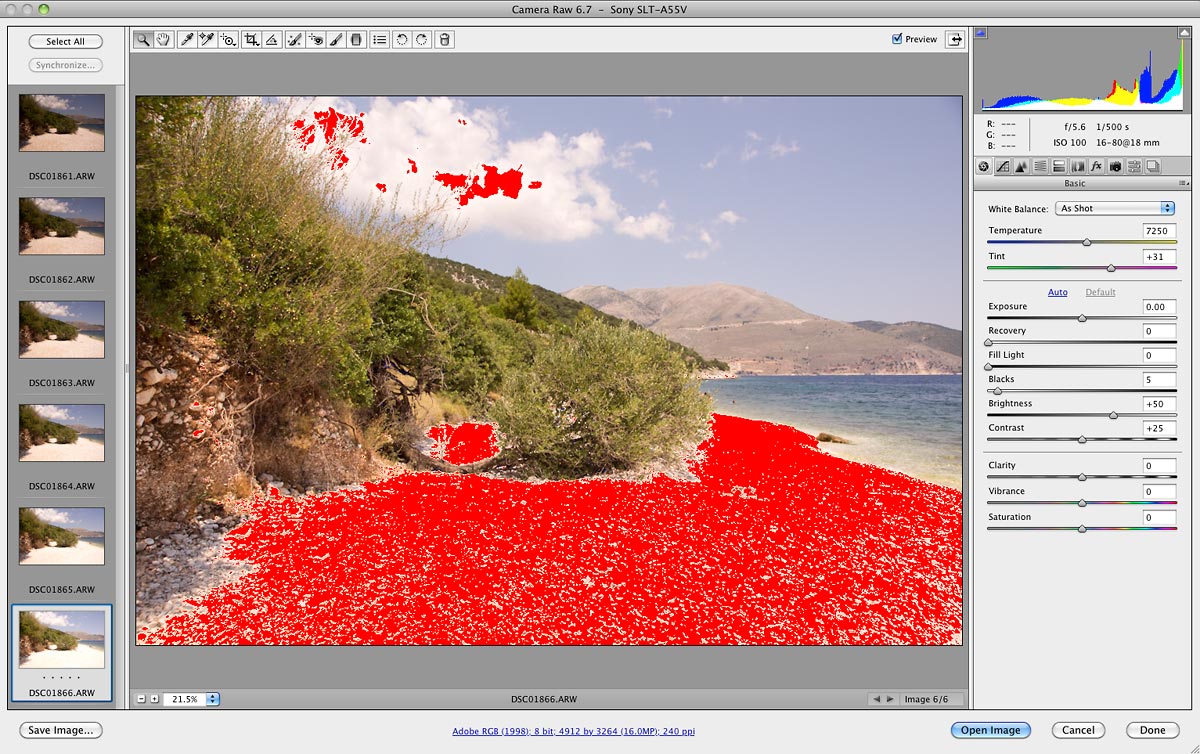
Default render.
The histogram and overexposure indication are screaming that this shot is beyond recovery.
Nevertheless, let's try to change the White Balance.
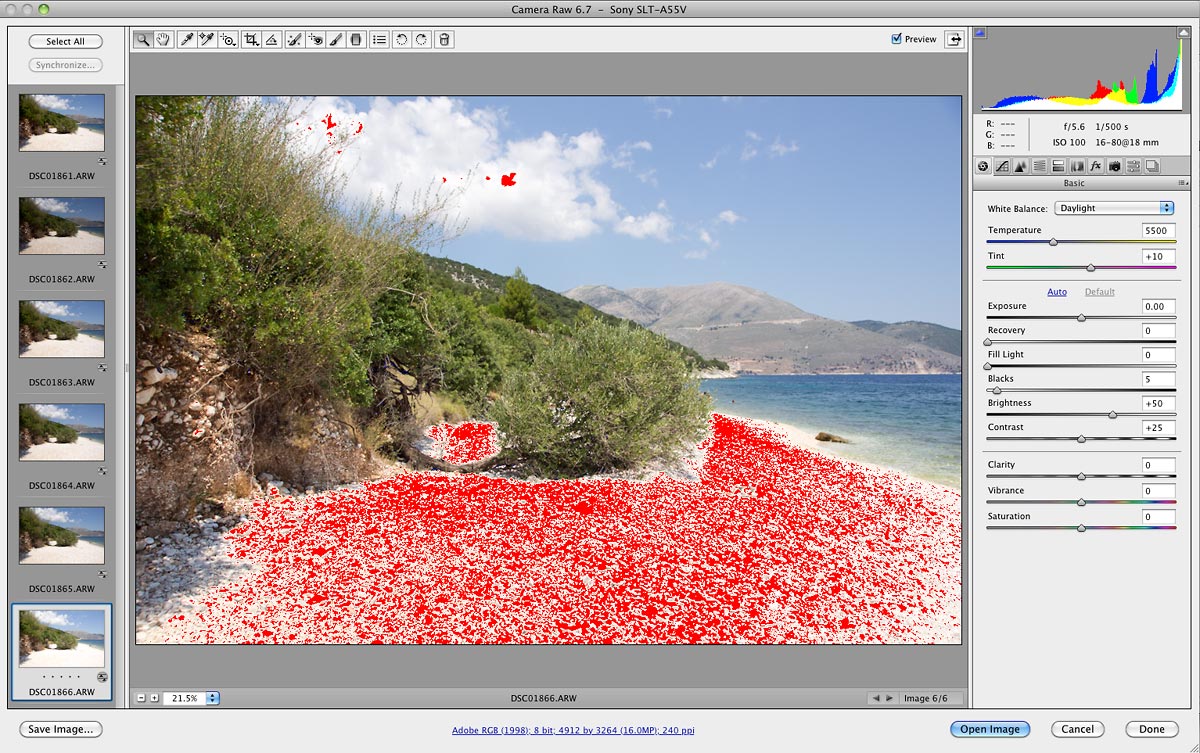
White Balance applied.
Now, the histogram shows that this shot is still overexposed in the highlights, but in the shadows the situation is very normal.
So, we again try to get rid of default baseline exposure compensation, by moving the Exposure slider to the left to decrease the exposure until, according to the histogram, we don't have overexposure in the highlights.

White Balance and Exposure adjustment applied.
Believe it or not, this "unrecoverable" shot is the one which was exposed correctly. We have tiny areas of overexposure in non-important parts of the scene, and we don't have underexposure in the shadows, which means that we won't have to worry about plugged and noisy shadows.
So, despite the fact that we knew exactly what we could expect from this series, it still took us several minutes to pick one of six images as a keeper. Furthermore, due to the scene specifics we could content ourselves with changing only two parameters - White Balance and Exposure. Imagine the time increase if we had to play with more parameters or tried to estimate areas of sharpness, noise in shadows etc.
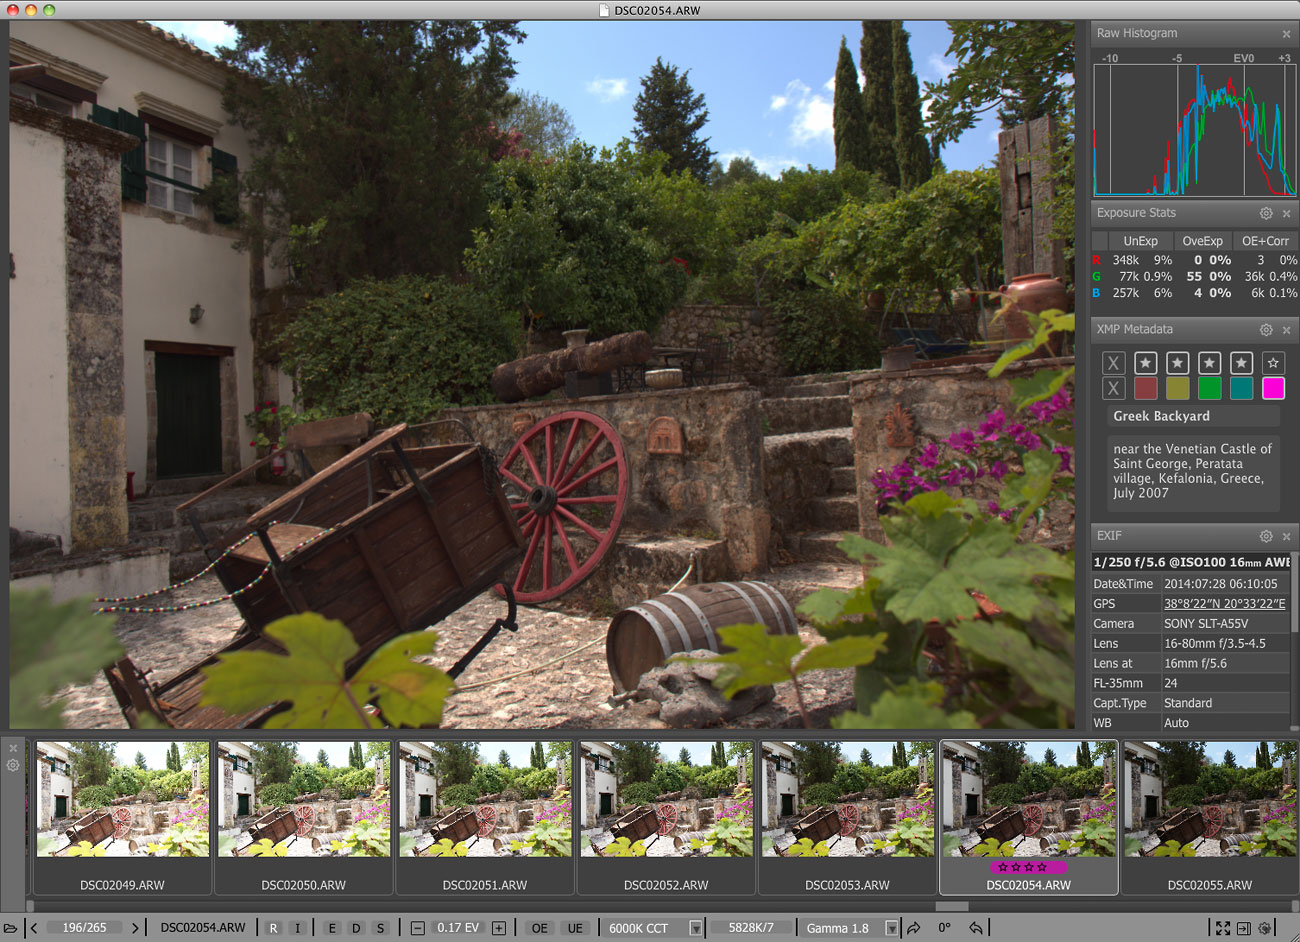
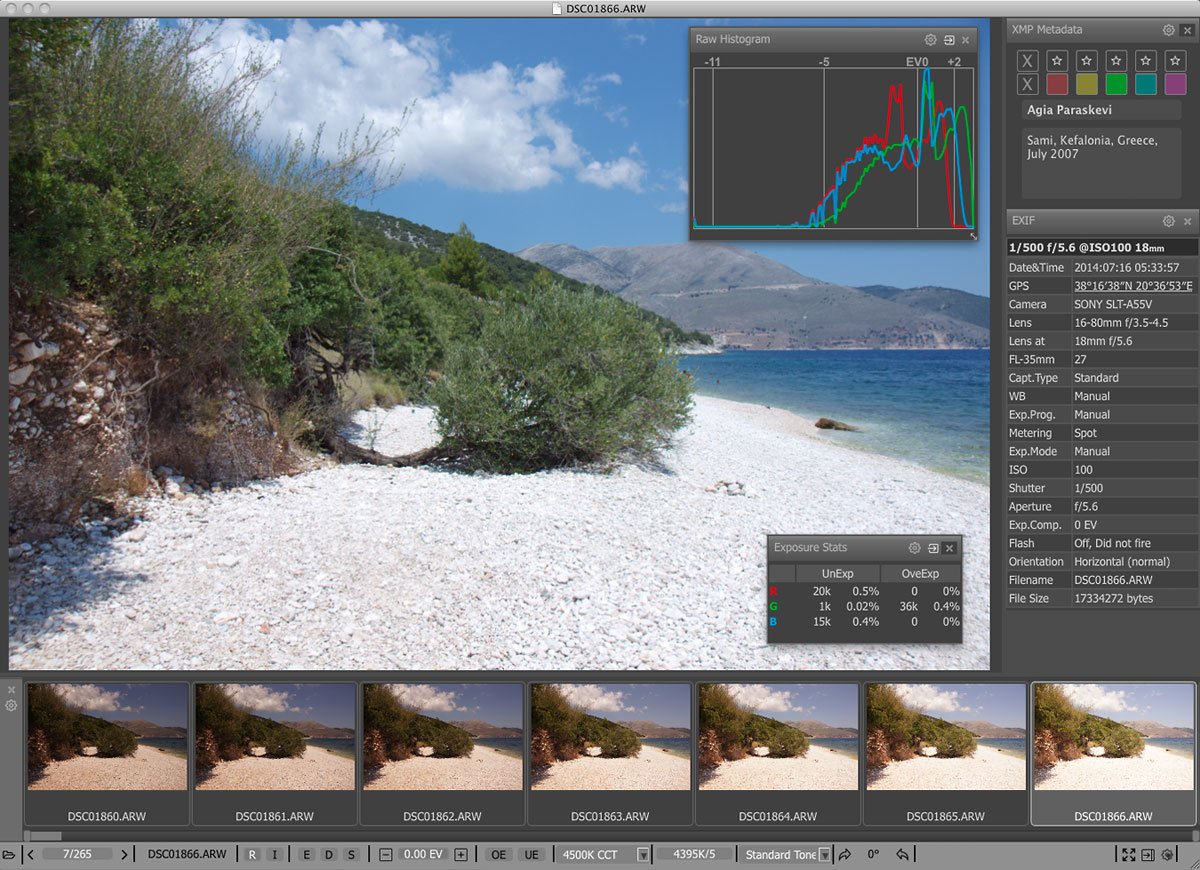
With FastRawViewer, you would pick shot #1866 and cull all previous ones without any manipulation, right after looking at the RAW histogram and RAW-based over- and underexposure statistics (those don't change whatever white balance settings or exposure correction we apply to the shot).
As a matter of fact, evaluating a RAW image using a RAW converter usually turns into a full-scale process of iterating the settings to get the best possible conversion. This is a time-consuming task and quite a rabbit's hole. And the result? Lots of time and effort spent, often only to see that you can't do anything good with this shot. Or, that the next shot, while being exposed slightly worse than the previous one (which you already converted after spending a lot of time tweaking the conversion settings) is composed better and still within the recovery margin, so you don't need the previous fully converted shot any more.

Save Time, Space, and Effort: Don’t Organize the Rejects
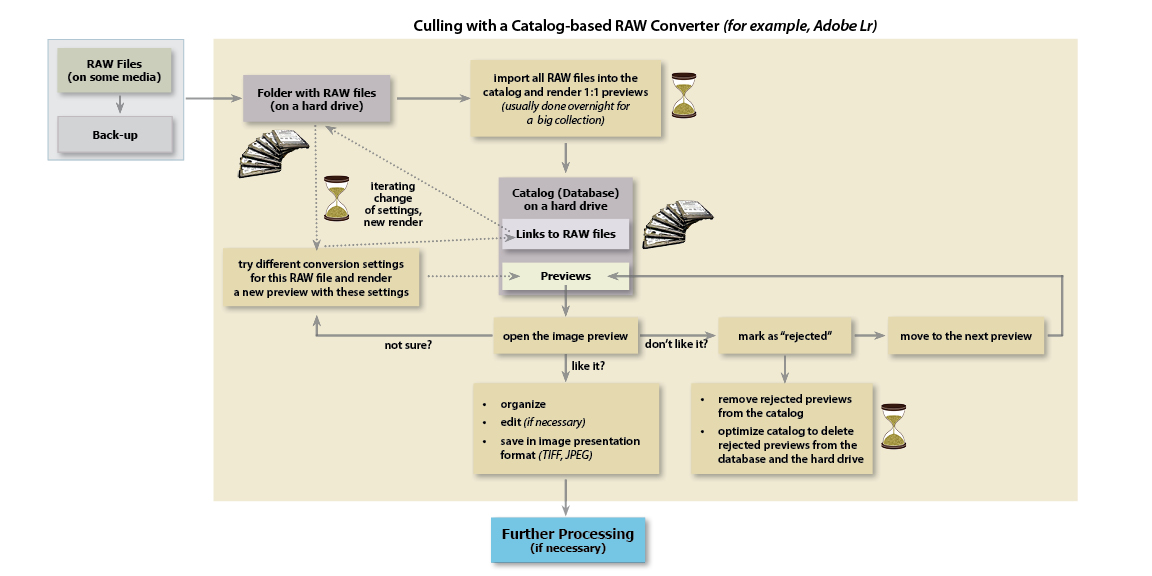
If you are using catalog-based RAW converter for culling the situation becomes even worse.
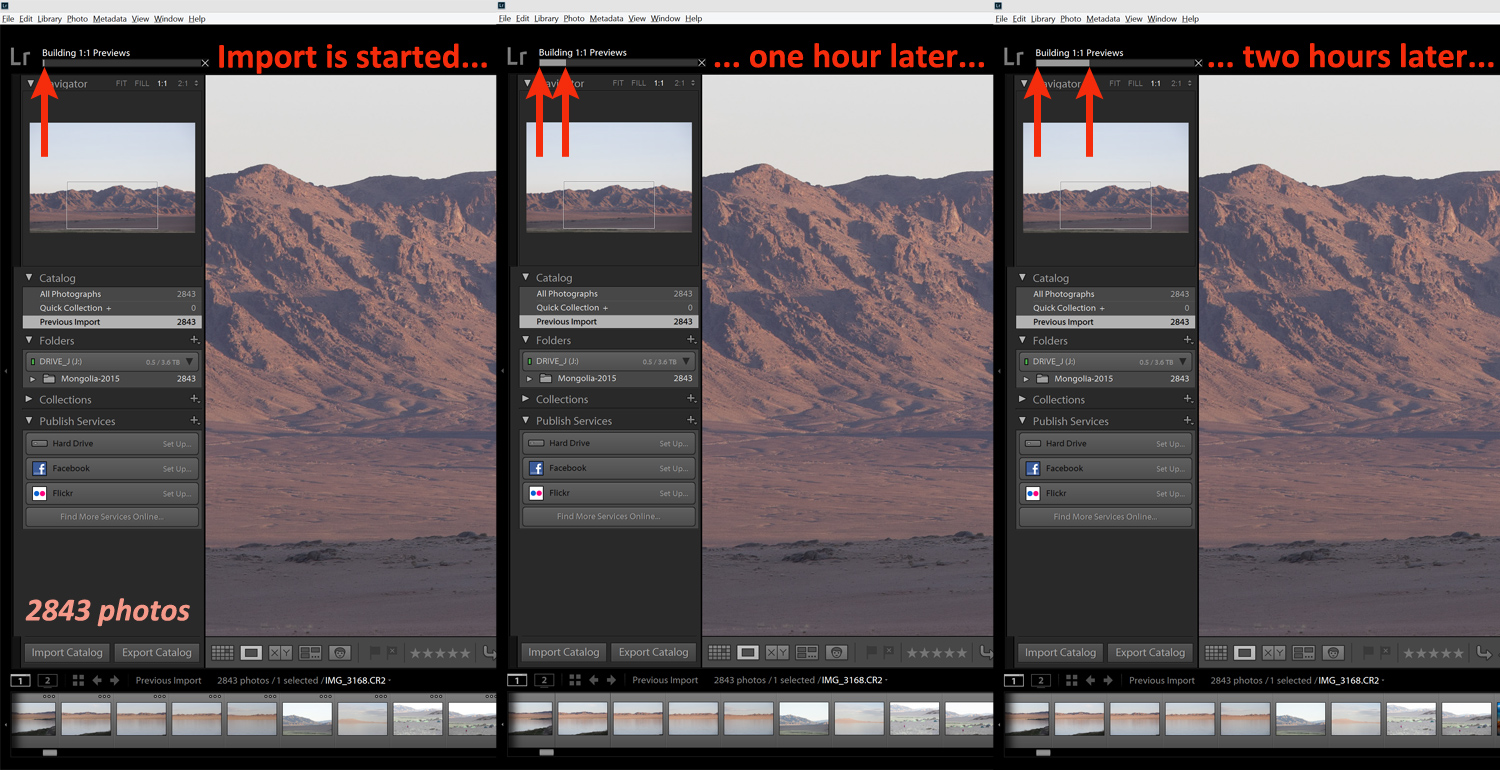
In the case of Adobe Lr, you first import all of the RAW files that you are planning on working with into the Adobe Lr catalogue. During the import, Adobe Lr creates a preview for every RAW image and stores these previews together with links to the original RAW files in the database on your local hard drive (by default). For culling purposes, experienced users and tutorials recommended "almost always" rendering 1:1 preview already during the import stage (Adobe Lr will also automatically render them to standard size previews and thumbnail previews during the import stage). To speed up the whole culling process, they suggest importing with 1:1 size previews "overnight", since "on a fast machine, a few thousand images may still take a few hours to render." Note that 1:1 size previews also require significant disk space - a 1:1 size preview of one shot from a modern camera might "weigh" up to 10MB and more. You do the math.
Now, these 1:1 previews are the results of conversion with "default" settings, so when Lr renders these previews some default visual "corrections" are already applied. Are they satisfactory? What we mean is, do we need some different white balance, exposure correction, tone curve? Quite often we do. And here we start to change those conversion settings and render a set of new previews with these new settings to see what could we do with this RAW...during a conversion stage. As was already said above, you practically do a full-scale conversion of every image that you examine during the culling stage - and all just to choose a few keepers "for further conversion."
Isn't it just a waste of time feeding Lr huge amount of RAW shots and going through conversion process for most of them, if more often than not 70-90% of them are going to be rejected as a result of culling?
Let's not forget that now you have to deal with the previews of shots you have culled. First, you need to mark as rejected the image you've already spent quite a while working on. Then, you have to remove all rejected previews from the catalogue. Removing a preview from the catalogue means that this preview is marked as hidden, but the preview itself is not removed from catalogue. So previews removed from the Adobe Lr catalogue but not deleted properly will continue occupying disk space and will pollute the Adobe Lr database, slowing down all work and eating out the disk space. To delete previews from the database/hard drive you need to optimize the Adobe Lr catalogues on a regular basis. Also you have to backup the database regularly, since this catalog optimization is not without a risk - it may result in database crash, so some safety net is in order here. This means more time, efforts, and headaches - not because the tool is bad, but because of improper use of the tool. You would significantly reduce that overhead if you imported only keepers into Adobe Lr, just for "enhancing and sharing" as suggested by Adobe.
Don't Lose the Opportunity to Use a More Advanced RAW Converter
RAW converters are advancing; their developers incorporate new RAW image processing algorithms to get better, more precise conversion results and "to meet customers satisfaction." Unfortunately, the trade off is conversion speed. Quite often as a result of precision improvements, RAW converters get slower. Then users who have upgraded to the new version, might very soon decide to return back to the previous version in order to get back at least that "not satisfactory but still better than now" speed of work. The unfortunate part is, that while using the new version of the tool for the wrong purpose, users miss the updates and benefits this new version is intended to provide.
Shoot First, Select Later
Another problem is that without a fast way to cull substantial amounts of images, you subconsciously try to reduce the total number of shots taken during a session - or even opt for JPEGs. Many of the camera features you paid for remain unused, money wasted. Instead of just bracketing your shots, you try to figure out the best exposure for the scene; being misled by in-camera histogram, you often resort to underexposure in an attempt to hold the highlights; instead of shooting with all the speed your camera offers and catching every possible moment and variation of the scene, you try to catch the best version with your eyes first. Sometimes it works, oftentimes it does not. How often have you lost your best shot just because you had tried to choose it before shooting, just to save on the quantity of RAW files?
This is why a culling tool, which is designed to display piles of RAW images quickly and stably, not applying any "default improvements" to an image but displaying the RAW shot "as is," providing you with convenient tools for the technical analysis of said RAW shot and the application of basic adjustments, so that the culling process will run quickly, smoothly and reliably, will optimize and significantly speed up, and as a matter of fact simplify your workflow.
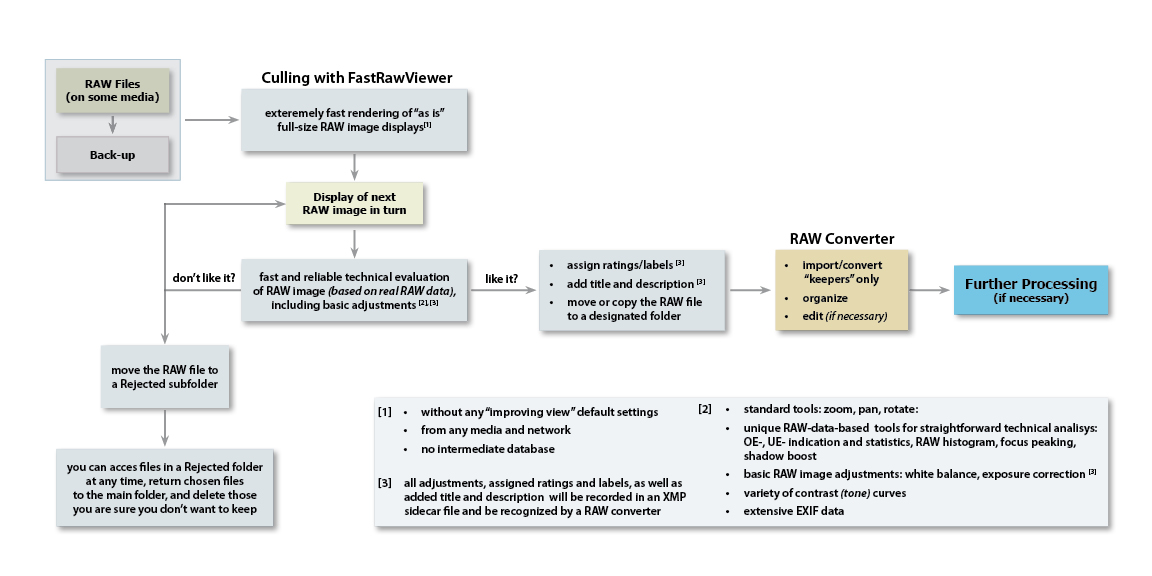
What you save using FastRawViewer
- time needed for the importing of considerable amounts of multi-MB size RAW files, the rendering of 1:1 previews for all of those and the choosing settings for rendering new previews, more trustworthy for culling
- efforts directed at the systematic optimization and maintenance of huge catalogues to prevent a decrease in the overall speed of RAW converter operation
- significant disk space needed for storage (even if temporary) of previews of all RAW shots imported for culling
What you get using FastRawViewer
- straightforward and simple workflow without recurring back-and-forth cycles
- convenient and reliable tools and procedures for fast, trustworthy, and painless sorting of any amounts RAW shots.
- peace of mind for shooting as many shots as needed to follow the rule "shoot first - choose later," and not to worry if the quantity of shots you are going to sort will choke your RAW converter or will force you to continue the culling process forever