
More Speed: Culling in Grid Mode While Staying Rooted in RAW Data
Mid-Fall Sale!
All LibRaw Products and Bundles - 25% off
Our Special Prices are valid until November 15, 2026.
When culling a high volume of raw, it’s faster if they are arranged as a grid of comfortably sized images paired with real-time RAW histograms and under-/overexposure statistics for the active selection.
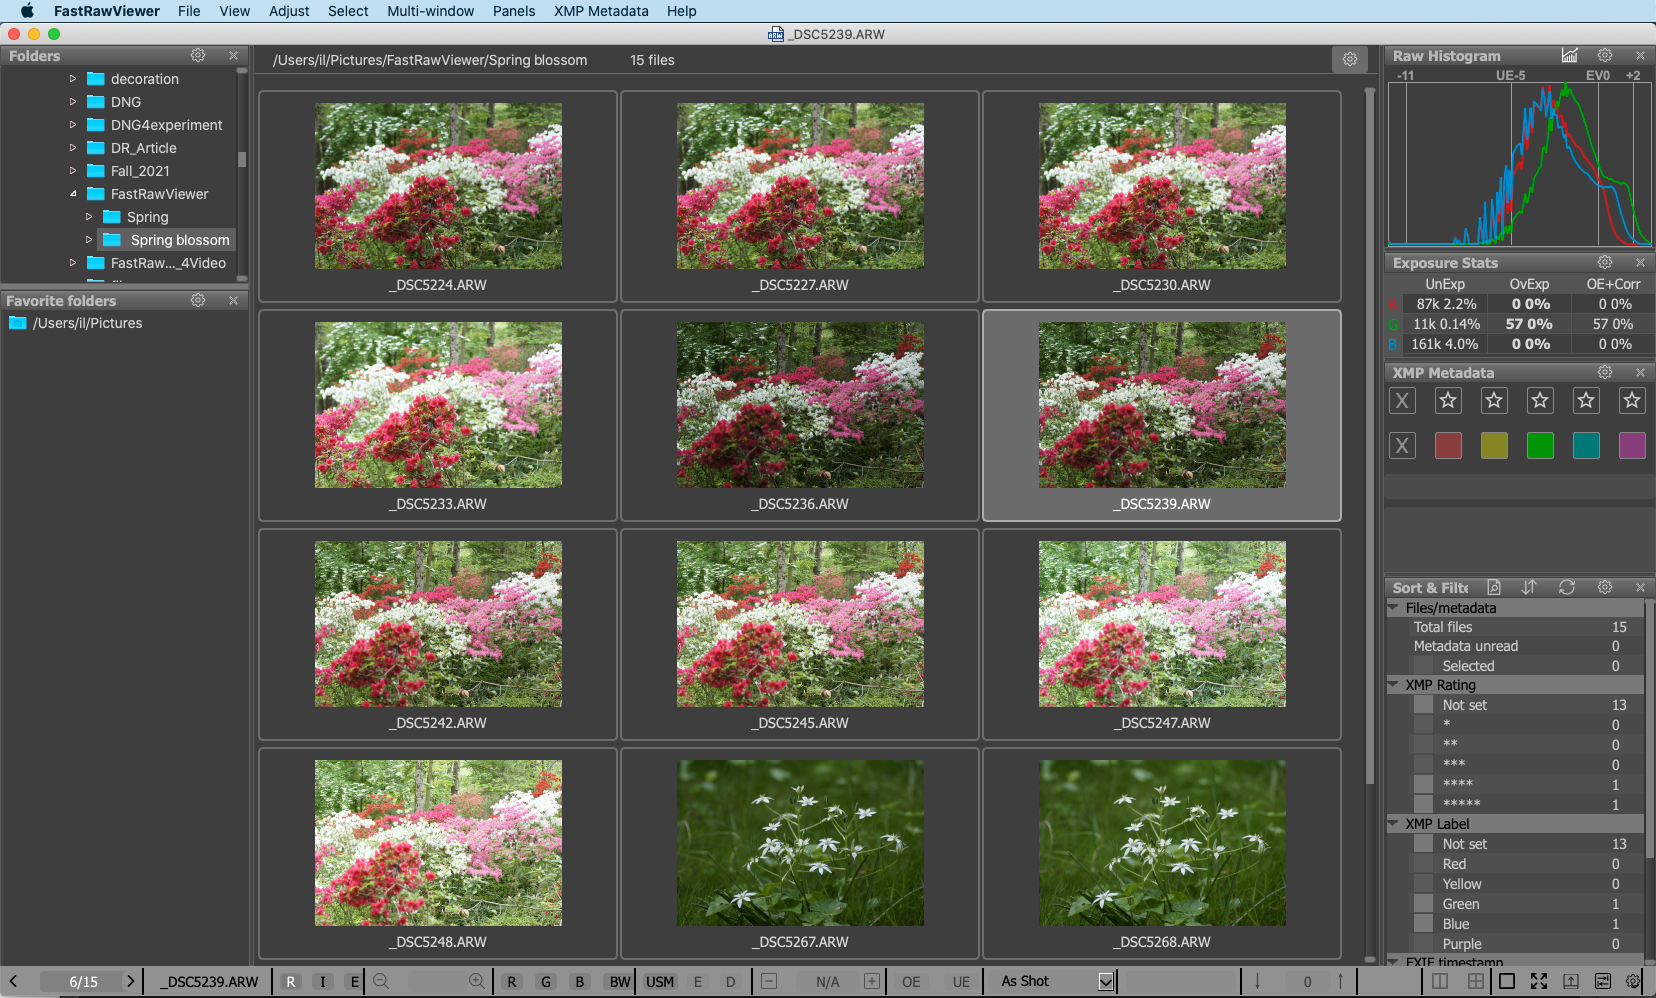
Picture 1. Grid Organized for Culling
1. Choose your Grid View preferences
- Enter Grid Mode: Press the G key if you are currently in the single-file view
- Select Overlay Metadata: Click the Gear icon at the top-right corner of the Grid panel. Navigate to Show EXIF data and choose your preferred metadata fields (e.g., exposure parameters, camera model, or file size). Decide whether to display this data above the thumbnail or as an overlay.
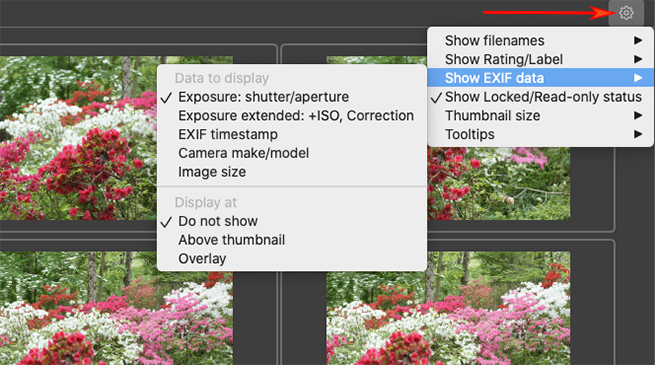
Picture 2. Set Grid Thumbnails Info to Display
- Adjust Thumbnail Size: In the same Gear menu, navigate to
Thumbnail size. Choose a pixel width (e.g., 300 px) that allows you to fit as many images on your screen as comfortably possible.
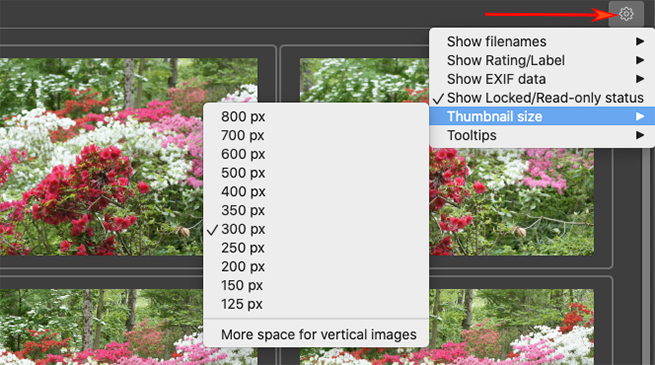
Picture 3. Set Grid Thumbnails Size
2. Configure Panels for True RAW Analysis
- Enable the Histogram Panel: If it is hidden, enable it by navigating to the main menu and selecting Menu -> Panels -> Histogram or by pressing the F2 function key.
- Enable the Exposure Statistics Panel: similarly, to the above reveal it by navigating to Menu -> Panels -> Over/Underexposure Stats or by pressing the F4 function key.
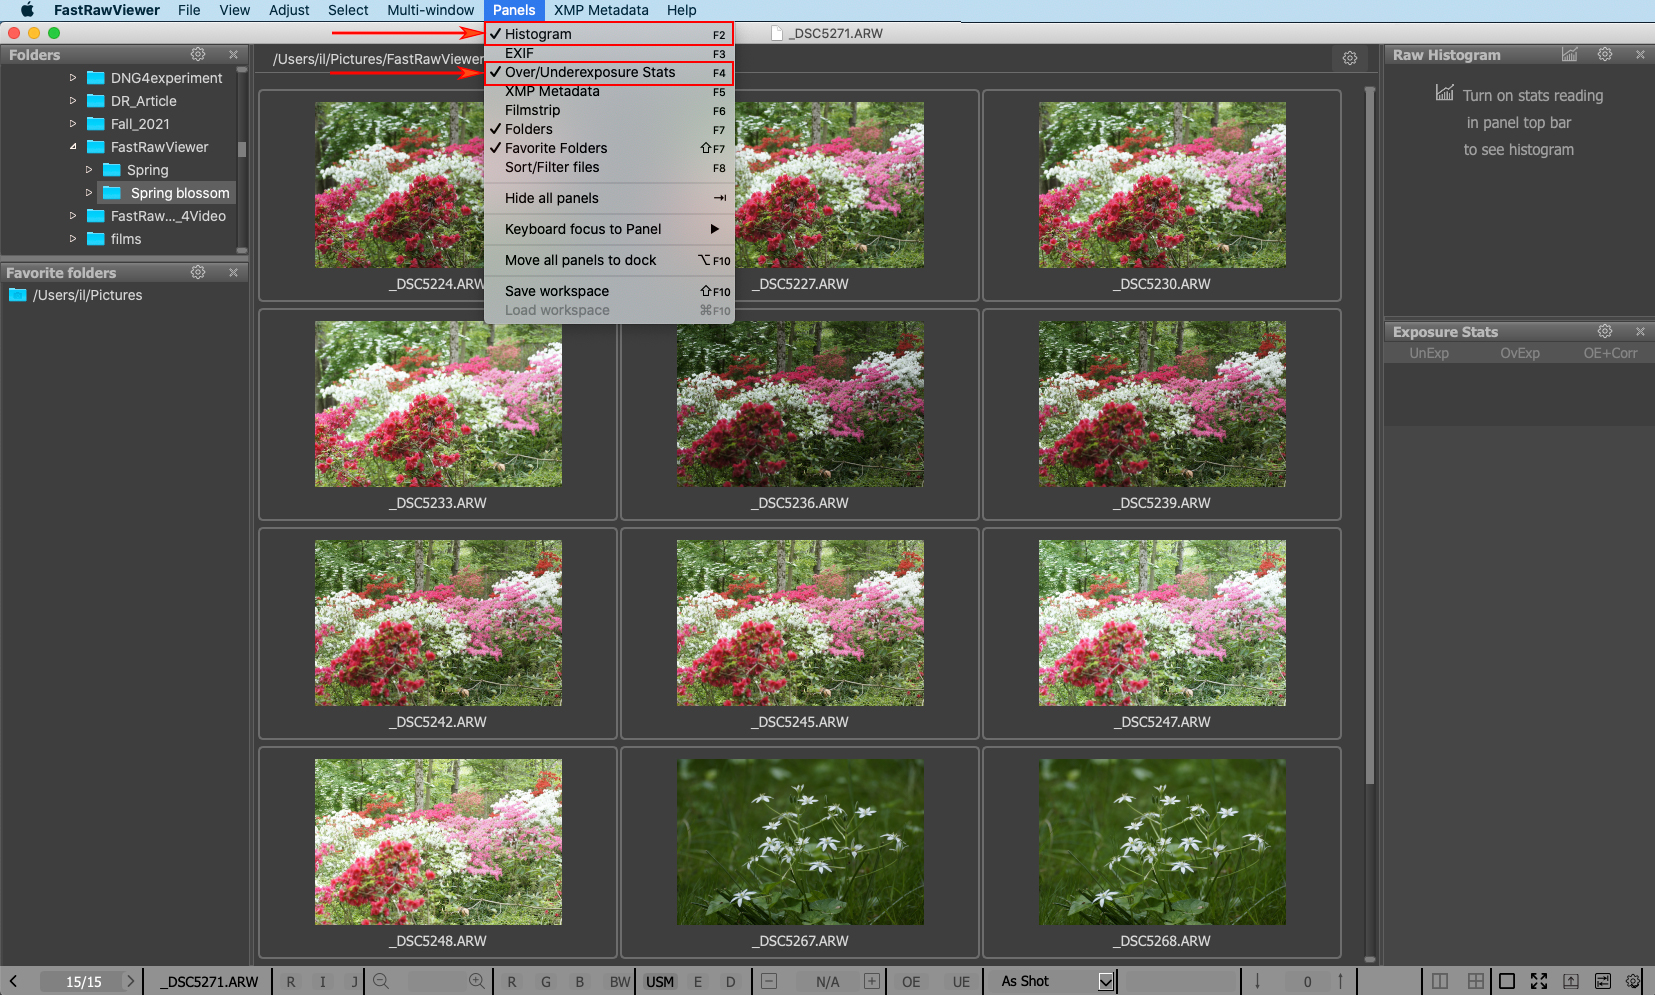
Picture 4. Enable Histogram and Exposure Stat Panels in Grid mode
- Tune the Exposure Stats Presentation: Click the Gear icon at the Exposure Stats panel. To display more exposure statistics data in this panel, check Show pixel counts and Always display OE+Corr column. (For deep customization, see page 234 of the manual).
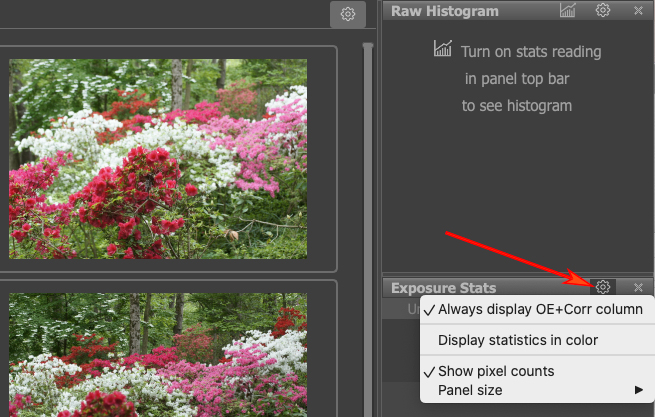
Picture 5. Set Exposure Stat Table
3. Optimize Background Performance and Enable Stats Monitoring
Before starting to analyze your images, adjust how FastRawViewer will process raw data in the background:
- Disable Hidden Adjustments: To ensure that you see unadulterated sensor data navigate to Preferences -> Exposure and
- uncheck Apply Adobe hidden exposure correction.
- check Use camera provided highlight limit
- set Exposure correction on file open to No correction
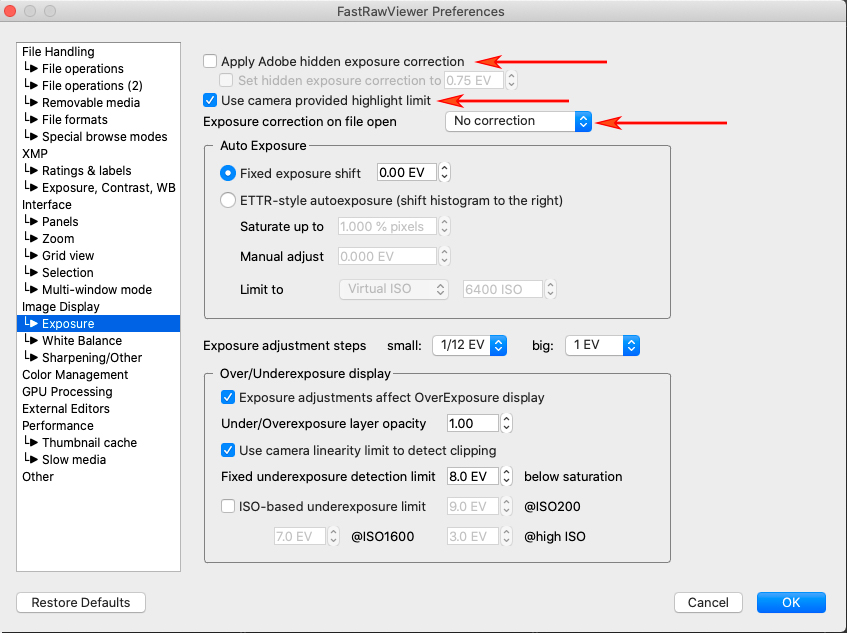
Picture 6. Preferences. Disable Hidden Adjustments
- Configure RAW Processing in the Grid mode: Go to Preferences -> Grid Mode, locate RAW processing in Grid mode and select the processing setting based on your workflow needs (read more in the manual p. 183):
- Partial: Decodes exclusively what is required to display exposure statistics and the histogram. This offers the fastest browsing performance for massive bursts and large image sets.
- Full: Performs a complete background decode. This choice makes switching from Grid mode to Single File view nearly instantaneous.
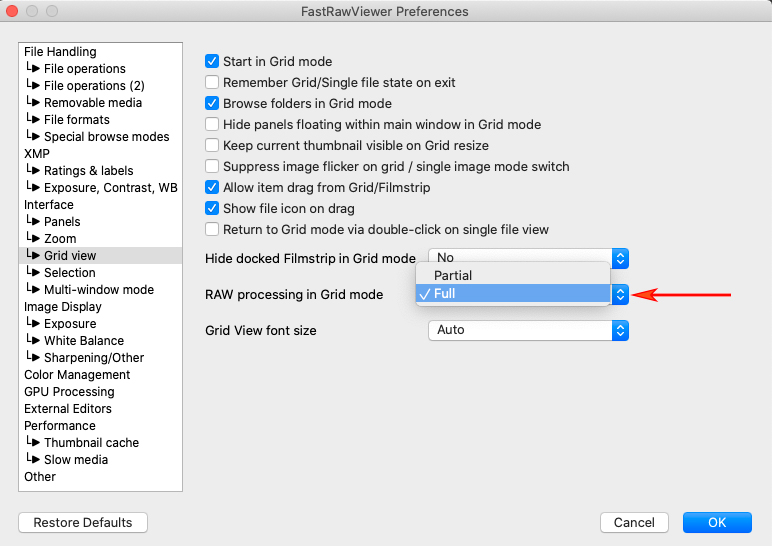
Picture 7. Preferences. Set Raw Processing in Grid mode
When raw statistics isn't enabled in the Grid mode, the Raw Histogram panel displays the Toggle Stat icon (small chart graphic) along with the message "Turn on stats reading in panel top bar to see histogram" (please see the picture 5).>/p>
- Toggle Stats Display in Grid Mode:
- Click once on any image in your grid.
- then Click the Toggle Stat icon at the top bar of the Raw Histogram panel where the tooltip reads "Enable histogram / exposure statistics in grid mode". This will trigger background RAW decoding and populate your data fields for the active selection.
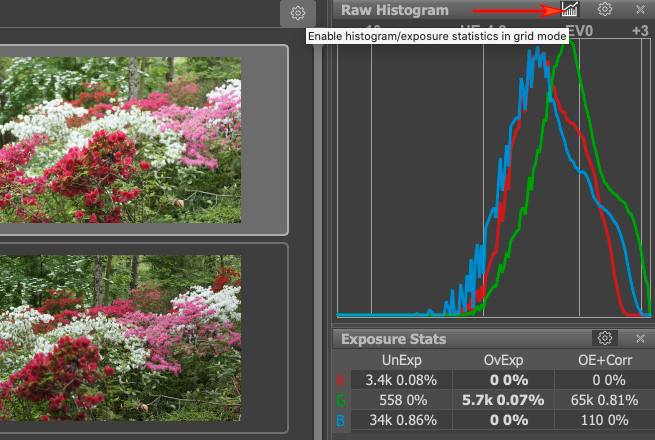
Picture 8. Enable Histogram and Exposure Stat in Grid
4. Evaluating Exposure States At-a-Glance
- Overexposed image: The statistics panel immediately alerts you if a channel is blown out. For example, seeing thousands of overexposed pixels in the Green channel indicates clipped highlight details that cannot be fully recovered.
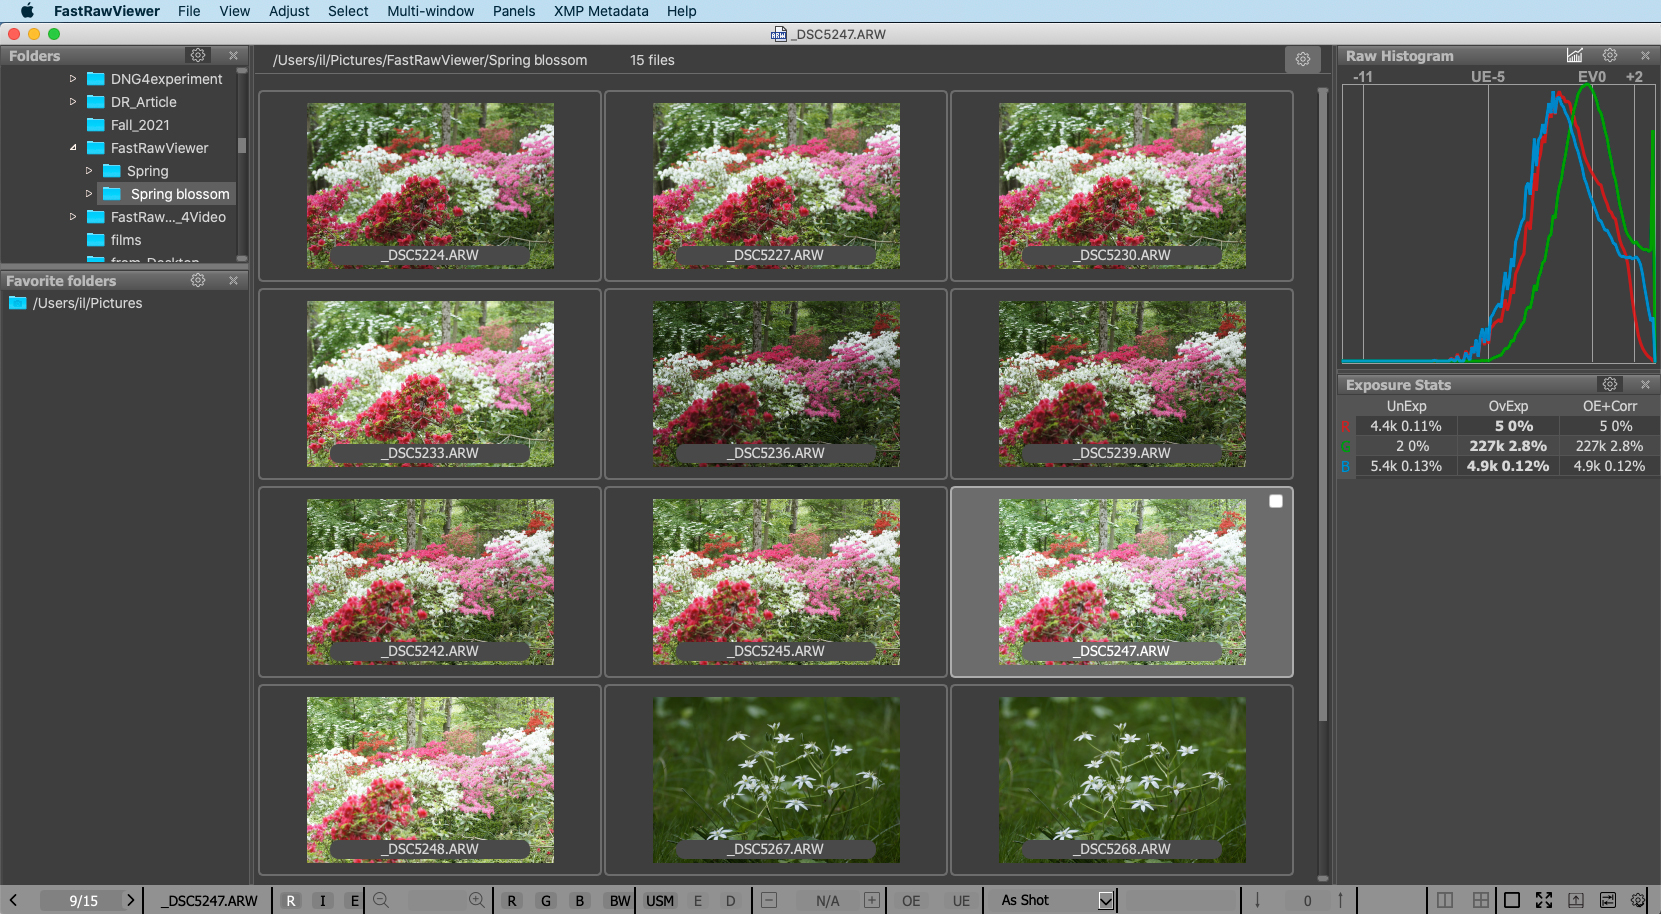
Picture 9. Overexposed shot
- Underexposed image: Massive pixel counts under the UnExp column (underexposed pixels) show that your shadows are (sometimes, severely) clipped, threatening to introduce heavy noise if you attempt to push the exposure (actually, boost lightness) later.
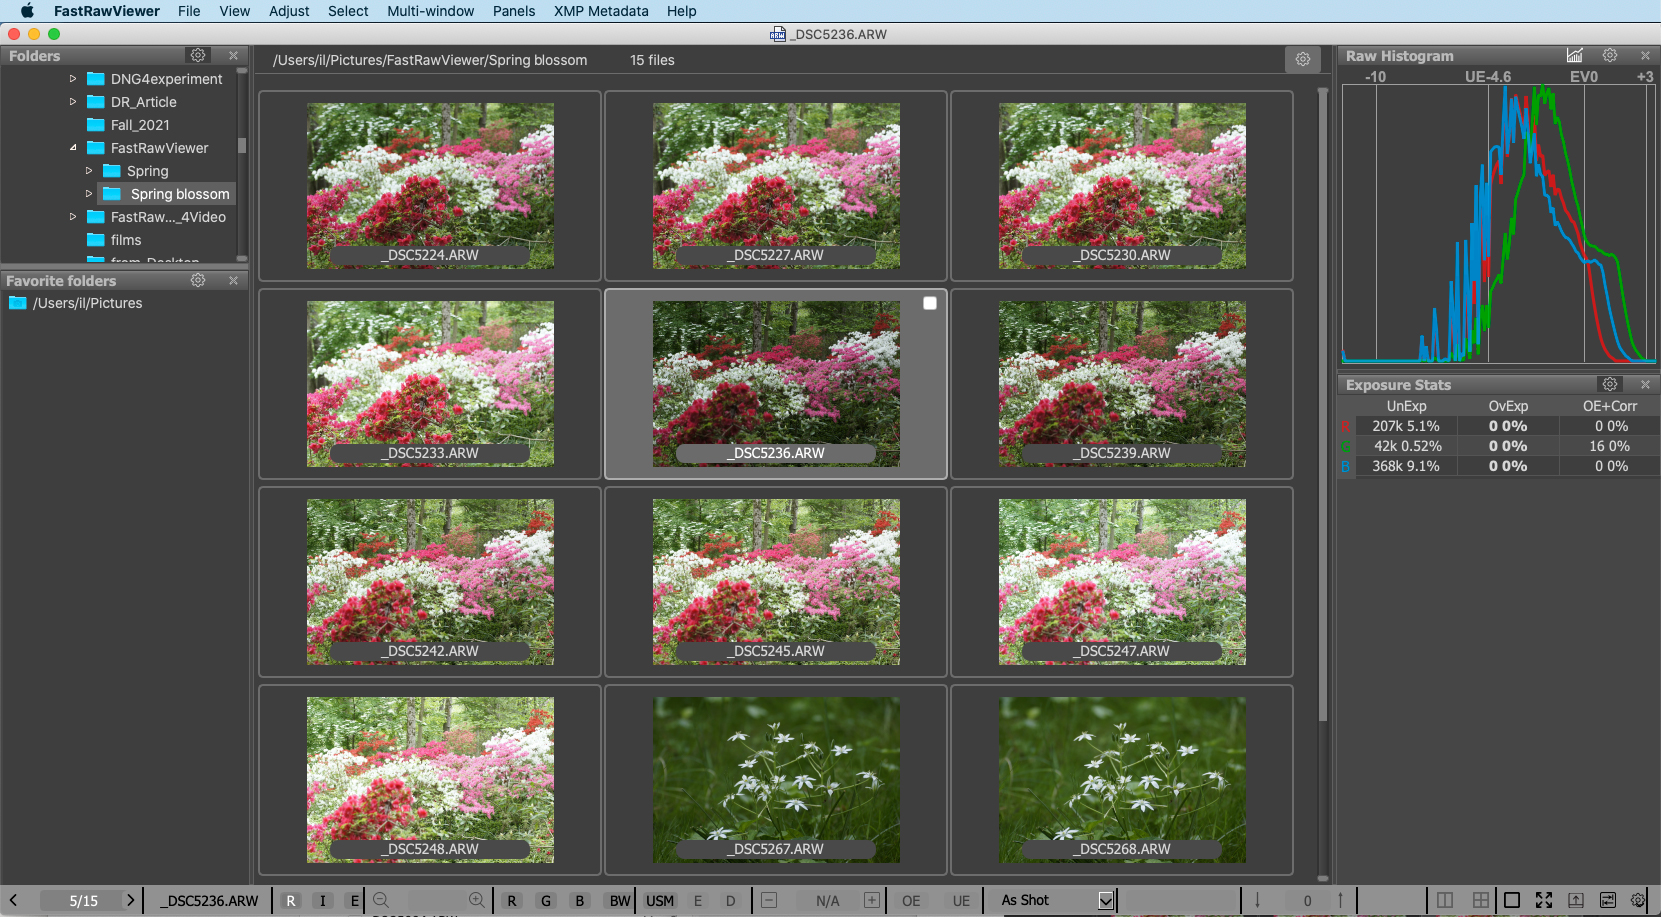
Picture 10. Underexposed shot
- Close to good: The statistics might show only minor overexposure, but a distorted green trace at the right wall of the histogram indicates that highlights in the green are heavily bunched up. White balance adjustments will struggle to neutralize these areas cleanly.
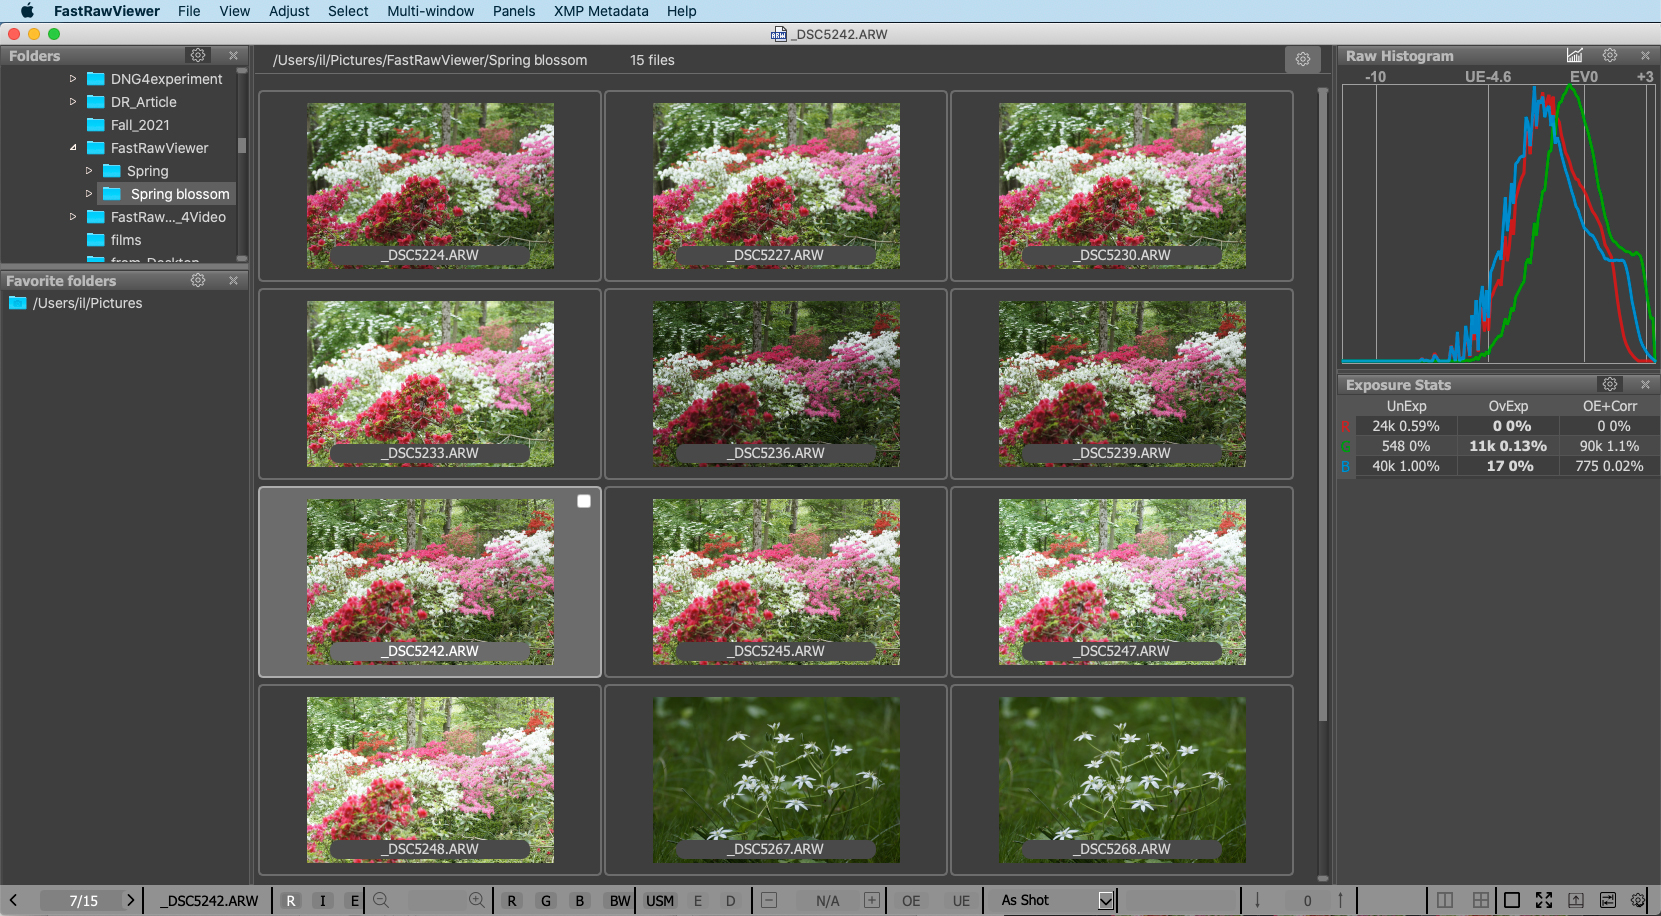
Picture 11. Still not good enough shot
- Best of the bunch: The histogram is pushed as far to the right as possible without clipping. The OvExp columns (overexposed pixels) read 0 0% or show completely negligible pixel counts (57 pixels in this case, rounded to 0%), ensuring you have maximized your dynamic range and captured the cleanest possible data.
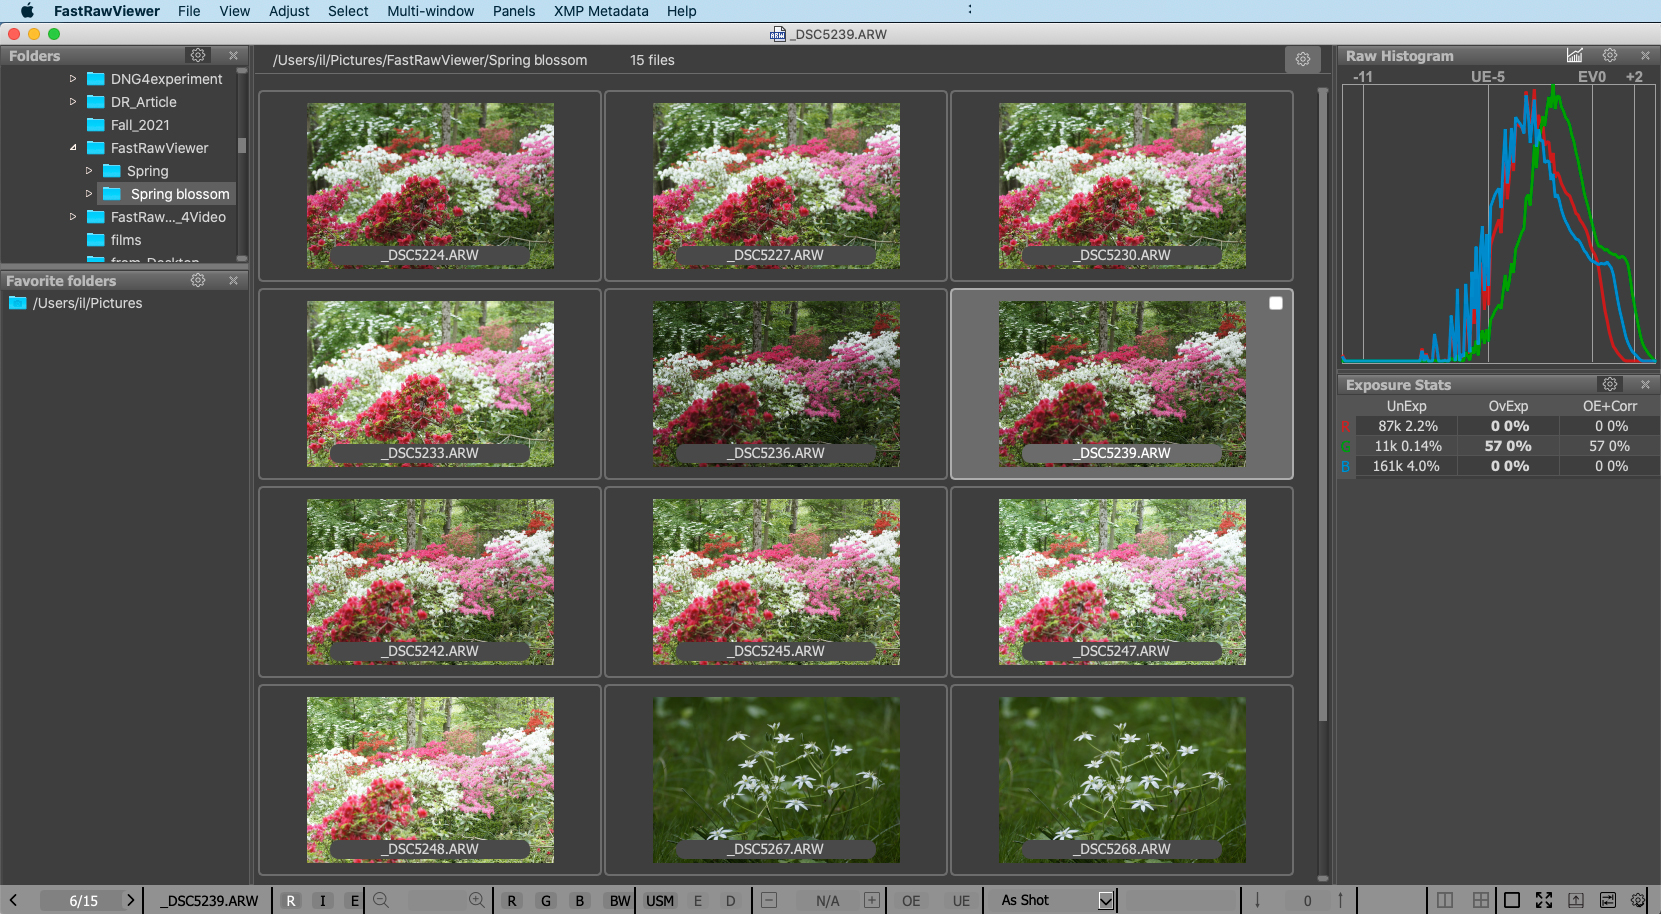
Picture 12. Properly exposed shot
5. Utilize FastRawViewer’s Dedicated Culling Tools
- Open Supporting Panels: Enable the XMP Metadata panel (F5) and the Sort/Filter panel (F8) (see pict.1) to track your progress.
- Keyboard Shortcuts: Keep your hands on the home row. Go to FastRawViewer -> Preferences -> Keyboard Shortcuts to map your favorite keys for ratings, labels, and selections.
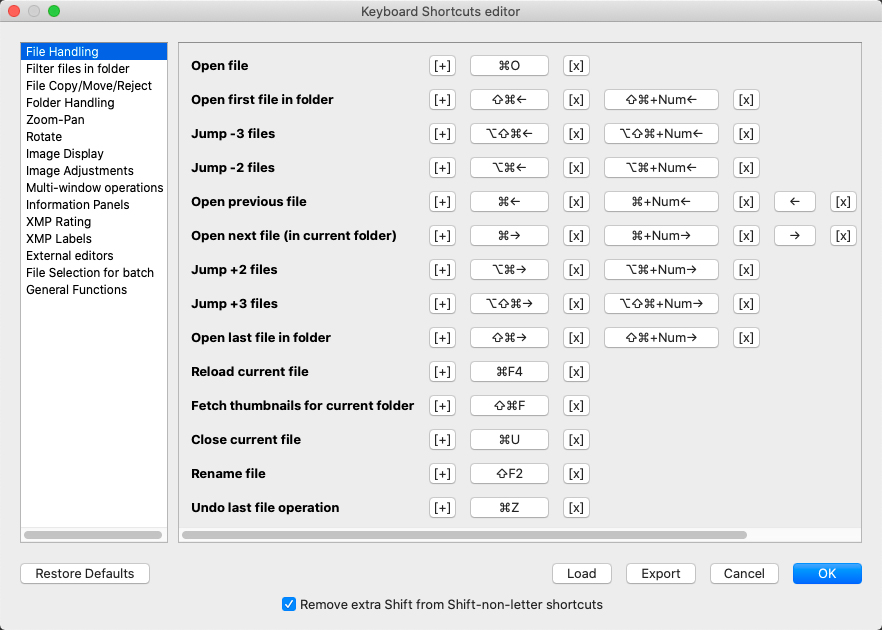
Picture 13. Keyboard Shortcut editor
- Instant File Sorting: Use FastRawViewer build-in file sorting functions to instantly move your selections to “_Selected" or "_Rejected" subfolders, keeping your workspace perfectly organized.
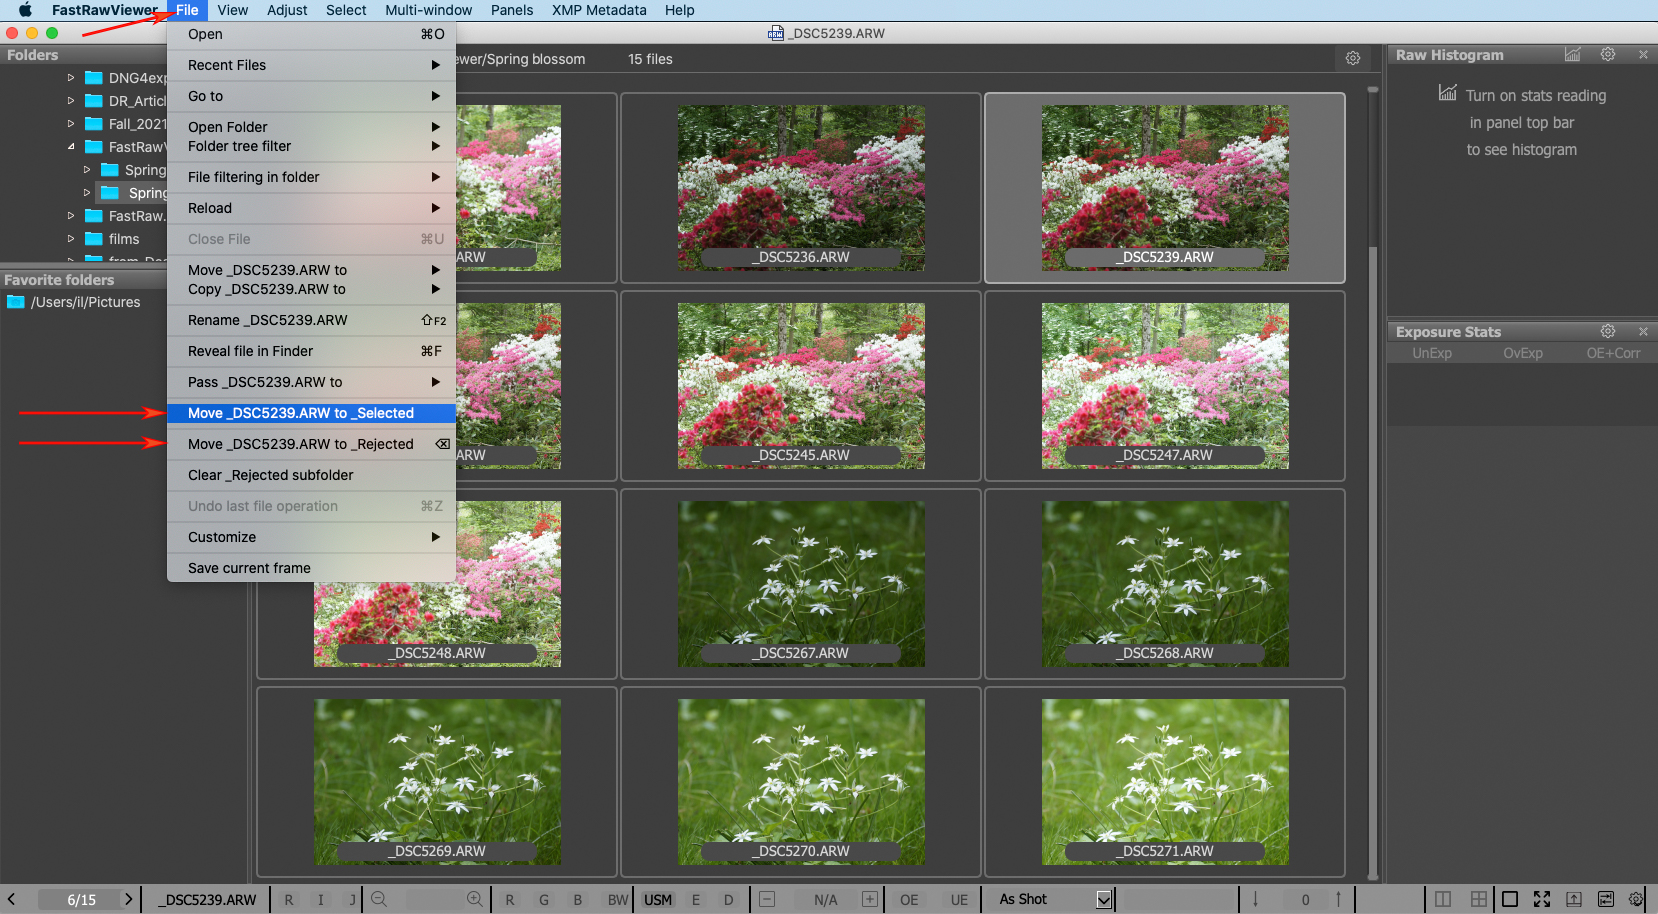
Picture 14. Move selected files to _Selected or _Rejected folders
Need more technical depth? Refer to the FastRawViewer User Manual, accessible directly from the main menu under Help -> PDF Manual. The manual features a fully interactive table of contents, and this guide utilizes its exact technical terminology to make your PDF text searches fast and seamless.
Notes:
Grid mode is designed for evaluating exposure, composition, and burst sequences at a glance. However, to check for motion blur or focus misses—using single-file view, focus peaking, or detail view—you will still need to inspect the frames individually before moving on to your primary raw converter.
And also... While the Raw Histogram and Exposure Stats panels provide absolute sensor metrics, there are at least two distinct scenarios where these numbers should be intentionally ignored during your cull:
The Planned Crop Exception
If you plan to heavily crop the image during primary raw processing, the global Exposure Stats panel and Raw Histogram metrics are structurally deceptive. The blown-out or noisy pixels in the outer periphery don't matter because those raw coordinates will never be fed into the final RGB rendering matrix anyway.
Artistic or Sentimental Value vs. Technical Perfection
A raw file is a canvas, not just a spreadsheet. If a frame has irreplaceable artistic or sentimental value - capturing an unrepeatable historical moment, a fleeting family memory, or an emotionally powerful expression - those values instantly outweigh any technical deficiencies. Do not let a clipped highlight warning or an imperfect noise floor trick you into rejecting an irreplaceable photograph. The data is there to inform your choice, not to make it for you.
