FastRawViewer 1.5.2: force Adobe tools to render tones accurately
Enjoy the summer!
All LibRaw Products and Bundles - 25% off
Our Special Prices are valid until July 28, 2026.

What is new:
New settings to support Highly Linear Mode
Support for a new Panasonic format:
- Panasonic S1, S1R
Camera support (besides S1/S1R)
- Olympus TG-6
- Panasonic FZ1000-II
- Adobe compatibility data for Canon EOS 250D, Panasonic DC-G90/91/95/99
Other changes
- Adobe Lightroom Classic 8.3: (new) path to application added to known apps list.
- EXIF Panel: new field "Lens(ext)" is added to EXIF panel display (default: not displayed).
- This field contains extended lens description.
New Settings to Support Highly Linear Mode
Some photographers prefer to start processing RAW from neutral settings as was suggested about 10 years ago by Dan Margulis. There is also the question of the default silent clipping of highlights in raw converters, which sometimes is confusing and you may want to disable it.
For example, with Adobe CameraRaw and Adobe Lightroom we have:
- Hidden lightness adjustment (correction for baseline exposure) which makes the lightness of the rendered midtone accord with the lightness of the midtone in the out-of-camera JPEG. You can read more about this in our article on Adobe’s Silent Exposure Compensation;
- An S-curve, adjustments to blacks, overall brightness, and contrast, as well as some other basic tone-mapping parameters are applied, to enhance the rendering and make it more pleasing right out of the box. If the scene has high dynamic range, strong saturated colors, or if some serious image editing is planned, then that enhanced view may be not the best starting point.
Our experiments show that we can achieve pretty good linearity using just a few simple overrides over the default settings if we start with Adobe process 2010 aka Process Version 2 (and convert to more recent PV later, if needed). Essentially, all that is needed in PV2 is to select the linear tone curve and set all the basic adjustments, starting with Exposure, to zero. Here it is in more detail: Forcing a Raw Converter to Render Tones Accurately.
Since FastRawViewer records XMP sidecars, we’ve decided to add settings to disable hidden lightness adjustment and to support highly linear mode.
Please keep in mind, that if you want to switch to highly linear mode, first you need to:
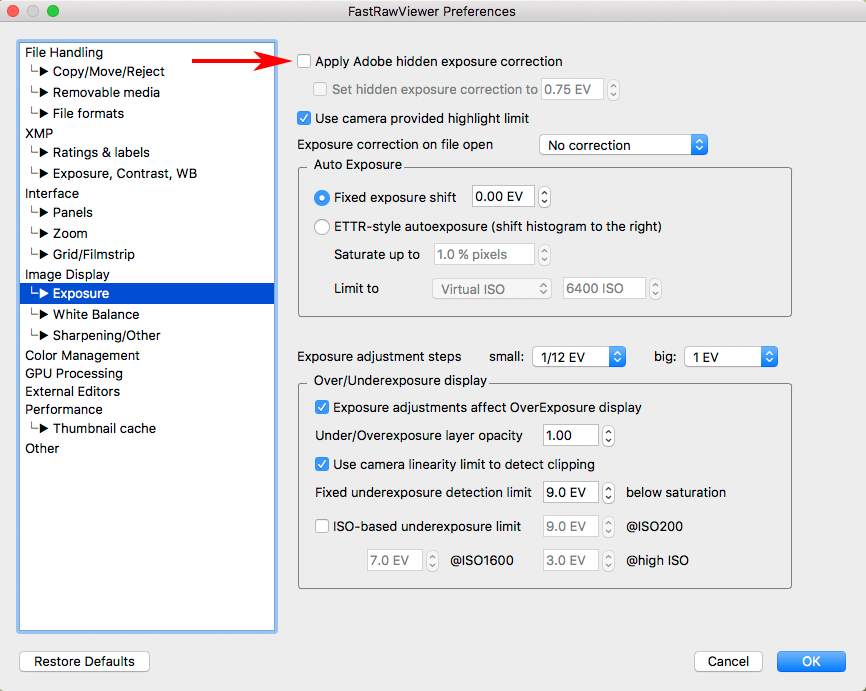
- Make sure that Preferences -> Image Display -> Exposure - Apply Adobe hidden exposure correction setting is not checked
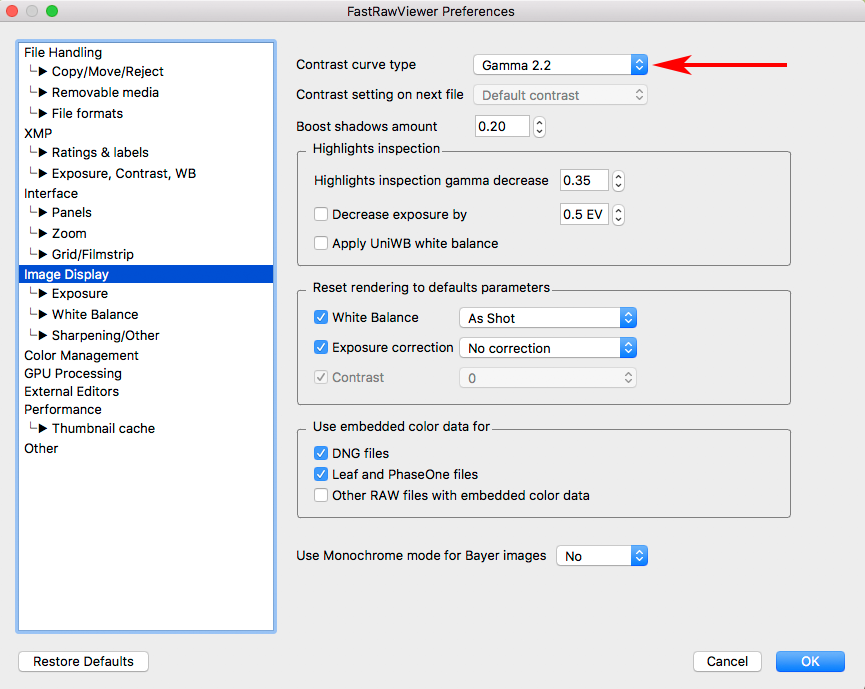
- Preferences -> Image display - Contrast curve type is set to any fixed contrast one: sRGB, gamma 1.8, 2.2, L* (gamma 2.2 is recommended for proper lightness match)
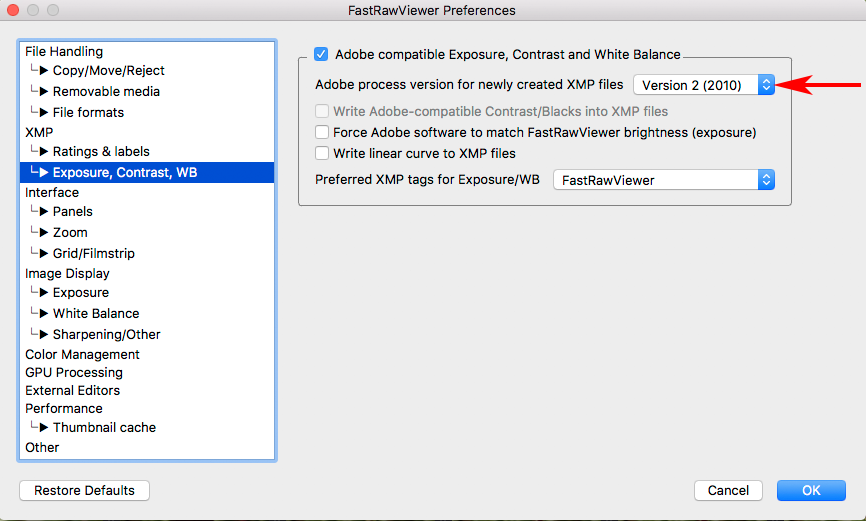
- Preferences -> XMP -> Exposure, Contrast, WB - Adobe process version is set to Version 2 (2010)
And now we can move directly to...
Settings to disable hidden lightness adjustment and to support highly linear mode
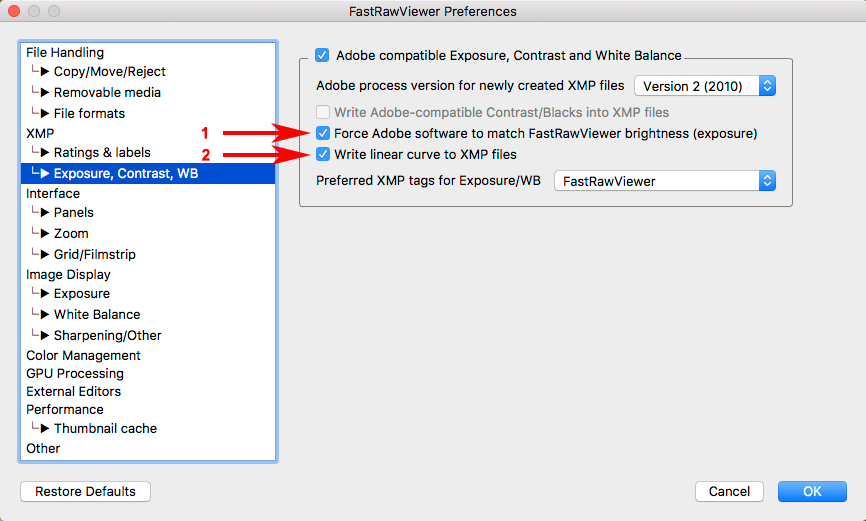
- Preferences -> XMP -> Exposure, Contrast, WB - Force Adobe software to match FastRawViewer brightness (number 1 on the picture above)
- This will result in silent "exposure boost" / baseline exposure being rolled back in Adobe CameraRaw/Lightroom, preventing false clipping indications and allowing one to regain the highlights that were not truly clipped.
- Preferences -> XMP -> Exposure, Contrast,WB - Write linear curve to XMP (number 2 on the picture above)
- If this new setting is enabled, Adobe-compatible exposure and white balance tags will be written with the following additions and amendments:
- the curve will be set to Linear (both name and values)
- tag crs:Shadows will be set to 0
- tag crs:Contrast will be set to 0
- tag crs:Brightness will be set to 0
- tag crs:ProcessVersion=5.7 will be forced
- tags crs:ToneCurvePV2012, crs:ToneCurvePV2012Red, crs:ToneCurvePV2012Green, crs:ToneCurvePV2012Blue will be deleted
- Enabling these new settings will not automatically rewrite existing XMP files or create new XMP files if they are absent. To set new XMP parameters for the linear mode or to roll back Adobe's "exposure boost", you need to do the following after enabling appropriate settings:
- either check "Force XMP files creation" (Preferences -> XMP - Force XMP files creation) and open the files where you want the new settings in FastRawViewer

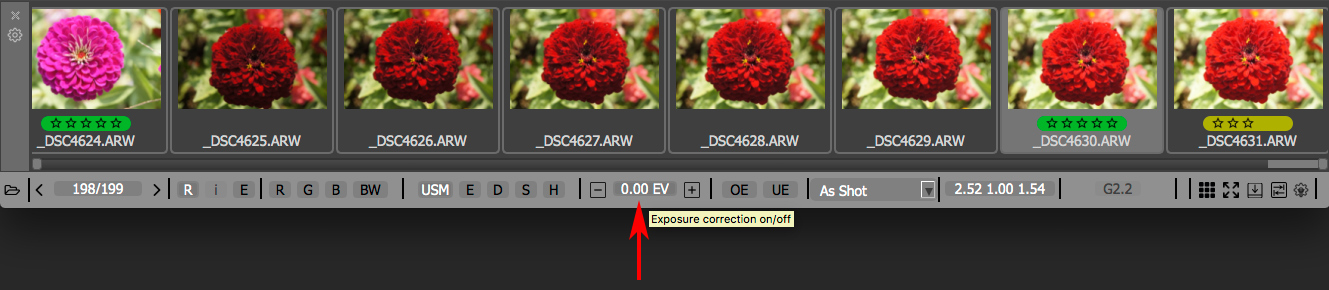
- or open the files where you want the new settings in FastRawViewer and at the Bottom Bar change the White Balance or Exposure; clicking twice on "Exposure correction on/off" to switch it off and then back on should do the trick.
Some notes
- The image will look flat and dull but none of the decisions will have been made for you. The rendition will be neutral and it will more accurately reflect what is in the RAW file, how noisy and detailed the shadows are, and what information is present in the highlights.
- Since FastRawViewer records processing tags only for Adobe converters (there is no useful descriptions of the appropriate settings that we could find for other converters), these settings have effect only for Adobe CameraRaw and Adobe Lightroom.
- Please keep in mind that Adobe Lightroom ignores XMP sidecar files if they are present on removable media, such as a camera connected as a mass storage device, a memory card connected through a card reader and, in many cases, on external drives. For XMP files to be acknowledged by Adobe Lightroom, you can either copy the files you are going to import into Lightroom onto a fixed drive or onto a network drive (FastRawViewer can help you with that, also ensuring that the XMP sidecars will be copied together with the RAW files), or (for Windows) you can use this trick.