Red Flowers Photography: Now It is Easy to See the Real Picture
Enjoy the summer!
All LibRaw Products and Bundles - 25% off
Our Special Prices are valid until July 28, 2026.
Some time ago, we published a couple of articles demonstrating a multi-step procedure that allows one to prevent Adobe raw converters from showing false highlight clipping - "Red Flowers Photography: Real Problems or Deceptive Previews?" and "Forcing a Raw Converter to Render Tones Accurately".
Now, with the settings that allow one to cancel the baseline exposure compensation and support Highly Linear Mode that are being introduced in FastRawViewer 1.5.2, this process has become much more automated (see below the detailed instructions).
Previously you would open a shot in one of Adobe's converters (with default settings), only to see this:
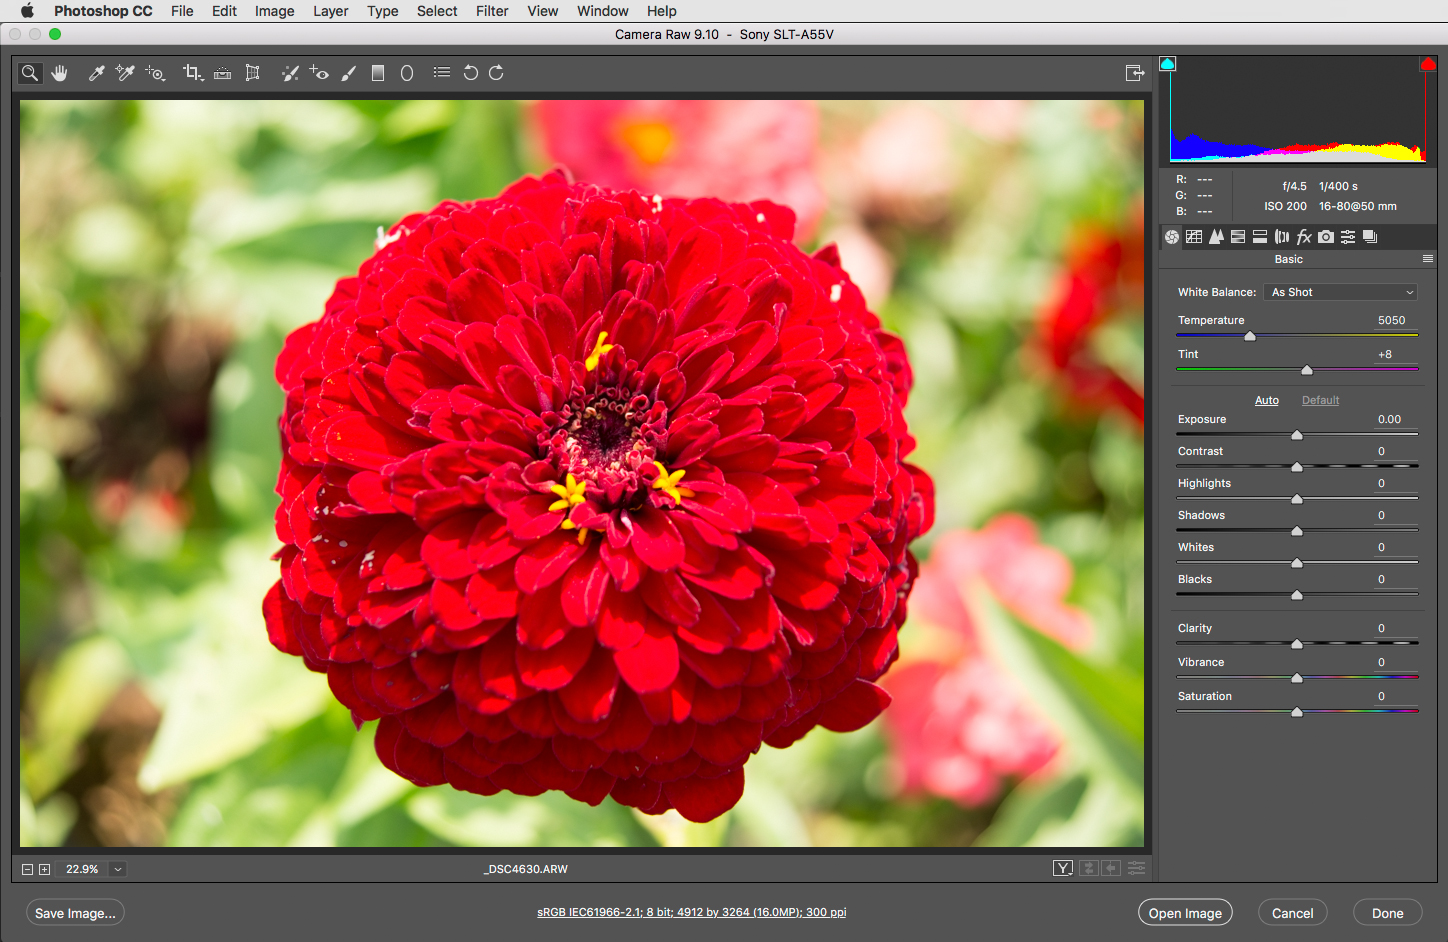
Shot 4630 opened in ACR with default settings: the highlights in R channel look blown out; the shadows in B channel look clipped.
Then, after a series of manipulations with tabs and sliders in an Adobe raw converter, including entering baseline exposure compensation (BLE) manually, having gotten it from the FastRawViewer EXIF panel (the procedure is described at length in the above-mentioned articles), you would get a more adequate idea of what was in the RAW data.
Now, all you need is to go to FastRawViewer's Preferences and enable the settings that switch baseline exposure compensation off and Highly Linear Mode on. After that, when opening this shot in an Adobe raw converter, you will see exactly what you would get by manually overriding Adobe's default settings...
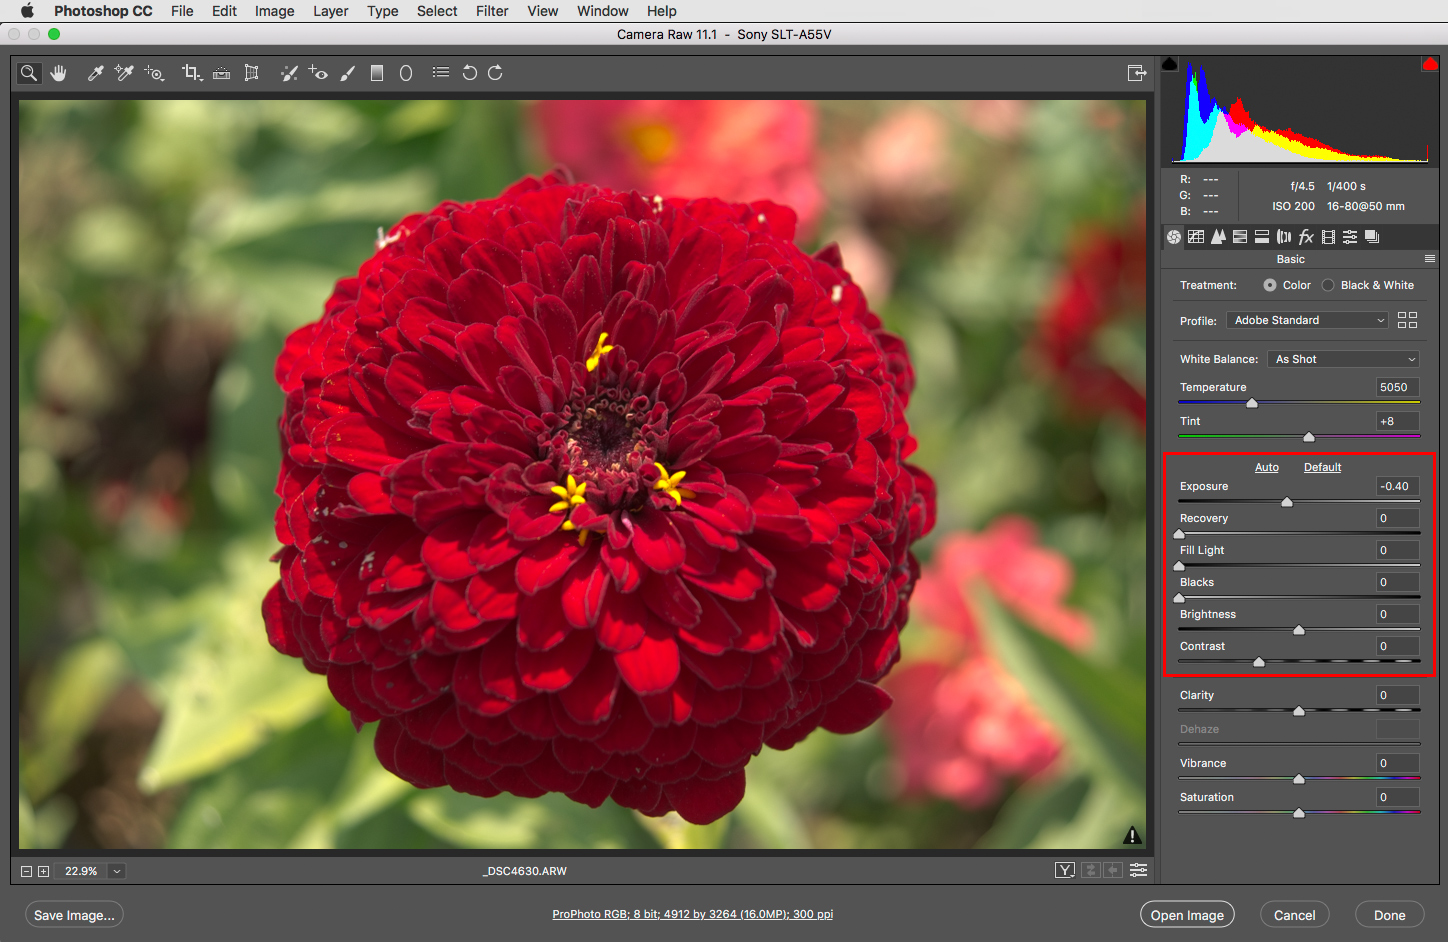
Shot 4630, opened in ACR after tuning FastRawViewer to cancel BLE and to enable Highly Linear Mode parameters in XMP sidecar files
...and now, in an Adobe converter, you have what FastRawViewer has shown you from the very beginning - a preview of the real RAW data without false clipping in the highlights or shadows.

Shot 4630, opened in FastRawViewer. RAW Histogram and RAW exposure statistics panels in the top left corner
How to disable Baseline Exposure compensation in an Adobe raw converter and switch to Highly Linear Mode in FastRawViewer
Note: You would need FastRawViewer starting from the version 1.5.2
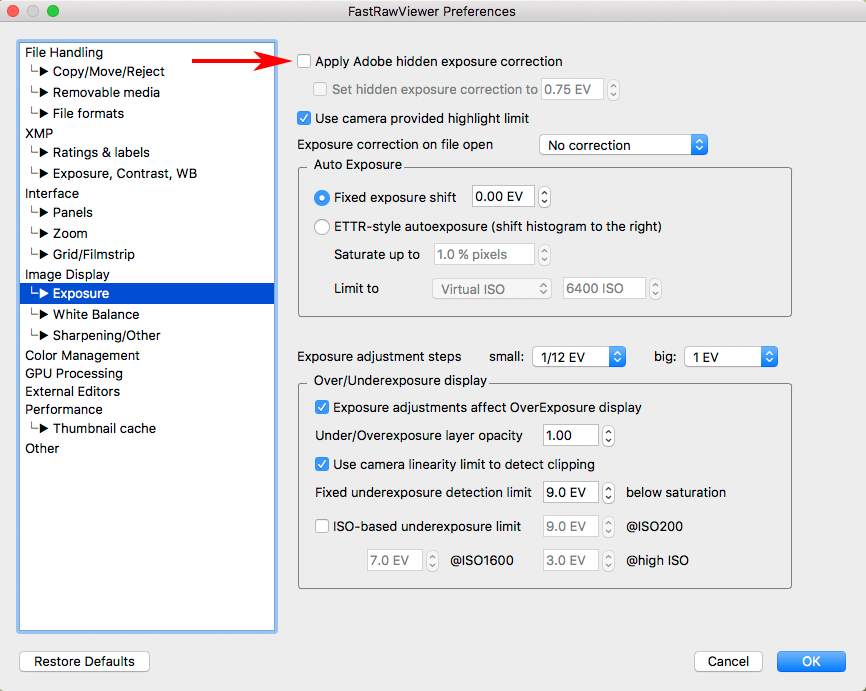
- Make sure that the Preferences -> Image Display -> Exposure - Apply Adobe hidden exposure correction setting is not checked
A. If you only want to disable Baseline Exposure compensation in an Adobe raw converter:
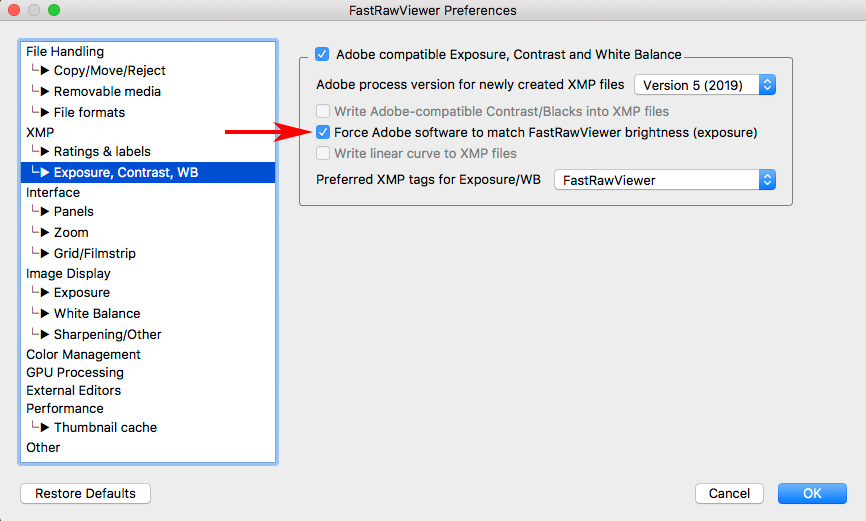
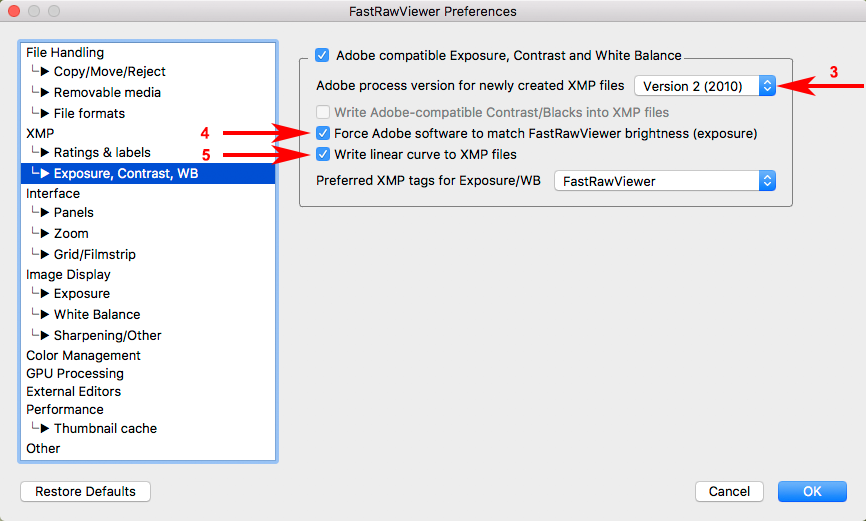
- Preferences -> XMP -> Exposure, Contrast, WB - Force Adobe software to match FastRawViewer brightness
- This will result in a silent "exposure boost" / baseline exposure being rolled back in Adobe CameraRaw/Lightroom, preventing false clipping indications and allowing one to regain the highlights that were not truly clipped.
B. If you want both to disable Baseline Exposure compensation and switch to Highly Linear Mode in FastRawViewer
- Preferences -> Image display - Contrast curve type is set to any fixed contrast one: sRGB, gamma 1.8, 2.2, L* (gamma 2.2 is recommended for proper lightness match)
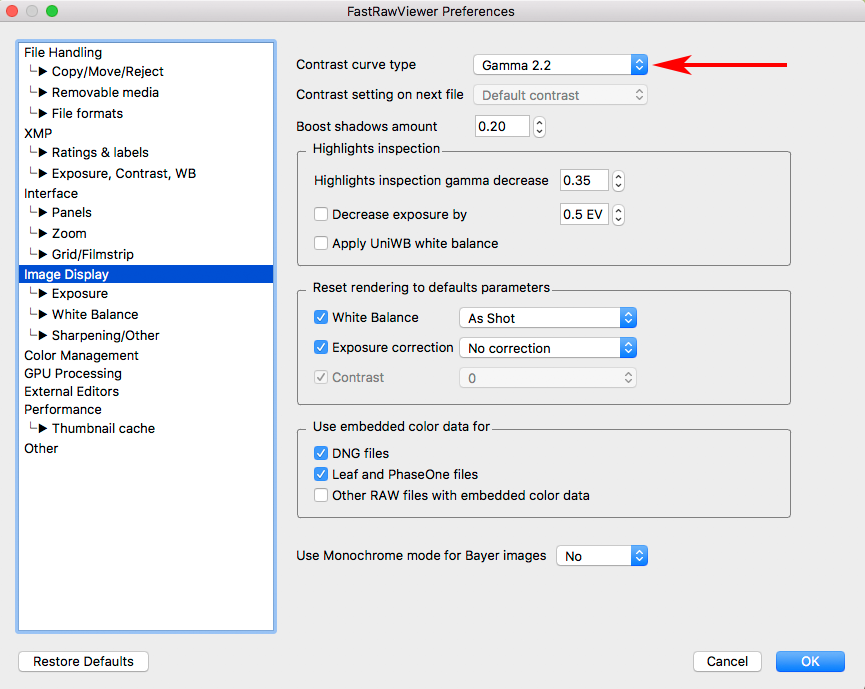
- Preferences -> XMP -> Exposure, Contrast, WB - Adobe process version is set to Version 2 (2010) (number 3 on the picture below)
- Preferences -> XMP -> Exposure, Contrast, WB - Force Adobe software to match FastRawViewer brightness (number 4 on the picture below)
- This will result in a silent "exposure boost" / baseline exposure being rolled back in Adobe CameraRaw/Lightroom, preventing false clipping indications and allowing one to regain the highlights that were not truly clipped.
- Preferences -> XMP -> Exposure, Contrast, WB - Write linear curve to XMP (number 5 on the picture below)
- If this new setting is enabled, Adobe-compatible exposure and white balance tags will be written with the following additions and amendments:
- the curve will be set to Linear (both name and values)
- tag crs:Shadows will be set to 0
- tag crs:Contrast will be set to 0
- tag crs:Brightness will be set to 0
- tag crs:ProcessVersion=5.7 will be forced
- tags crs:ToneCurvePV2012, crs:ToneCurvePV2012Red, crs:ToneCurvePV2012Green, crs:ToneCurvePV2012Blue will be deleted
Enabling these new settings will not automatically rewrite existing XMP files or create new XMP files if they are absent, so...
- To set new XMP parameters for the linear mode or to roll back Adobe's "exposure boost", you need to do the following after enabling the appropriate settings:
- either check "Force XMP files creation" (Preferences -> XMP - Force XMP files creation) and open the files where you want the new settings in FastRawViewer

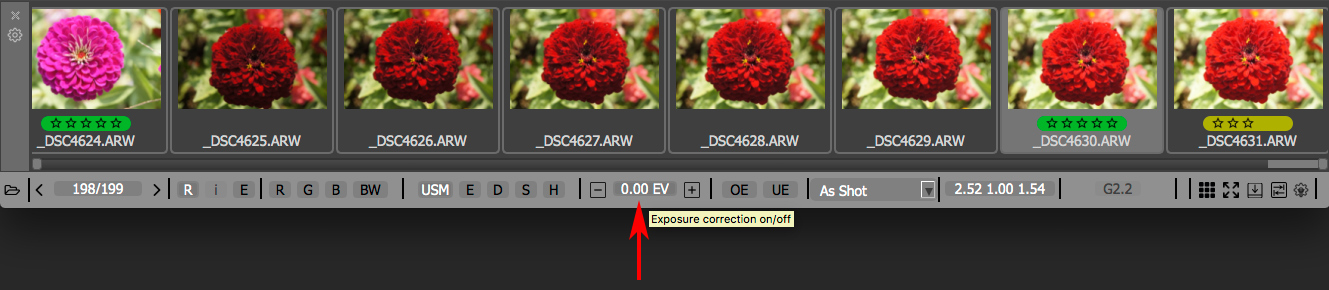
- or open the files where you want the new settings in FastRawViewer and at the Bottom Bar change the White Balance or Exposure; clicking twice on "Exposure correction on/off" to switch it off and then back on should do the trick.
Some notes
- The image may (and probably will) look flat and dull, but none of the editing decisions will be made for you. The rendition will be neutral and it will more accurately reflect what is in the RAW file, how noisy and detailed the shadows are, and what information is present in the highlights.
- Since FastRawViewer records processing tags only for Adobe converters (there is no useful descriptions of the appropriate settings that we could find for other converters), these settings have an effect only for Adobe CameraRaw and Adobe Lightroom.
- Please keep in mind that Adobe Lightroom ignores XMP sidecar files if they are present on removable media, such as a camera connected as a mass storage device, a memory card connected through a card reader and, in many cases, on external drives. For XMP files to be acknowledged by Adobe Lightroom, you can either copy the files you are going to import into Lightroom onto a fixed drive or onto a network drive (FastRawViewer can help you with that, also ensuring that the XMP sidecars will be copied together with the RAW files), or (for Windows) you can use this trick.