FastRawViewer 2.0: Multi-window Display Mode
Enjoy the summer!
All LibRaw Products and Bundles - 25% off
Our Special Prices are valid until July 28, 2026.
Multi-window Display Mode
How It Works
Switching to multi-window mode can be done through Menu – Multi-window – Window layout.
Switching to multi-window mode and back can also be done via the buttons (“2-window mode” or “4-window mode”) in the right part of the application’s bottom bar (please see the picture above).
When 2/4-window mode is active, the lines on the button become white. In Grid View mode, these buttons are inactive. How these buttons are displayed can be tuned through Menu – File – Customize – Customize status bar (the corresponding element in the list is called Multi-window mode controls).
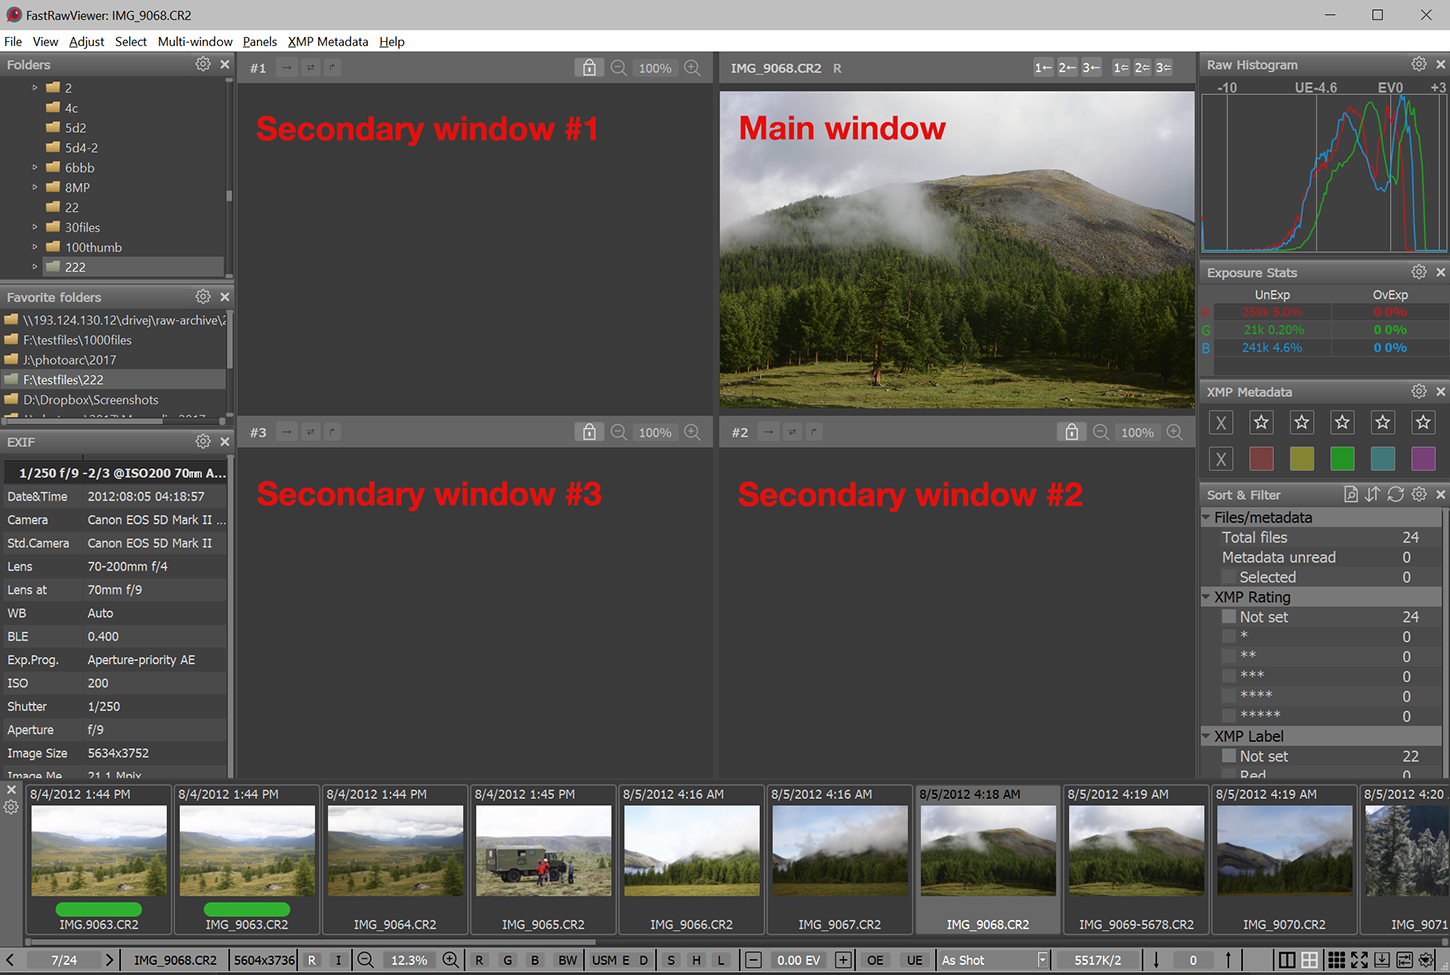
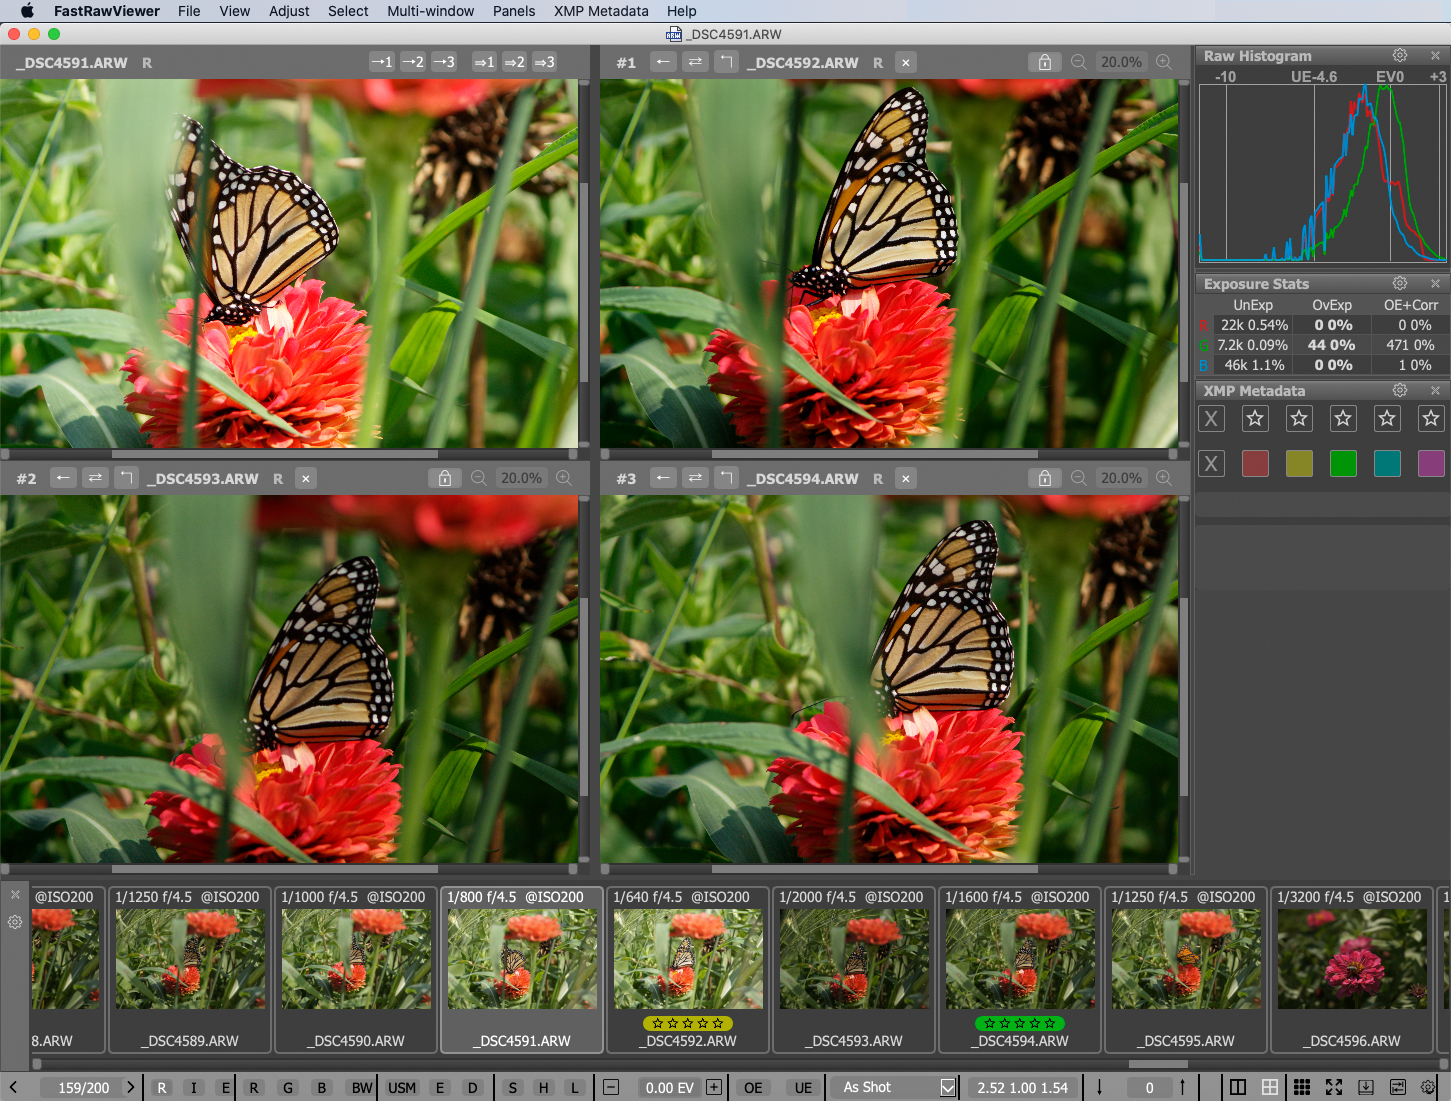
A switch to multi-window mode will cause two or four subviews to open on the screen (the screenshot below shows four subviews):
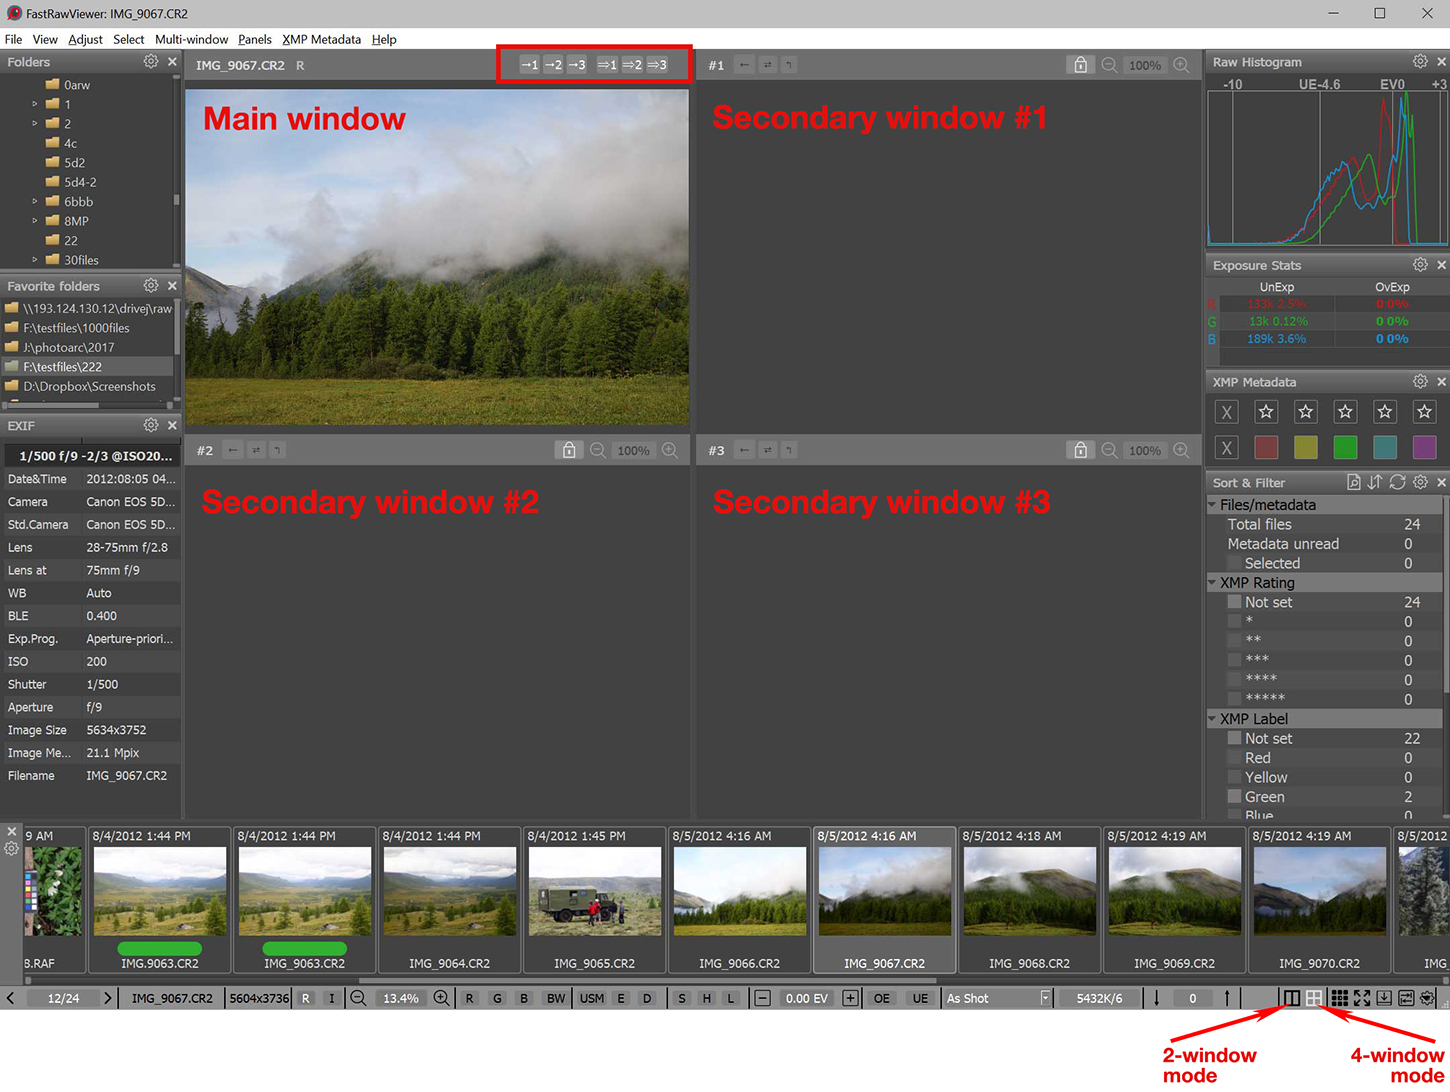
- The top-left (or just left for two-subview mode) is the main window, analogous in function to the window in Single Image View.
- In particular:
- All hotkeys affect this window (exception: zoom, pan, and display modes, see below).
- Histogram, EXIF, exposure statistics, etc., are displayed only for the main window
- Changing the rendering parameters (lightness, contrast, white balance) for a RAW image is only possible for the main window.
- The other windows are secondary (additional/ancillary), they display copies of some images that cannot be edited, that is the rendering parameters for the views in secondary windows can’t be changed in those windows.
- The order of the windows (main is at the top left, please see the picture above)) is the default. The main window and the secondary subview #2 can be placed at the right column via Preferences – Multi-window mode - Main/secondary window order (please see the “Multi-window Mode Settings“ section).
- To populate windows, you can use the following options:
- Drag-n-Drop from Filmstrip
- Drag-n-Drop from a different window
- Via context menu in the Filmstrip (Open in window – Secondary Window #N)
- Via context menu for an opened file (Open in window – …)
If a group of files is selected in the Filmstrip, then drag-n-dropping / the context menu will work for the whole group; a window, however, can only open one file at a time. To drag-n-drop / use the context menu for one file out of a selected group without destroying the selection, press and hold the Alt key (Option key, if using macOS) while executing the operation.
Important: both the context menu and drag-n-drop from the Filmstrip work normally when using Advanced Selection mode. When using standard Selection mode (like in Finder/Explorer), both right-click and drag change the “current file” in the Filmstrip, and it will be displayed in the main window. This is the default behavior for Standard Selection mode, and it cannot be changed – if this is unsuitable, then you should use Advanced Selection Mode, especially since in FastRawViewer 2.0 we’ve improved it.
- Please note:
- If a file that is already opened in the main window is opened in a (secondary) window, then the image is copied from the main window to the secondary, fully analogous to Menu – Multi-Window – Copy image from main window
- If a file that is not opened in the main window is opened, then a full-fledged open and rendering process happens:
- The displayed “representation” (RAW/JPEG…) is selected in accordance with the settings in File Formats – Default image to display
- The rendering parameters are taken from the XMP (if such exists) or from the settings.
- The parameter Force create XMP is not applied.
- To copy an image from the main window to a secondary one, use menu options/shortcuts or the buttons in the left part of the top panel of the main window (the picture below is for the default order of the windows):

- Menu – Multi-window – Copy image from Main window to Window N (or the buttons →1, →2, →3) – copy an image from the main window to the secondary window #N
- Menu – Multi-window – Copy image … then open next file (or the buttons =>1, =>2, =>3) – copy the image from the main window to the secondary, and then open in the main window the next file in the folder.
As a result, the secondary subviews (some or all) will also display some files:
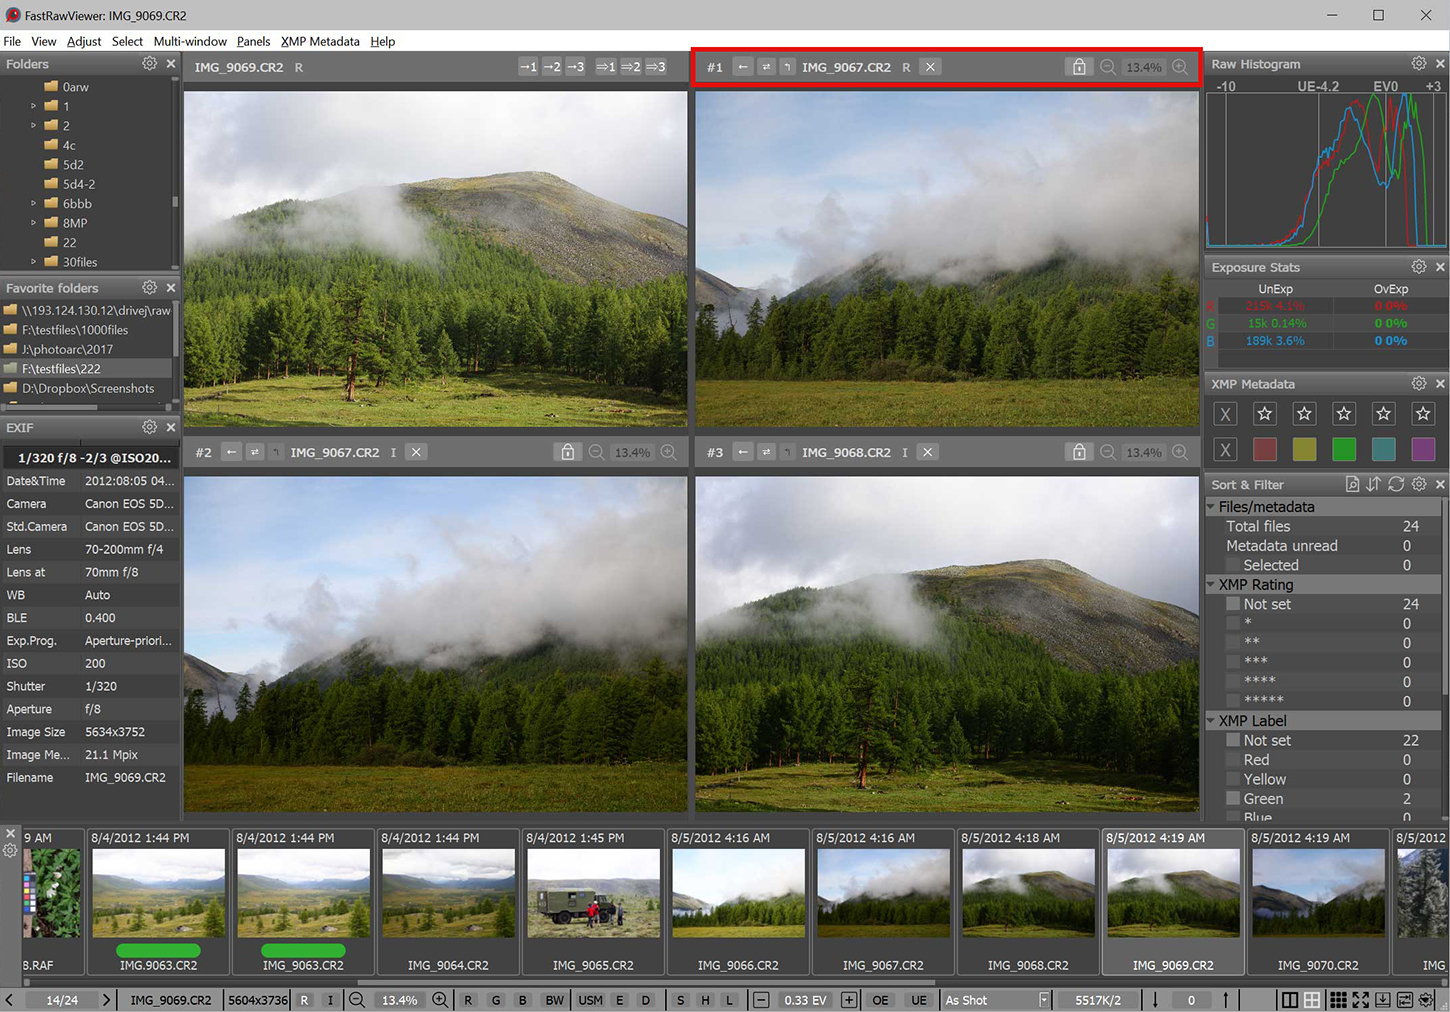
The top bar of the secondary subview contains, left-to-right:
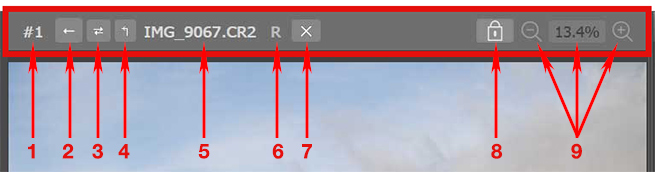
- #n – subview number
- ← - is a button for copying an image back, from the secondary window to the main window
- ⇄ - is a button for swapping the images in the secondary and main windows.
- ↰ - is a button for copying the rendering parameters of a RAW file from the secondary window to the main window.
- The name of the file displayed in the secondary window
- R/I/E/J – the type of the displayed representation (Raw, Internal JPEG, External JPEG, Lone JPEG)
- ✕ - is a button for clearing the secondary window
- Padlock – zoom/pan status; when the padlock is closed, zoom and pan are synchronized across the main window and all of the secondary windows. When it’s open, each window can be zoomed/panned independently.
- Button for zooming out, the current zoom level, and button for zooming in.
When the settings are changed such that the main window is positioned on the right side, all arrow icons are mirrored.
- The contents of the secondary window can be returned to the main window using:
- Menu – Multi-window – Copy image to Main window from… (or the button ←) will copy from the secondary window to the main window.
- Menu – Multi-window – Swap Main window with image in… (or the button ⇄) on the secondary window swaps the content of the main and secondary windows.
- When copying or swapping images, what’s actually happening is a full-scale re-opening of a file in the main window; the displayed representation (RAW, internal JPEG, external JPEG) is determined through Preferences – Multi-window mode – When opening a file from a secondary window use:
- Default image format to display: the displayed image representation is determined by the setting Preferences – File Formats – Default image
- Secondary window file format: the image representation that was displayed in the secondary window will be opened in the main one.
If the Shift key is held down while pressing a button in a top bar of a window to perform a copy or swap, then RAW rendering parameters (lightness, contrast, white balance) will also be copied.
- Furthermore, a file can be copied from a secondary window to the main window via:
- Drag-n-drop a file from a secondary window to the main window
- The context menu in the window (Open in Window element)
- In this case, a full-scale re-opening and re-rendering happens, as if the file had been opened through Menu – File – Open.
Synchronous Zoom / Pan
- With the default settings, the shortcuts for zooming in/out affect:
- The window that is closest to the mouse cursor
- And the windows that are tied to it (via the closed padlock)
Similarly, the “padlock connection” affects panning an image in a window (with the mouse, or scrollbars), the connected windows will also pan the same distance.
- There are three possible modes for zoom synchronization (these are selectable, see below the Preferences section)
- Same zoom value
- Same width
- Same size (that is to say the length of the diagonal)
For images that have the same size and orientation, all three options naturally give the same result; the three options therefore only have “meaning” when looking at images that have different sizes and/or orientation.
Synchronizing Special Display Modes
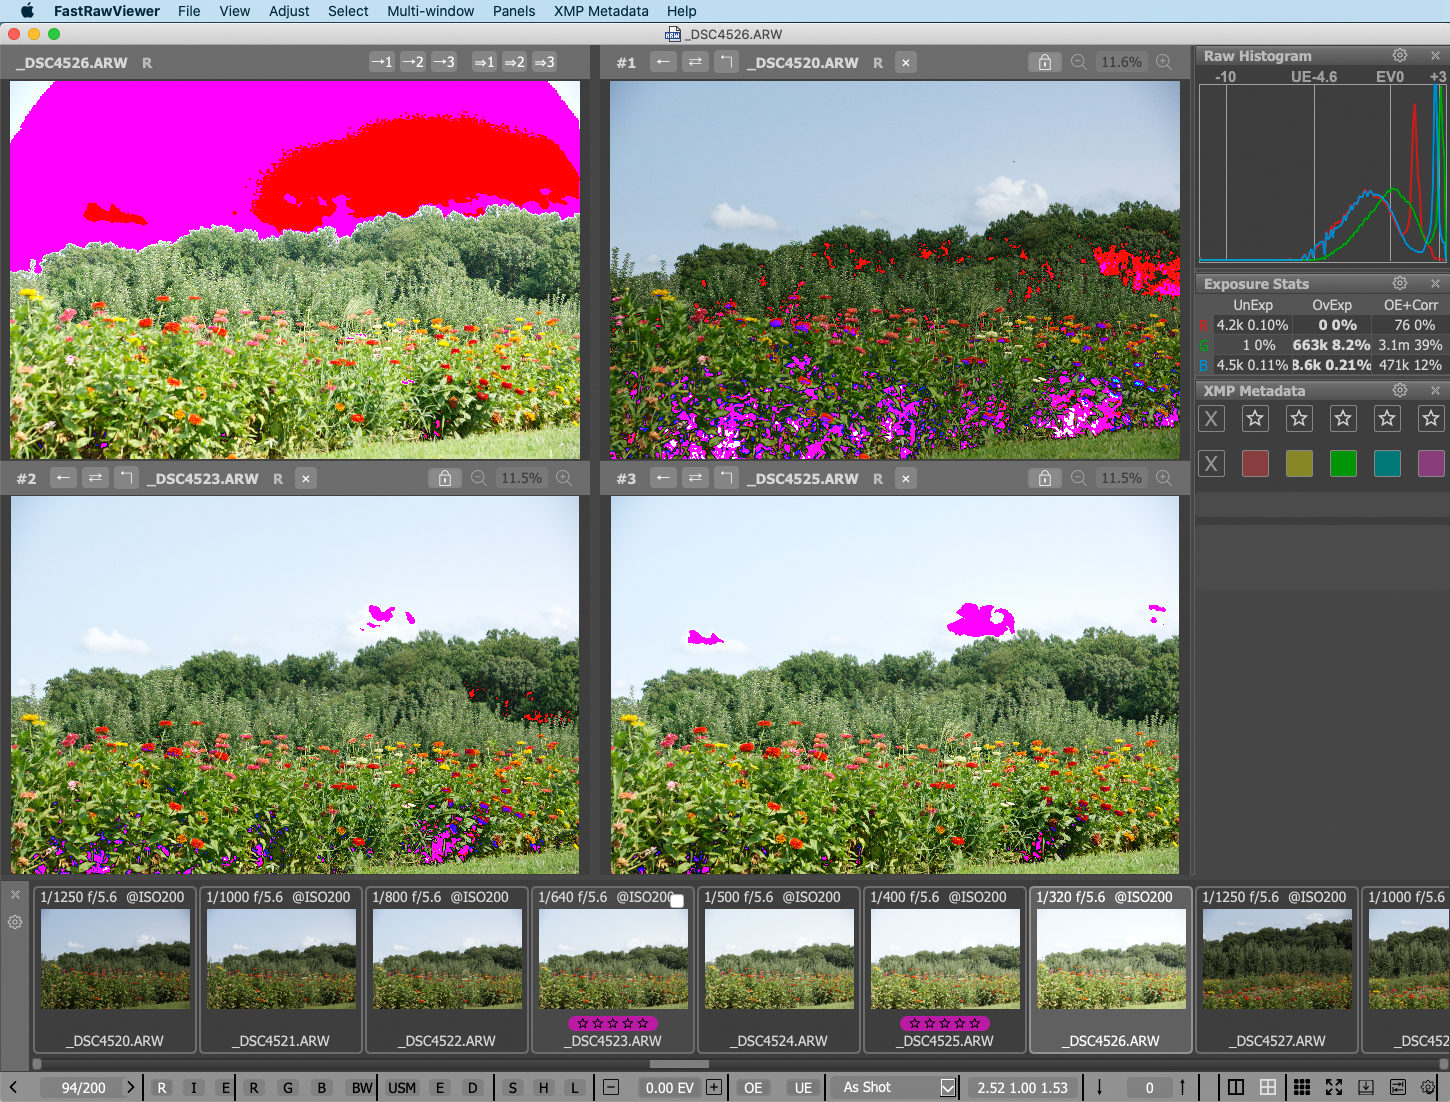
Special display modes are applied simultaneously to all images opened in the main and secondary windows.
- Here, by “special display modes” we mean:
- Screen sharpening
- Focus Peaking
- Per-channel (R-G-B) black and white display
- Over/underexposure indication (only for RAW)
Scope of Hotkey and Menu Actions
- With the exception of zoom / pan and the special display modes listed above, all actions taken through the menu and / or via hotkeys are applied only to the main window.
- For the secondary windows, there are context menus that allow one to perform standard actions (XMP ratings/labels, copy, move, pass to an external program), excluding rotating the image.
- Also, from the secondary windows one can perform Drag-n-Drop actions to both external programs and the folder tree in the Folders panel.
Copying RAW Rendering Parameters from a Secondary to the Main Window
If the main window and a secondary window contain an image taken by the same camera model, and both windows are displaying RAW images, then you can copy the RAW rendering parameters (namely, exposure correction, white balance, contrast) from the secondary window to the main window. The copied settings will be applied to the RAW image in the main window and recorded to the corresponding XMP file.
This way, the secondary window can be used as a repository for processing presets.
- Copying the settings can be done via:
- Menu – Multi-window – Copy processing from … to Main Window or by pressing the ↰ button on the window top bar.
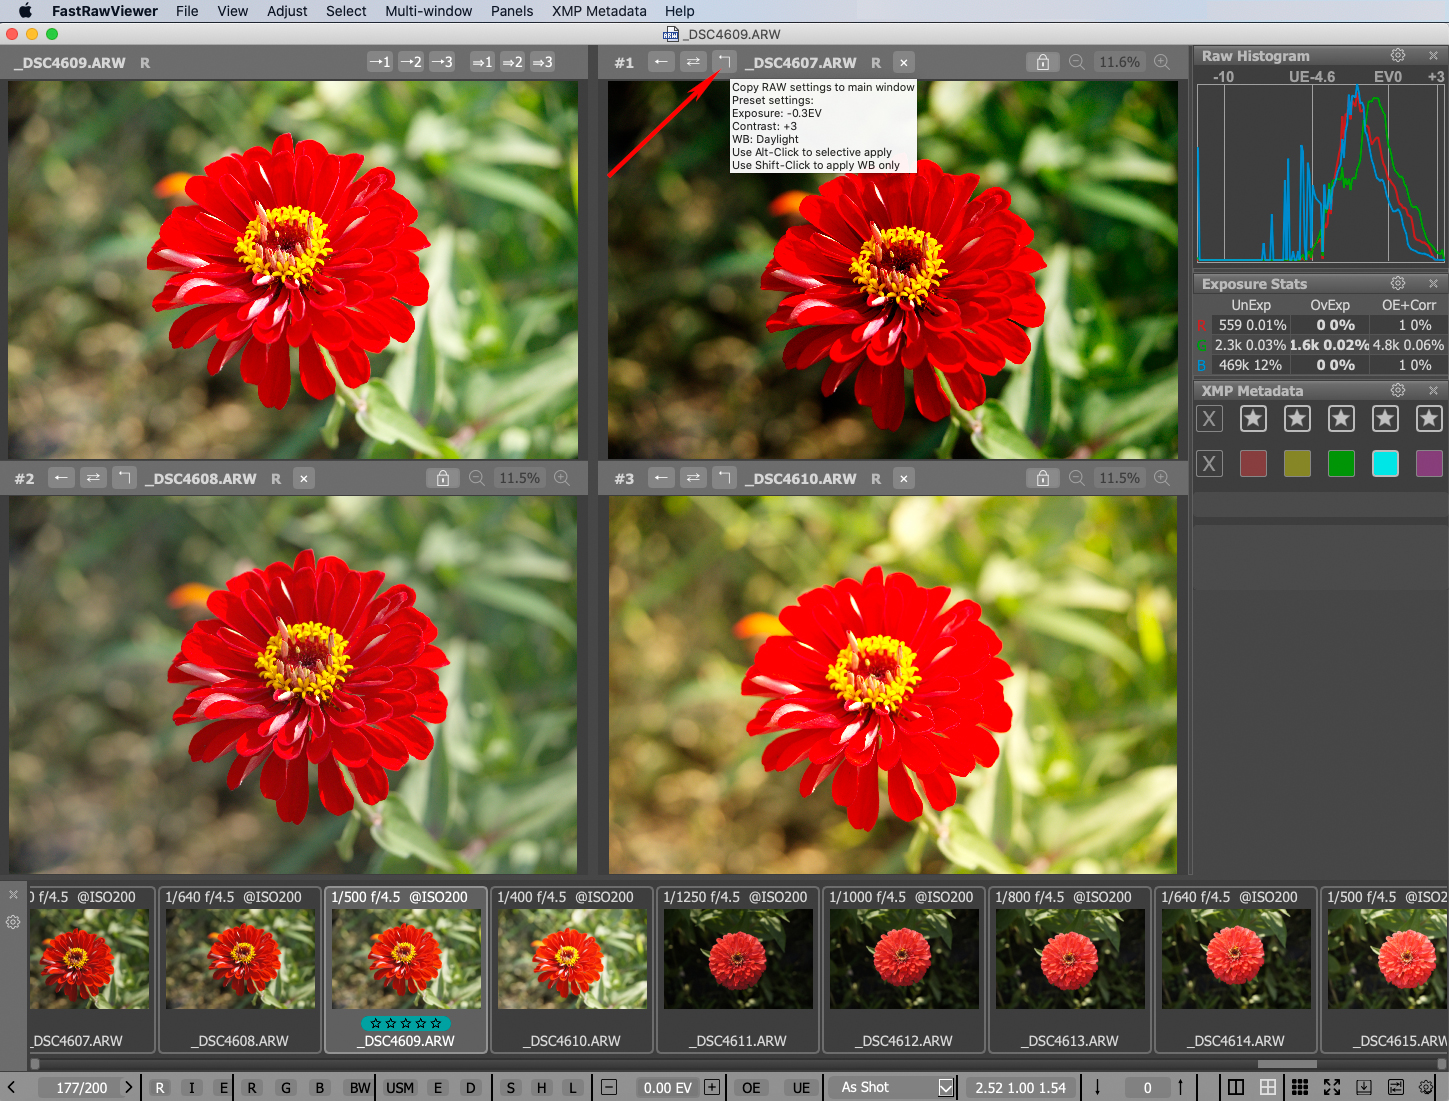
- When this is done, all the above-listed rendering parameters are copied.
- Shift-Click on the ↰ button in the top bar of the secondary window to only copy the white balance.
- Alt-Click (Option-Click for Mac) – opens a dialog window in which you can select which rendering parameters to copy
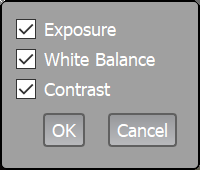
The checkbox settings in this window are saved for the duration of the session, and each secondary window has an individual list of settings.
Why Do We Have the Main - Secondary Window Distinction?
If all of the windows were treated as equal, then a multitude of logical and interface problems would emerge, for example:
- All actions that affect files (exposure, white balance, contrast) are immediately saved in an XMP sidecar file. As a result, the changes applied to one window would either have to be duplicated in all the windows where the file is opened (but then why do you need several windows?), or the results of the last change would have to be saved, leading to confusion and unwanted overwriting of the rendering parameters.
- The user would have to constantly keep track of the context for their actions; which window is currently active, and which will be affected by a hotkey? Which window will be affected when clicking Next File? If the same file is opened across several windows, will they all be flipped through?
By delineating one window as the main one, where all actions “with consequences” can happen, and which is affected by shortcuts (with the exception of shortcuts that affect their specific secondary window), the problem of context is solved.
Other Characteristics
- The contents of the secondary windows are only stored in the video card memory (GPU). This approach allows one to copy the contents between windows almost instantaneously, but these GPU-stored objects do not survive the computer entering sleep mode or hibernation.
- If a file that was displayed in a secondary window disappears from the zone of visibility (filtered out through Sort&Filter or moved to a different folder), the secondary window will be cleared and there will not be a move to the next file the way it happens for the main window.
Multi-window Mode Settings
The settings for Multi-window mode are located in a separate Multi-window mode tab of FastRawViewer Preferences.
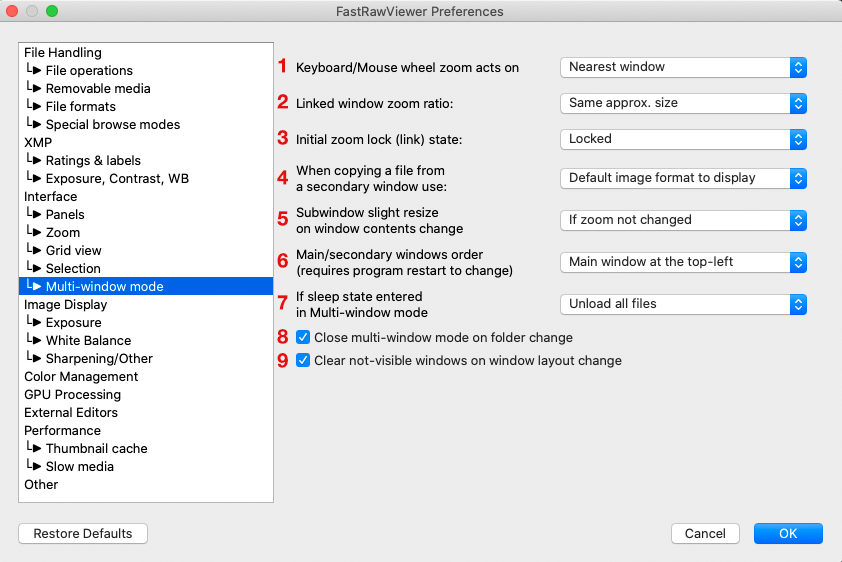
What’s in this window:
- Keyboard/Mouse wheel zoom acts on - which window is affected by the zoom hotkey:
- Main window – the main window
- Nearest window – the window closest to the mouse cursor
- Linked window zoom ratio - the method for calculating the zoom for images of different size:
- Same zoom – the same zoom size (“in percent”)
- Same width – same image width
- Same approx. size – same image size (length of the diagonal)
- Initial zoom lock (link) state - the state of the zoom lock when opening secondary windows:
- Locked – “closed padlock”
- Not locked – open
- Keep previous – the same as previous
- When copying a file from a secondary window use - determines what is displayed (RAW/Int. JPEG/Ext JPEG) when using functions “copy from secondary window” and “swap with secondary window”:
- Default Format to display: the displayed image type will be determined by the setting Preferences – File Formats – Default image
- Secondary window file format: the displayed image type will correspond to what is displayed in the secondary window.
- Subwindow slight resize on window contents change - some video cards/video drivers do not refresh the contents of the window even if the data for said window were changed. This setting turns on forced refresh:
- None – do not refresh
- If zoom not changed – refresh if the size of the zoom is unchanged
- Always – forcible refresh whenever the window refreshes.
- Main/secondary window order: this allows one to switch position of the main window between upper left and upper right.
- The change takes effect upon application restart.
- If sleep state entered in multi-window mode - what to do when the computer enters sleep mode (it is impossible in this case to save the contents of the secondary windows):
- Unload all files: clear all of the windows but stay in multi-window mode
- Switch to single-window mode: switch to single-window mode.
- Close multi-window mode on folder change: when moving to a different folder, multi-window mode will be turned off (if the checkbox is unchecked, then the mode will stay but the secondary windows will all be cleared).
- Clear non-visible windows in window layout change: what to do when part of the (secondary) windows stop being viewable (switching from 4 -> 2 windows or 4/2 -> 1 window). If the checkbox is checked, then the non-visible windows will be cleared.
Hotkeys
The hotkeys for multi-window mode are set through Shortcuts Editor - Multi-window operations tab.
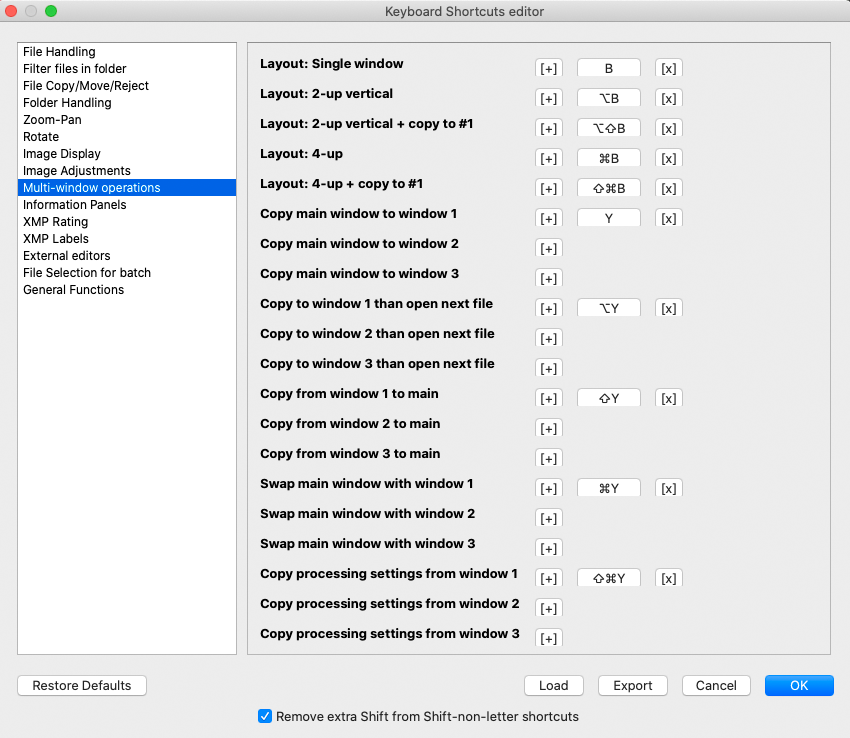
By default, only buttons for changing the window layout, and buttons for using secondary window #1 are set. Buttons for using the other windows can be set by the user in accordance with their preferences.
More about FastRawViewer 2.0 Features
Renaming Files
Either single files or groups, with optional use of renaming templates and a rename history
Improved User Interface
Advance Selection Mode in addition to the standard selection mode; Move from _Rejected; and more
Improved Performance
Accelerated image display, especially effective when using fast and slow data media at the same time
About FastRawViewer 2.0
What's new, Forewarnings: Limitations and Inherited Settings, System Requirements, Downloads
Comments
Shawn (not verified)
Thu, 08/05/2021 - 21:25
Permalink
Fantastic, thanks!
Wow, just randomly checked for updates and this most requested feature has been added and it works great! Also like what you came up with for handling this as far as the UI goes. Got my copy activated right away... Only thing I noticed is that even when working off my HDD it randomly gets stuck when I cycle through files rapidly.
lexa
Fri, 08/06/2021 - 02:37
Permalink
If you use magnetic/mechanica
If you use magnetic/mechanica HDD (not SSD), you may try to change in Preferences - Performance
- Parallel Prefetches decrease to 2
- Uncheck Auto-extend to if checked
This will add smoothnes to file changing (while will slightly decrease peak performance)
--
Alex Tutubalin/FastRawViewer team