FastRawViewer 1.7 User manual
Download the manual (in pdf format) - the same for both Windows and Mac OS X versions (the manual comes with the installation, too).
FastRawViewer is the first and the only dedicated tool specifically designed and developed for extremely fast display, visual and technical analysis, basic corrections, sorting and setting aside or directly transferring for further processing of RAW images.
How FastRawViewer Helps You
FastRawViewer (FRV) is the only solution for those who:
- Shoot in RAW and are tired of wasting hours or days on browsing through piles of shots and sorting them.
- Tired of rendering all those RAWs into JPEGs so that you can quickly browse through them with your client, CMO, senior designer, editor in chief; or show them to your friends and family members.
- Are in constant need of very quick viewing, visually and technically analyzing, sorting through hundreds or thousands of RAW shots, and selecting the apt ones for further processing.
- Want to shoot in RAW, but don’t, fearing to get mired in sorting RAW files.
- Are forced to use JPEG format, because your previous experiences tell you that it is impossible to quickly select and show your client the images taken in RAW.
- Are in need of tools to instantly adjust white balance and exposure (brightness) right while browsing through the shot.
FastRawViewer is the first and the only dedicated application with the purpose of extremely fast culling and pre-processing of RAW images: i.e. display, visual and technical analysis, applying basic corrections, sorting and setting aside or directly transferring the selected ones for further processing.
FastRawViewer Strengths:
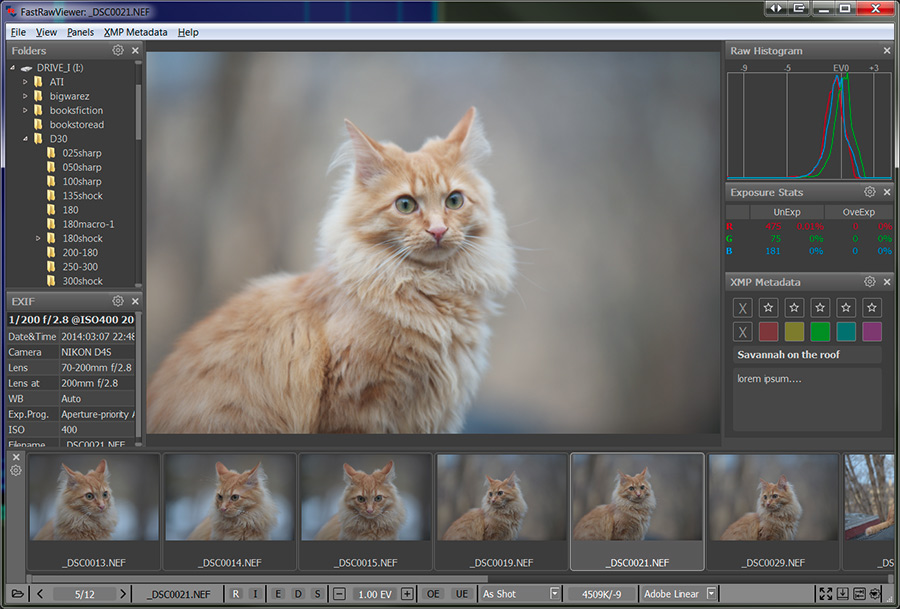
- Display of the actual RAW as well as the actual RAW histogram
- For the first time, a comfortable speed of RAW file viewing (together with histograms), provided by FastRawViewer using the power of modern processors and video cards to process RAW images:
- 6-15 frames per second on a modern desktop computer for files from modern photo cameras (16-50 Mpix, testing was conducted on a mix of shots from recent cameras, SSD recommended for peak performance).
- 24-30 frames per second for CinemaDNG 2.5k on the same equipment (we used Blackmagic Pocket Cinema files for testing).
- Support of almost every single existing RAW format (that is, almost every known digital camera)[1], including native out-of-camera DNG files as well as the files converted to DNG.
- Instant display of RAW files directly from any memory card or other file storage - without customary delays for importing, creating catalogues, libraries, and temporary databases.
- View JPEGs (including embedded JPEG thumbnails) – and also display the histograms.
- Support for TIFF, HEIF/HEIC and PNG formats – with histogram and EXIF data display.
- The convenience of working with the shots taken in the RAW + JPEG mode, with two files being paired:
- While listing through files, you have the option to ignore the second file in the pair.
- JPEGs (including embedded thumbnails) are considered to be “additional images” and are immediately accessible for viewing.
- When you move a file from the RAW + JPEG pair to another folder, the other file follows.
- And, of course, you can always switch this mode off, if you so choose, and treat the files as separate.
- The possibility of doing a quick visual and technical analysis by:
- Examining the real RAW histogram.
- Assessing the exposure based on:
- Spotlighting of over- and underexposed areas on the shot.
- Over- and underexposure statistics.
- Outlining the in-focus and highly detailed areas on the shot.
- Assessing per-channel exposure and acutance.
- Assessing the noise level in the shadows.
- Time-saver: exposure and white balance adjustments can be made while browsing RAW files and are saved in XMP files so that they can be automatically applied when you open that shot in Adobe Lightroom or Adobe Camera Raw.
- Time-saver for series, including panoramas: propagation of white balance, exposure, and image orientation adjustments from one shot to the entire series.
- Highly compatible system of assigning labels and ratings to images, including the user-defined labels. Ratings and labels are written into XMP files and are read by Adobe software (and others which acknowledge XMP sidecar files).
- Copying and moving the selected shots into folders chosen by the user.
- Moving the rejected shots into a special folder, which can be reviewed again later.
- Transferring the selected shots for further processing to a user-selected RAW converter directly from FastRawViewer.
- Support for black and white RAW, including shots from cameras converted to b/w by removing the color filter array.
- Warnings when FastRawViewer comes across a damaged RAW file.
- Monitor color profile support, without the loss of image rendering speed.
- Modifying settings to suite your workflow
- You can set your own keyboard (or keyboard+mouse) shortcuts for every action.
- The settings panel allows you to turn off the ones you don’t need, and change the others to your preferences.
Conventions in this Manual
The user manual is the same for Windows and Mac versions of FastRawViewer.
All of the standard keyboard shortcuts are given in Windows notation (for example, Ctrl-O).
For OS X please use the following substitutions:
- Ctrl on Windows – is Command on Mac.
- Alt on Windows – is Option on Mac.
All keyboard shortcuts are fully customizable (see below, the “Keyboard Shortcut Settings”). Throughout this text we will be using default program settings for keyboard / mouse shortcuts.
[1] With only one significant exception: Foveon cameras are not supported.