Program Settings
File Handling
This group of settings controls the file processing rules.
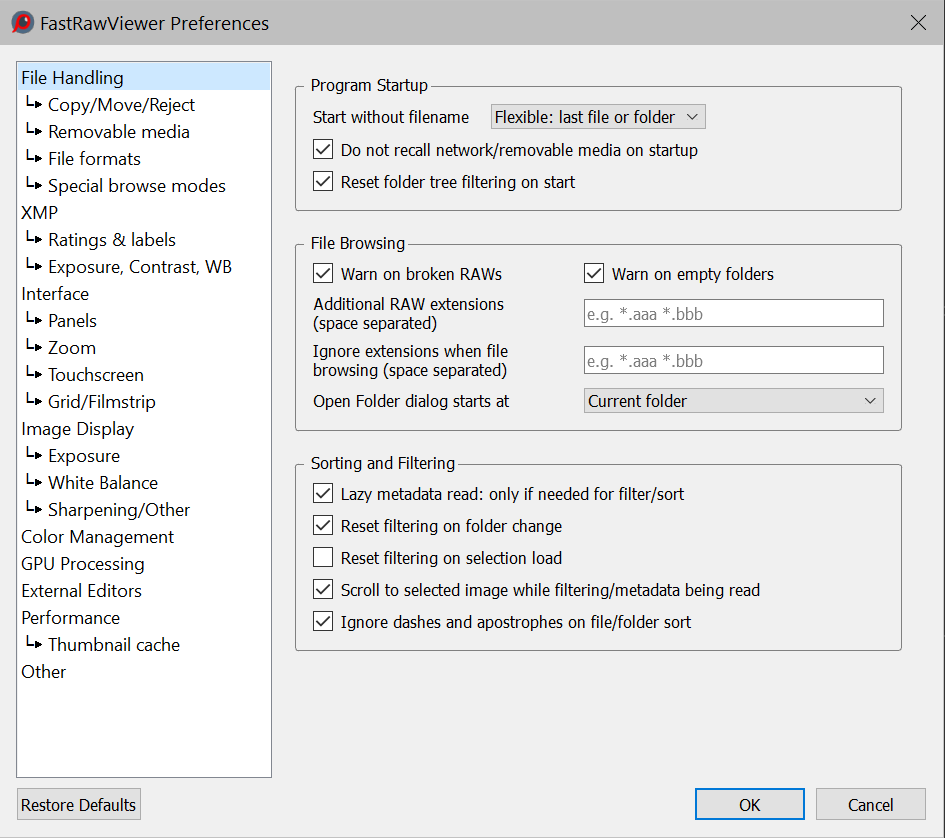
Program startup group
- Start without filename – to set the behavior if FastRawViewer was started without passing a filename to view:
- Empty Screen – FastRawViewer starts up "without file".
- Last opened file – opens the top (last) file from the Recent Files list.
- Last visited folder – opens the folder from the list of Recent Folders.
- Specified folder – allows you to set a "start folder".
- Flexible, last file or folder – opens last file or last folder, what it was later.
- Do not recall network/removable media – forbids the automatic display of files/folders from network volumes and removable media.
- Reset folder tree filtering on start – will clear folder filtering on program start.
File Browsing group
- Warn on broken RAWs – turns on the warning if a damaged RAW file is encountered.
- Warn on empty Folders – turns on notifications for situations when folders have no files the program can process.
- Additional RAW extensions – additional extensions for the RAW files FastRawViewer should process (appended to the built-in extension list).
- Ignore extensions when file browsing – this setting allows the user to supply a list of file extensions. Files having the extensions listed here:
- will be ignored during file browsing;
- will not be displayed in the "Open file" dialogue window.
- Open folder dialog starts at – sets the folder at which the “Open Folder” dialog starts:
- Current folder – Current folder.
- One level up – One level up.
- Specified folder – the folder specified by the user, always the same (until a different folder is specified here).
Sorting and Filtering Group
This group controls behavior for the sorting and filtering of files in the current folder.
- Lazy metadata read – if, for the current sorting/filtering method, file metadata (EXIF or XMP) isn’t necessary, then metadata won’t be read (ahead).
- Reset filtering on folder change – if this setting is turned on, then file filtering will be turned off when changing the current folder.
- Reset filtering on selection load – will reset file filtering when Menu – Select Load/Append selection from file is used. Without this option only not filtered files will marked based on file list loaded, while filtered out will remain invisible and so unmarked.
- Scroll to selected image while filtering/metadata being read – if metadata is necessary for filtering/sorting, then the files in the current folder will be re-sorted/re-filtered as metadata reading progresses. When this setting is turned on, Grid/Filmstrip will auto-scroll to the currently selected file (meaning scroll the Grid/Filmstrip at the same time as re-sorting/filtering – it will automatically return to the current file).
- Ignore dashes and apostrophes on file/folder sort – sorts files without accounting for punctuation marks in filenames.
Copy/Move/Reject
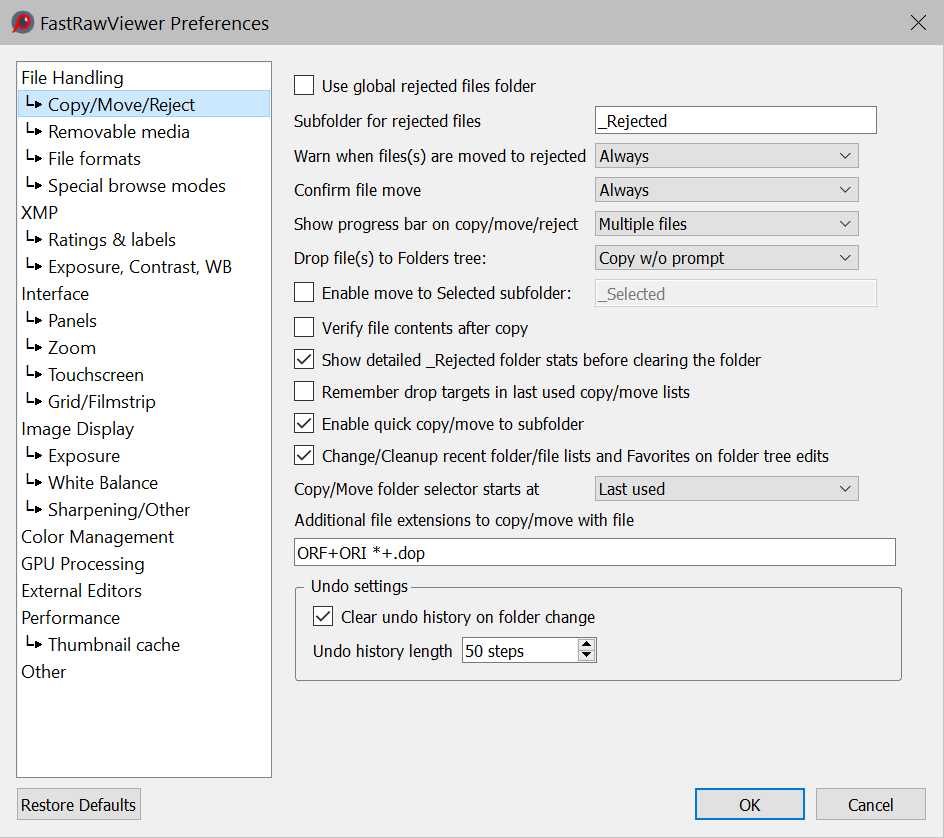
- Use global rejected folder – sets the folder for Rejected files as a global folder, or as a subfolder in the current folder (checkbox is unchecked).
- Subfolder for rejected files – the name of the subfolder to store the rejected files.
- Warn when file(s) are moved to rejected – customizes the warning settings for when files are moved to the _Rejected subfolder:
- No – never warn me.
- Always – always warn me.
- Multiple files – warn only moving several files to the _Rejected subfolder.
- Confirm file move – customizes the warning about moving a file(s) to the same destination as for the previous operation, with same options as for the setting directly above this.
- Show progress bar on copy/move/reject – controls the display of the progress bar for these operations (the progress bar also allows to stop the operation, if necessary).
- Drop file(s) to folders tree – allows one to select one of the following drop modes:
- Copy w/o prompt – the file is copied; no user confirmation is requested.
- Select copy or move – at each drop action, the user will be prompted to select what to do with the file (copy, move, cancel the action).
- Move files – the files will be moved, while the request for confirmation is controlled by the Confirm file move checkbox in the same Copy/Move/Reject pane.
- Enable move to _Selected subolder – turns on support for the _Selected subfolder, you can set a custom name for it in the neighboring field.
- Verify file contents after copy – turns on the verification of files after copying or moving a file to another file system.
- Show detailed _Rejected folder stats before clearing the folder – enables extended statistics for files to be deleted: (NN RAW files, MM RAW+JPEG…)
- Remember drop targets in last used copy/move lists – turns on the recording of the names of folders that are used in drag and drop to the list of folders in copy file to/move file to.
- Change/Cleanup recent folders/file lists and favorites on folder tree edits – when renaming folders, whether to rename/remove elements in the Recent files/Recent folders/Favorite folders lists, etc.
- Allow move/reject for locked files (Mac only) – allows for the moving/copying of locked files.
- Copy/Move folder selector starts at – controls the dialog to select a destination folder when preforming copy/move operations, with the following options:
- Last used – the folder that was used last for Copy or Move operation (for Copy and Move, separate “last used” lists are kept).
- One level up from last used – a folder one level above (“parent”) the previous option.
- Current folder – current folder
- One level up from current folder – a folder one level above (“parent”) the previous option.
- Specified folder – the specified folder (an additional text line input will pop up to enter the folder path with folder selection button).
- Additional file extensions to copy/move with file. Allows one to list the additional file extensions of the files to be copied/moved along with the main (raw) file of the given extension.
Syntax: RAWext+AUXext, several such pairs can be listed, separated by spaces. If AUXExt starts with a dot, then the extension will be added to the end of the FILENAME.RAWext (FILENAME.RAWext.AUXExt); if it starts with a letter, then RAWext will be replaced by AUXext, forming FILENAME.AUXExt. An asterisk (*) can be indicated in place of RAWext, in this case, this will be applied to all files.
Default: ORF+ORI *+.dop
means: copy FILENAME.ORI along with FILENAME.ORF, and copy FILENAME.EXT.dop along with FILENAME.EXT (.dop is a DXO Photolab file containing metadata)
Attention: the rules that govern copying JPG, XMP, .rpps are defined separately via the Handle RAW+JPEG together, Use XMP, Write RPPS files settings, accordingly.
- Undo settings – Customizing the Undo mode:
- Clear undo history on folder change – clears the undo history when the undo is changed.
- Undo history length – sets the number of undo levels.
Removable Media
This group of settings sets the specifics of work with removable media and network volumes.
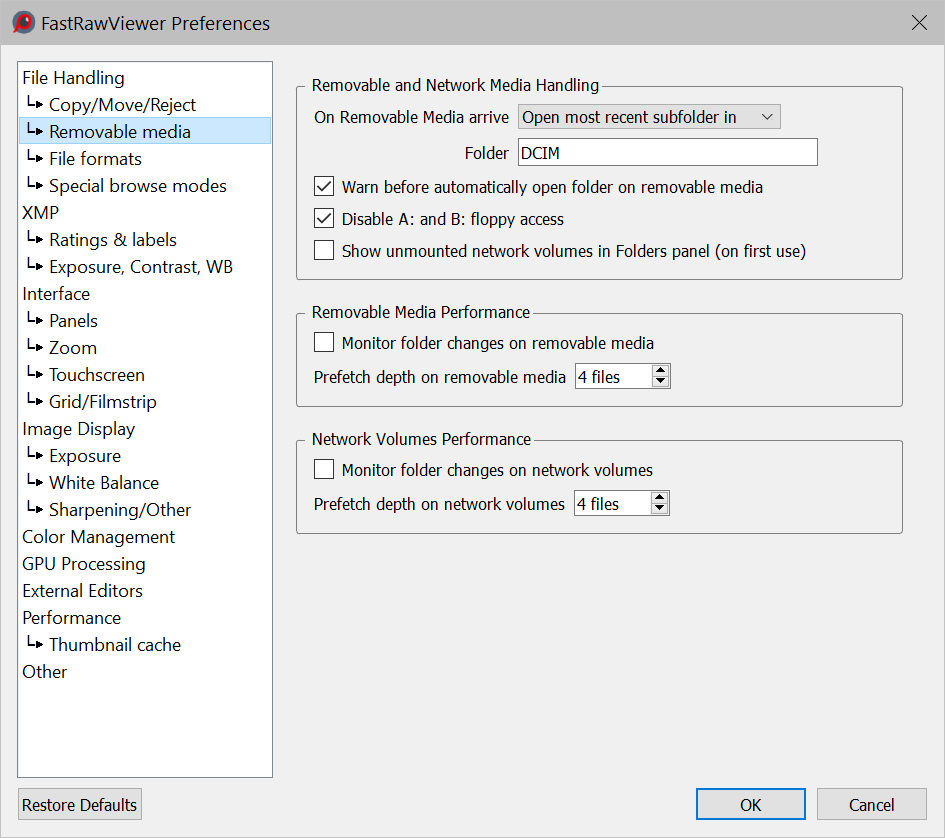
- On removable media arrive – what to do when removable media is detected:
- Open most recent subfolder in – opens the most recent (by date of modification) subfolder in the selected folder (/DCIM by default).
- Open folder – opens the selected folder.
- Do nothing – Do Nothing.
- Open in subfolder browse mode – opens the indicated folder together with the nested folders (with this, the depth of subfolder browsing is fixed: two levels).
- Warn before automatically open folder on removable media – display a warning before automatically opening a folder on removable media.
- Disable A: and B: floppy access – prevents any access to the A: and B: drives, as well as monitoring of changing media for those drives (Windows only). This preference is intended for the (fairly common in our day) case of a computer having a floppy drive controller, and one or two drives being “visible” to the system, though they’re not actually present.
- Show unmounted network volumes in Folders panel
– this setting will switch on the display of the contents of the current un-mounted volume in this panel (if this setting is Off, the network devices that do not have a drive letter assigned will not be displayed). - Monitor folder changes on removable media/network volumes – monitor changes in removable media/network volume folders, updating the Folders and Filmstrip panels when new subfolders and files are added.
- Prefetch depth on removable media/network volumes – sets how many files to decode before moving to the next file.
File formats
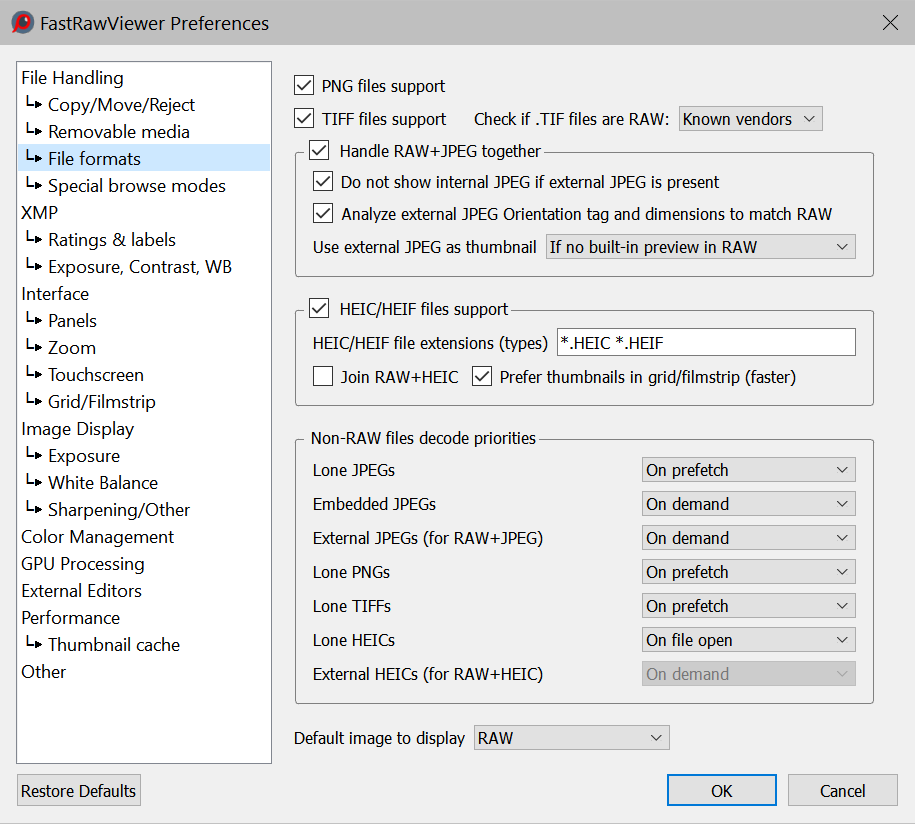
- PNG file support, TIFF files support – turns on support for the respective formats.
- Check if .TIF files are RAW: The point of this is the following: some (old) cameras wrote RAW files with the .TIF extension. Accordingly, FastRawViewer checked each TIF file to see "is this a RAW file," which in some cases leads to false triggers. This setting organizes the above-described checking procedure in the following way:
- Do not check: consider .TIF files to be just TIF files, without suspecting them of being RAW
- Known vendors: check the file to determine camera manufacturer, only trust a "this is RAW" verdict if the "vendor / number of colors in the file" combination fits known cases. This is the default, and it should work in 99% of cases
- All TIFF files: same behavior as for FastRawViewer 1.5.0 - 1.6.0
- Handle RAW+JPEG together – turns on the pairing of RAW and JPEG of the same name: displaying them as different representations of the same image, and treating them as a single unit for move operations, so that both are relocated to a different folder when a move operation is invoked.
- Do not show internal JPEG if external JPEG is present – removes the embedded JPEG from the list of available representations if there is an external JPEG (which, usually, has better resolution).
- Analyze external JPEG Orientation tag and image dimensions to match RAW
– FastRawViewer will rotate the external JPEG if necessary, to match the orientation of the RAW image. - Use external JPEG as thumbnail: use external (associated) JPEG for thumbnail generation (in most cases this is much slower than embedded JPEG decoding):
- Do not use: if no embedded thumbnail present, ‘No preview’ will be displayed in Grid/Filmstrip
- If no built-in preview in RAW: use only if no embedded preview present in RAW.
- Prefer external JPEG: use associated JPEG (if any) even if embedded preview present in RAW.
- HEIC/HEIF files support – turns on support for HEIC/HEIF files.
- HEIC/HEIF file extensions (types) – the list of file extensions for files that are considered to be HEIC/HEIF
- Join RAW+HEIC – joins a RAW and a HEIC/HEIF (analogous to RAW+JPEG mode)
- Prefer thumbnails in grid/filmstrip – in cases when the size of the thumbnail embedded in the HEIC file is smaller than the thumbnail size set in FastRawViewer, this setting controls whether to “zoom up” the embedded thumbnail (this is quicker) or build a preview from the full-resolution data.
- Non-RAW files decode priorities – sets the decoding mode for each RGB file type (Lone JPEGs/TIFFs/PNGs, not paired with RAW; embedded JPEGs, contained in RAW files; external JPEGs, paired with RAW, as in RAW+JPEG:
- None – do not decode at all (only for Embedded/External JPEGs)
- On demand – the decoding will happen during switching from RAW to JPEG (only for Embedded/External JPEGs also)
- On file open – the decoding will happen during the file load
- On prefetch – the decoding happens in advance, decoded data is cached.
- Default image to display – which representation to display when switching to the next file:
- Same as previous – the same as for the current file.
- RAW, internal JPEG, external JPEG – explicit designation of the representation.
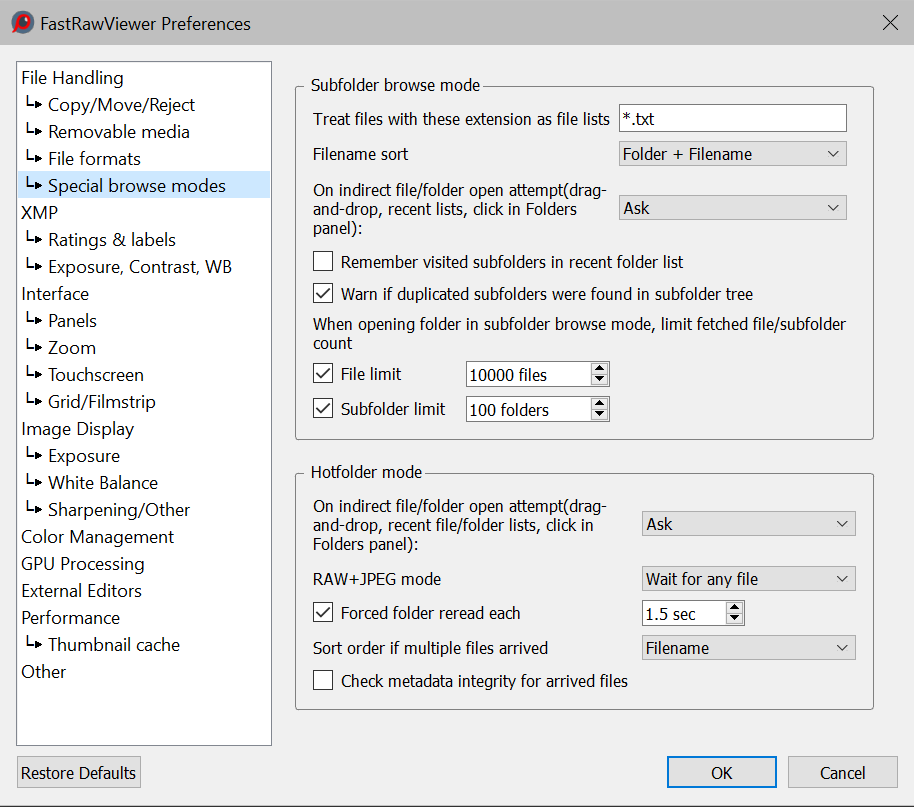
Special browse modes
This group of settings controls special folder browse modes
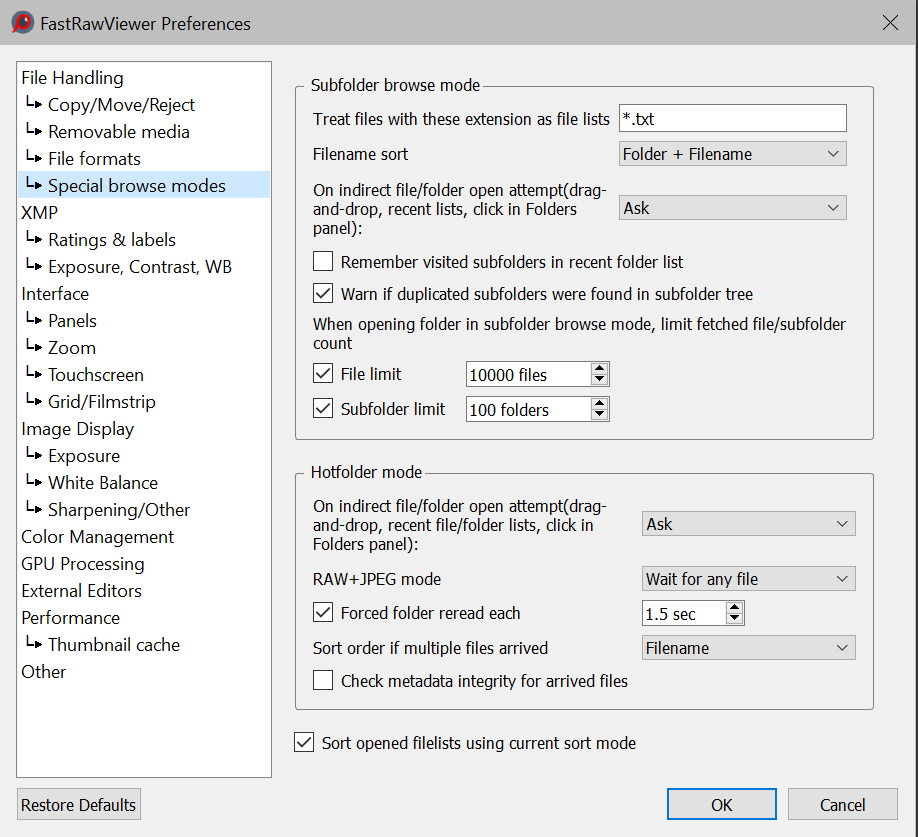
Subfolder browse mode group: settings for subfolder browse mode:
- Treat files with these extensions as file lists – sets the list of extensions that will be treated as files containing lists of files: this will open them as a list when Drag and dropping, and these extensions will be offered when reading or saving lists of files.
- Filename sort in subfolder browse mode:
- Folder + Filename – consider the full name of the folder where the file is located when sorting
- Filename – sort only by filename
- On indirect file/folder open attempt…. what to do with an indirect move out of subfolder browse mode:
- Ignore: stay in subfolder browse mode.
- Ask: ask
- Open w/o confirmation: move to default mode without asking.
- Remember visited subfolders in recent folder list: the subfolders that were visited when viewing files in subfolder browse mode will be remembered in the list of Recent folders.
- Warn if duplicated subfolders were found in subfolder tree: if, when scanning the subfolder tree, duplicates are found (cyclic symbolic links, symbolic links or folders with the same name but different letter cases), then a warning will be displayed. If this setting is turned off, duplicates will be ignored.
- Limits on the depths of subfolder scanning
- File limit: stop scanning if the indicated number of files is found
- Subfolder limit: stop scanning if the indicated number of subfolders is found.
This limit is not a hard one: if, while scanning, 99 subfolders are found, and in the next folder there are a further 1000, then in all 1099 subfolders will be browsed, but the program will not go any deeper.
Hotfolder mode group: settings for folder monitoring mode:
- On indirect file/folder open attempt…. – what to do if, while in Hotfolder mode, the current folder is changed, or there was an “indirect” file opening (Drag and Drop):
- Ignore – do not open the new file/folder, stay in Hotfolder mode.
- Ask – asks
- Open w/o confirmation – interrupt the Hotfolder mode, open the indicated file/folder.
- RAW+JPEG mode: this setting is available if
- Wait for any file – all files that appear in the folder will be opened.
- Wait for RAW file – only RAW files will be opened
- Wait for pair – only legitimate RAW+JPEG pairs will be opened
- Forced folder reread each – forces a reread of the folder with the indicated frequency (if this is turned off, then only a notification from the operating system that “something in the folder has changed” will be used).
- Sort order if multiple files arrived – if several files appear in the folder, they will be sorted according to this setting and the last of them will be displayed.
- Check metadata integrity for arrived files – for new files that appear, the integrity of the metadata will be checked.
Filelist mode settings (not marked as group)
- Sort opened filelists using current sort mode – if checked (default), opened file lists will be sorted according to current sort mode. If not checked: file list order will be preserved.
XMP
This group of settings controls the processing of XMP files
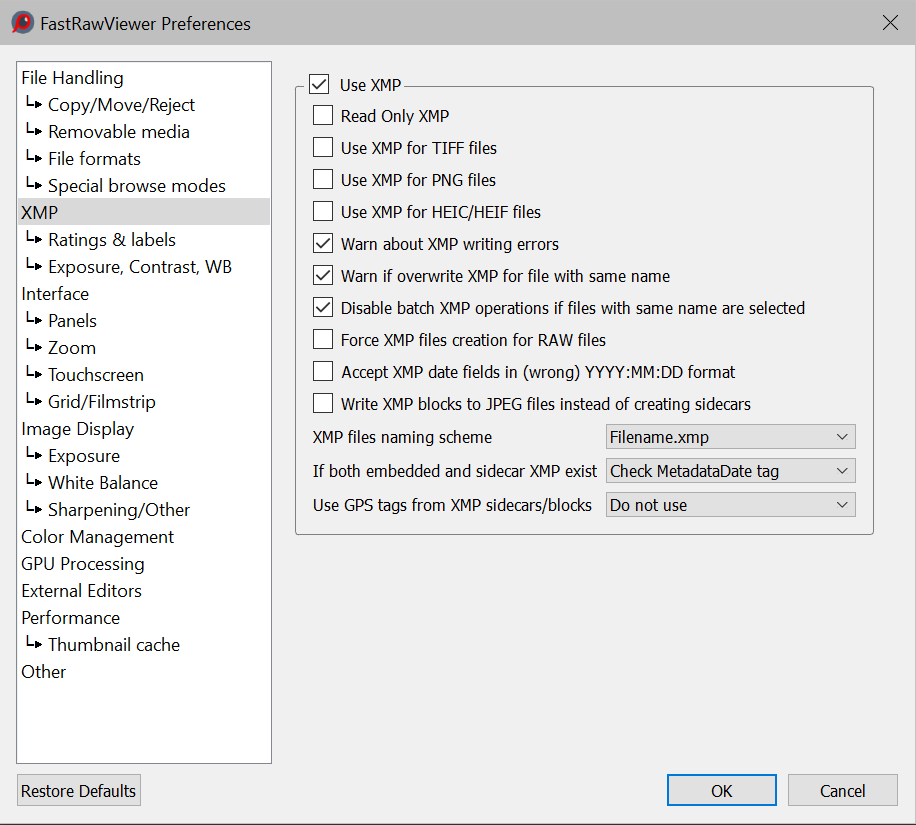
- Use XMP – turns on/off the use of XMP files.
- Read Only XMP – turns on the mode, where XMP files are read, but not changed.
- Use XMP for TIFF/PNG/HEIC-HEIF files – turns on XMP support for files of the indicated type.
- Warn about XMP writing errors – informs the user of any errors that occurred during the XMP file recording process.
- Warn if overwrite XMP for file with same name – If it is "on", FastRawViewer will ask user for confirmation before overwriting an XMP sidecar file containing settings for a file with the same name but different extension.
- Disable batch XMP operations if files with same name are selected – If it is "on" (default) and the selected files contain filenames that differ in extension only, the batch editing of XMP (setting or changing orientation, labels, ratings) will be grayed out / disabled in Menus and in context menu.
- Force XMP file creation for RAW files – turns on the unconditional creation of XMP files, even if no adjustments were changed manually while viewing the RAW file (those adjustments are orientation, white balance, exposure adjustment, labels and ratings). Useful for automatic propagation of adjustments to the next file.
- Accept XMP date fields in (wrong) YYYY:MM:DD format – some applications may write incorrect XMP date tags with YYYY:MM:DD date format (instead of ISO 8061 YYYY-MM-DD). This setting allows correct parsing of that tags. Disabled by default because most tools use correct format.
- Write XMP blocks to JPEG files instead of creating sidecars – when working with JPEG files, record XMP blocks directly to the JPEG files, instead of creating sidecar files.
- Fallback to XMP sidecar if XMP block write to JPEG fails – if XMP block could not be recorded into JPEG file (e.g. because of read-only file), FastRawViewer will create XMP sidecar file for this JPEG file.
- Restore original JPEG file date after writing XMP block – if this setting is turned on, then after writing an XMP block, the original file modification data will be restored.
- RAW+JPEG mode: embed XMP block into JPEG – in RAW+JPEG mode, writes not only XMP sidecars, but also XMP blocks into JPEG files.
- XMP files naming scheme:
- Filename.xmp, Filename.XMP – sets the naming scheme to be without indicating the source extension of the RAW file, and selects the preferred extension case.
- Filename.ext.xmp, Filename.ext.XMP – naming scheme with source extensions is set.
- If both embedded and sidecar…. – sets the criterion for choosing between two XMP sets of data, embedded in the file or XMP sidecar: analyze the metadata, or always take the sidecar.
- Use GPS tags from XMP….:
- Do not use: always take GPS data (only) from EXIF
- Prefer EXIF, Prefer XMP: if GPS data is available both in EXIF and in the XMP, prefer the source that is indicated
Ratings & Labels
This section dedicated to XMP:Rating and XMP:Label tags creation
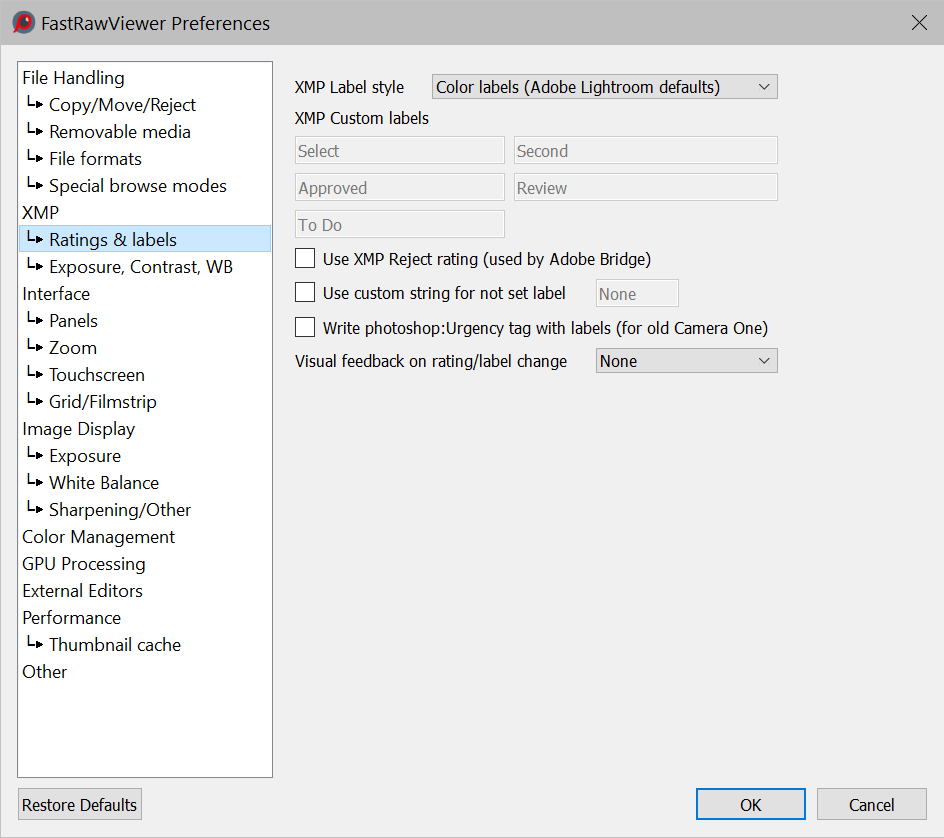
- Use XMP Reject Rating – turns on the possibility of setting the rating to -1. This rating is supported in Adobe Bridge. The setting is turned on automatically when selecting XMP Label Style: Adobe Bridge.
- XMP Label Style – sets the label format in XMP files:
- Adobe Bridge: Select, Second, Approved, Review, To Do.
- Color labels/Adobe Lightroom: Red, Yellow, Green, Blue, Purple.
- Review status/Adobe Lightroom: To Delete, Color Correction Needed, Good to Use, Retouching Needed, To Print.
- Custom – user labels (any text you choose).
- Use custom string for not set labels – allows one to set text for a un-set mark (if the text isn’t set, then when setting a mark in “un-set” the xmp:Label tag is deleted from the XMP file).
This is intended for use with the PhaseOne C1 program, which doesn’t reread deleted tags from modified files, but does reread xmp:Label=None. - Write photoshop:Urgency tag with color labels (for PhaseOne C1) – Turns on the recording of the XMP-tag photoshop:Urgency, which is used by CaptureOne to recognize and set color labels. The setting is activated only if the mode XMP labels is set in 'Color Labels' (this is the default). In other modes, the XMP Labels photoshop:Urgency tag is not modified: if it was in the XMP file, it stays unchanged.
- Visual feedback on rating label change – give easily-seen visual feedback when ratings/labels are changed (as in Adobe Lightroom).
Exposure, Contrast, WB
This section defines processing settings transfer to Adobe software
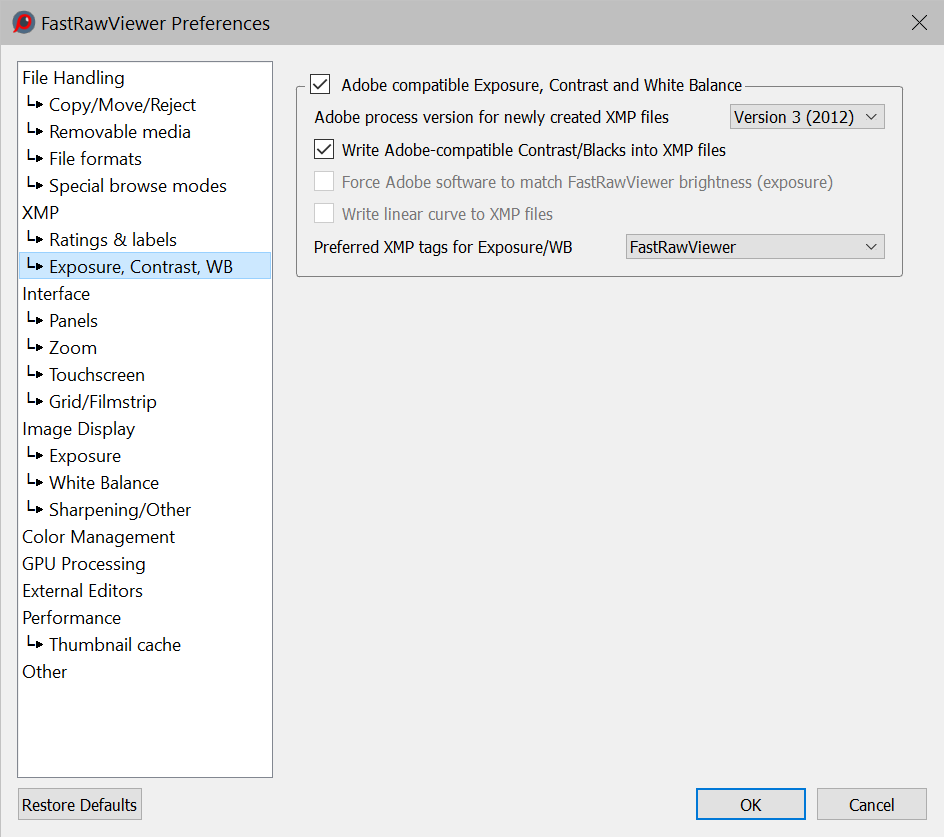
- Adobe compatible Exposure and White Balance – turns on reading and recording into XMP files exposure compensation and white balance in Adobe format:
- Adobe process version for newly created XMP files. Default: Version 3 (2012), can be set to Version 1 (2003)…. Version 5 (2019).
Features:
- If the tag crs:ProcessVersion is set already in XMP file, the version doesn't change and the exposure is written according to the version.
- If the crs:ProcessVersion tag isn't present in XMP file, then it's added in accordance to the setting (this way, XMP-files created in older versions of FastRawViewer and then not changed by ACR/LR will be "upgraded");
- For Version 3 – Version 5 process, Exposure2012 (equal to expo correction in FastRawViewer plus Adobe Shift) and the tags Contrast2012, Whites2012, Blacks2012 (set to 0, if these tags are not present in the file) are recorded.
- For the Version 1/2 (2003/2010) processes the tags crs:Exposure, crs:Brightness, and crs:Contrast are recorded (if the file already had the values for those tags, they are preserved, otherwise they are set to 0).
- Write adobe-compatible Contrast/Blacks into XMP files – enables the recording of the contrast settings in the Adobe-compatible format.
- Force Adobe software to match FastRawViewer brightness – Available only if the Image Display - Exposure - Apply Adobe hidden exposure correction setting is not checked. This will result in silent "exposure boost" / baseline exposure rolled off in Adobe CameraRAW/Lightroom, preventing false clipping indication and allowing to re-gain the highlights that are not truely clipped.
- Write linear curve to XMP – this setting It is available if the following is already selected:
XMP - Exposure,Contrast,WB - Adobe process version: Version 2 (2010);
Image display - Contrast curve type: any fixed contrast one (sRGB, gamma 1.8, 2.2, L*);
If this new setting is enabled, Adobe-compatible exposure and white balance tags will be written with following additions and amendments:- the curve will be set to Linear (both name and values)
- tag crs:Shadows will be set to 0
- tag crs:ProcessVersion=5.7 will be forced
- tags crs:ToneCurvePV2012, crs:ToneCurvePV2012Red, crs:ToneCurvePV2012Green, crs:ToneCurvePV2012Blue will be deleted
- Preferred tags for Exposure/WB – controls the priority of FastRawViewer/Adobe exposure and white tags:
- FastRawViewer – use tags recorded in FastRawViewer (libraw: ), if they exist.
- Adobe Camera Raw/Lr – use Adobe tags
- Flexible: last recorded – choose between FastRawViewer/Adobe according to the date of the last change made to the file (only works with the FastRawViewer tags of version 1.4 or newer).
Interface
The group of settings for user interface adjustments.
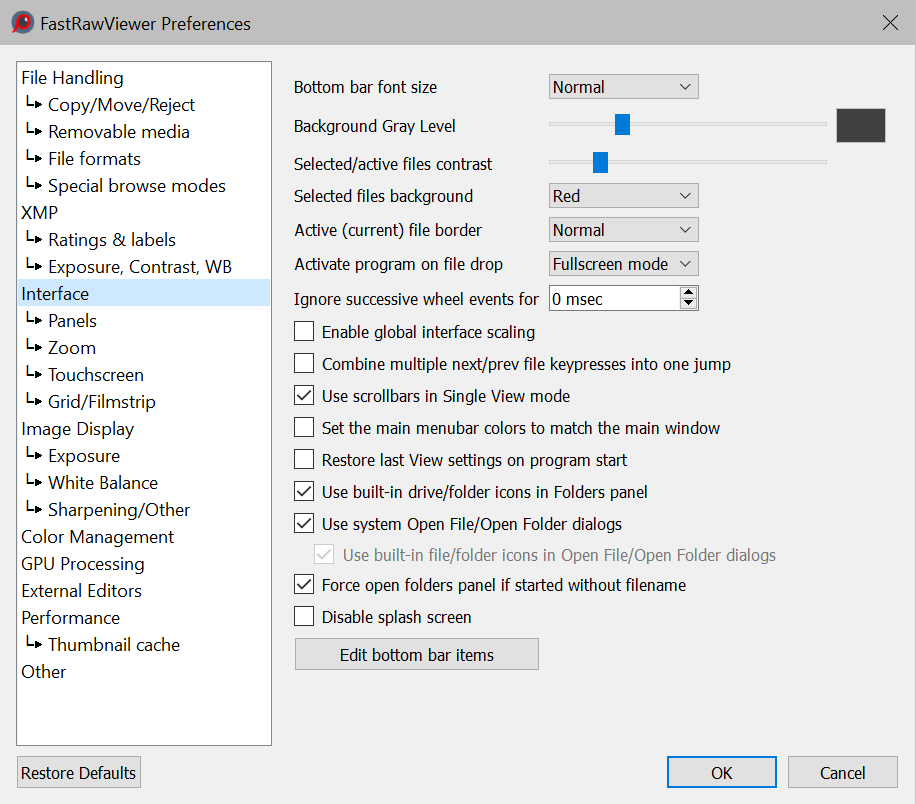
- Bottom bar font size – controls bottom bar font size (Small – Extra Large on Windows and Normal – Extra Large on OS X).
- Background Gray level allows you set the brightness of the main program window background.
- Selected/active files contrast – allows one to change the contrast (against the FastRawViewer background) of selected or active files when showing them in Grid mode or in the Filmstrip panel.
- Selected files background – allows one to set the background color for selected files.
- Active (current) file border – to set the color for the frame around the current file.
- Activate program on file drop – controls program behavior for file Drag-n-Drop operations and if started in ‘Single instance’ mode:
- None – the program remains on the background (if it is already there)
- Fullscreen – the program brings itself to the foreground if it is in Fullscreen mode
- Always – the program brings itself to the foreground for both Fullscreen and “windowed” modes.
- Ignore successive wheel events for NN msec – this setting is designed to tame the stream of events generated by mouse wheel, Apple Magic Mouse, or trackpad.
- Enable global interface scaling (and additional controls if checked): Controls global UI scaling, intended for HiDPI displays. If checked, additional drop-down will open with selectable choices:
- Auto: use automated scaling calculations
- Manual: use fixed UI items increase
- Env. Variable: use external settings via QT*SCALE* environment variables.
- Combine multiple next/prev file keypresses into one jump:
With the default settings, FRV will store up to 5 clicks of the navigation buttons and executes them sequentially (this can be turned off and back on using the DisableNextPrevQueue / EnableNextPrevQueue additional settings scripts).
If discussed setting is turned on:
- The size of the queue in which button clicks are stored is not limited.
- The queue is executed “in a single step” – the file to which the program needs to jump is calculated based on what is stored in the queue and the currently-open file; all intermediate files are skipped.
- Use scrollbars in Single View mode: turns on the Scrollbars in the single file view window (only for Windows and macOS 10.12+).
- Set the main menubar colors to match the main window – (Windows only) colors of main menu bar will match main window color scheme
Note: color of program top bar is controlled by Windows and could be edited only via Windows Colors Control Panel/PC Settings page.
- Restore last View settings on program start – when closing the program the following image display parameters are saved (independent of the status of the settings):
- Display mode (RGB, per-channel, BW Conversion)
- Focus Peaking mode
- Boost Shadows mode
- Exposure correction on/off
If 'Restore last View settings' is turned on, then during the next start-up of the program, the above-listed parameters will be in effect.
- Use built-in drive/folder icons in Folders panel – show icons built-in into FastRawViewer in the Folders panel (in several cases, using the system’s icon can lead to problems).
- Use system Open file/Open folder dialogs – switches between standard and smaller dialogs when opening files/folders.
- Use built-in file/folder icons in Open File/Open Folder dialogs – when using non-system dialogs for opening files/folders – use built-in icons.
- Force open Folders panel if started without filename – if this setting is on, starting the program without a file to be opened, or with an invalid / non-existent filename will result in the display of Folders panel, even if this panel was switched off previously.
- Disable splash screen – switches off the display of logo at FastRawViewer start.
- Edit bottom bar items – launches the dialog that allows one edit the composition of the program’s bottom bar.
Panels

- Panel’s font size: sets the font size in the informational panels.
- Panels color scheme – sets the brightness of the panel background.
- Hide Menu bar when hiding information panels – for the hide informational panels mode (Tab), controls if the menu bar should be hidden too.
- Hide bottom window bar when hiding information panels – hide main program window status bar in ‘hide information panels’ (Tab key) mode.
- Disable transparency for panels outside of main window – allows disabling transparency for informational panels that are placed completely outside the main program window.
- Dim Histogram/Stats/Exif panels while changing files – enables dimming of those panels for the time needed to switch to the next file. Dimming takes additional 6 to 15 milliseconds, if maximum performance is needed, you can turn this off.
- Restore Panels -> Hide all state on program start – allows the program to recall the “all panels are hidden” state when it’s opened.
Attention: the setting Interface -> Force open Folders panel if started without filename activates AFTER Restore Panels -> Hide All. If you want to always start without panels, you will need to either explicitly close them all, or turn off Force open folders.
- Hide floating panels – controls floating (not “docked”) informational panels behavior on Menu-Panels-Hide All panels action:
- Hide all – hide all panels
- Those inside main window – hide only panels, that float within main program window
- Do not hide – do not hide floating panels
Zoom
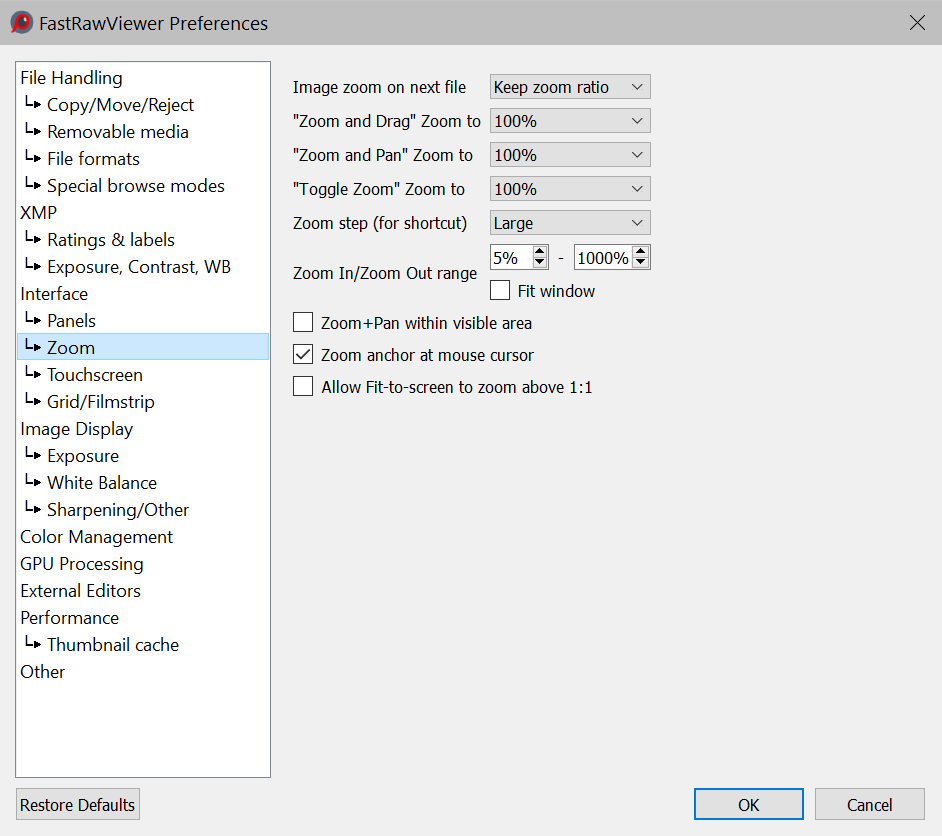
- Image zoom on next file – sets the zoom factor to be used when displaying the next file:
- Keep zoom ratio – will keep the zoom factor.
- Keep image width – will keep the visible width of the image
- Fit to window – the Fit to screen mode will be turned on.
- Fit to width – the image takes up the entire width of the window.
- Zoom and Drag Zoom to – sets zoom factor to use in the Zoom and Drag mode (Shift – left mouse click).
- Zoom and Pan Zoom to – sets zoom factor to use in the Zoom and Pan mode (Shift – right mouse click).
- Toggle Zoom Zoom to – sets the magnification/zoom level used for the Toggle Zoom (Z) mode.
- Zoom step (for shortcut) – controls the zoom step for keyboard (and mouse) shortcuts:
- Large – fixed zoom step value of about 50%, to be used for keyboard control.
- Medium – zoom step is set to 20%.
- Small – zoom step is set to 5%.
The last two settings are designed to be used while zooming with the Mouse Wheel or trackpad.
- Zoom In/Zoom Out range sets the range for zoom values for Zoom In/Out actions for any zoom mode, be it through menu, keyboard shortcuts, or mouse wheel.
Fit to Window – sets the minimum zoom level such that the image fits in the window. - Zoom+Pan within visible area – if this setting is on, then the panning will take place inside the area visible before the start of the panning. If it is off, then the panning will be over the entire image.
- Allow Fit-to-screen to zoom above 1:1 – this allows one to zoom (small) images to more than 100% in the Fit To Screen/Fit to Width modes.
- Zoom anchor at mouse cursor – zooming will happen taking the position of the mouse cursor into account; the point underneath it will retain its position respective of the window during zooming.
- Use Logical pixels for zoom calculation (macOS/Mac OS X only):
- If turned on (default, "legacy" behavior), then the pixel in the screen is considered to be the "logical pixel" (in the case of Retina, it's a block of 2x2 "physical" pixels) and the calculation of the zoom size is done in these units.
- If turned off, the zoom value is calculated in "physical pixels", so for Retina screens the displayed zoom value will now be doubled, and at 100% zoom the image will be half the size compared to "legacy" behavior.
Touchscreen
The settings in this group control working with the touchscreen
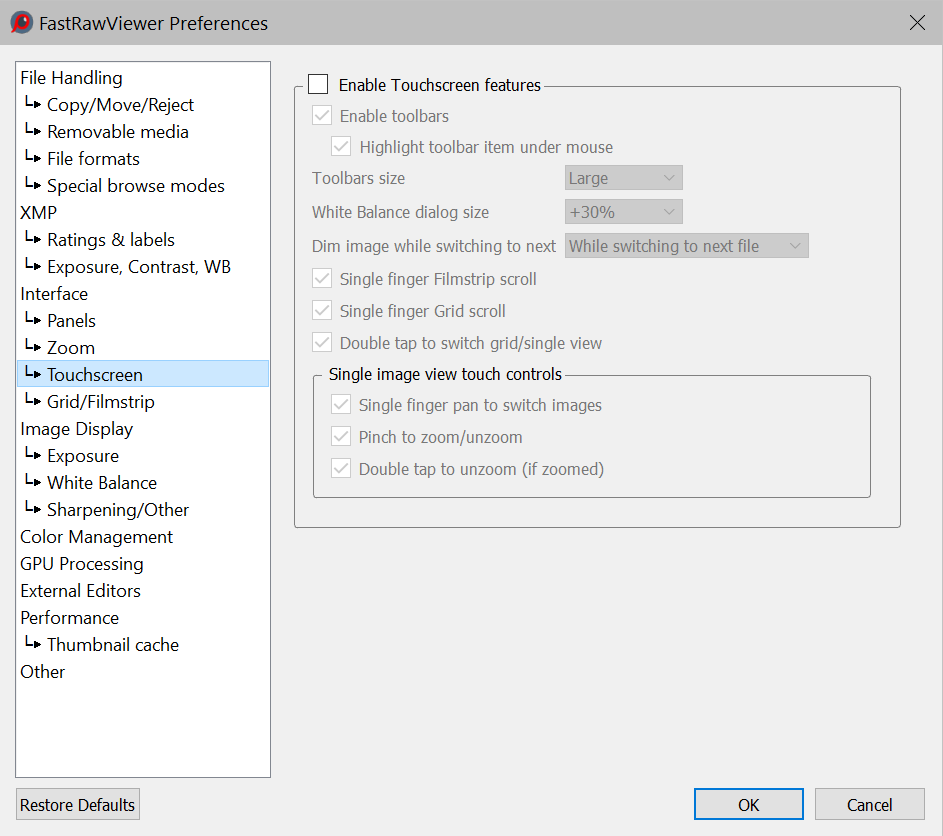
Touchscreen support is off by default, to turn it on one ought to use the setting Enable Touchscreen features. After it’s turned on, the following settings become available:
- Enable Toolbars – turns on toolbars (their visibility can be controlled through Menu – Panels – Toolbars).
- Highlight toolbar item under mouse – default: "on". If it is set to "off", the toolbar button under the mouse is not highlighted.
This setting is meant to be used with a "true" touchscreen: when a button is pressed with a finger, the last location where the pressure was detected is stored in the system as a cursor position, and the respective button remains highlighted even if the button itself doesn't change its status. This setting switches such highlighting off.
- Toolbars size – controls the size of the toolbar icons.
- White Balance dialog size – it allows to enlarge the dialog size when manually setting the white balance in touchscreen mode. Standard value: +30% (over normal).
- Dim image while switching to next – gives visual feedback about the status of the image moving to another image:
- Do not dim – works as previous; no brightness decreases while switching between images
- While switching to next file – decreases the brightness by 40% while in the process of switching to another image. This is the default.
- Next file or RAW/JPEG switch – the same as previous, plus a 25% decrease in brightness when switching between RAW and JPEG.
Other checkboxes control touch features:
- Single finger filmstrip scroll/grid scroll – the scroll is performed with a single figure gesture.
- Double tap to switch grid/single mode – switches between Grid Mode and displaying a Single File with a double-tap.
- Gesture support in Single File View:
- Single finger pan to switch – allows one to switch images with one finger gesture from left to right. If the zoom is larger than Fit to Screen, instead of switching images the current image is scrolled.
- Pinch to zoom/unzoom – change the zoom level of the image with a pinch.
- Double tap to unzoom (if zoomed): if the image zoom level is larger than Fit to Screen, a double-tap will bring it to Fit to Screen.
If Double tab to switch grid/single mode is turned on, another double tap will return to Grid Mode.
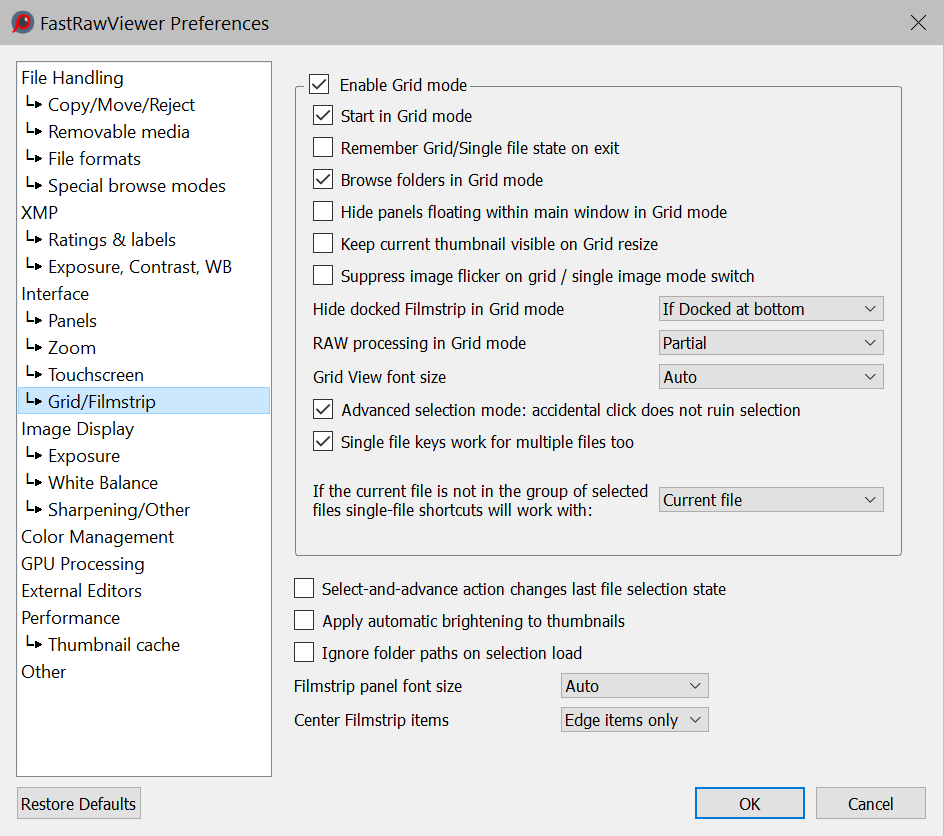
Grid/Filmstrip
The settings in this group control the display of the image in Grid mode and the Filmstrip panel.
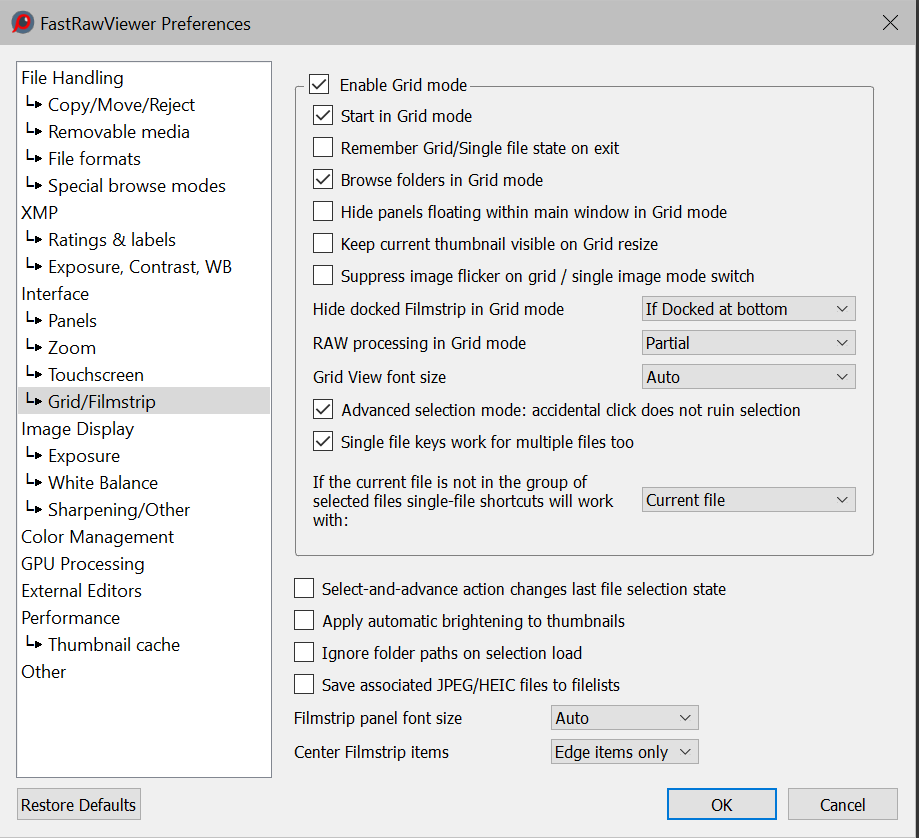
- Enable Grid mode – Turns on/off support for Grid Mode.
You must restart the program for the change to take effect.
- Start in Grid mode – when launched without passing a filename, FastRawViewer will start in Grid mode.
- Remember Grid/Single file state on exit – turns on restoration of the previous mode for the next time FastRawViewer is launched.
- Browse folders in Grid mode – when moving from the current folder to another one, FastRawViewer will switch to Grid Mode.
- Hide panels floating within main window in Grid mode – if the setting is on, all floating panels in the Grid Mode that are currently positioned inside the program’s main window will be hidden; they will reappear when switching to Single File View Mode.
- Keep current thumbnail visible on Grid resize – the current file will be held in the visible zone of the Grid View, no matter how the zone was resized.
- Suppress image flicker on grid/single image mode switch: In some cases, when switching from Grid to Single image mode, some flicker occurs: the previous image is displayed briefly (so far, complaints came only from Windows users, and only when using the DirectX11 video mode).
To turn off this effect, use this option (it slows down Grid-Filmstrip switch for 10-15ms, so by default it is on only for Windows/DirectX11 mode).
- Hide Filmstrip in Grid mode – customizes the visibility of the Filmstrip panel in Grid Mode (the Filmstrip panel can be brought back to display through Menu – Panels – Filmstrip):
- No – do not hide the Filmstrip panel
- If Docked at bottom – if the Filmstrip panel is at the bottom of the program window, it will be hidden upon switching to Grid Mode. The setting has no effect for a Filmstrip that is anywhere else.
- If Docked anywhere – the Filmstrip panel will be hidden if it is located in one of the main dock areas of the main window (at the top, at the bottom, and on the left). If the Filmstrip panel is dragged out of the main window, it will stay visible after switching to Grid Mode.
- RAW processing in Grid mode – customizes the RAW decoding when Grid Mode is enabled and RAW decoding is switched on through the Show Histogram/Stats/EXIF icon:
- Partial – only partial decoding is preformed, enough for displaying the exposure statistics and histogram. In this mode, browsing files happens faster.
- Full – full decoding is preformed, and switching to Single File view mode is nearly instantaneous.
- Grid View Font size, Filmstrip panel font size – to set the size of the fonts for the Grid View and Filmstrip panels:
- Auto – the font size is set automatically, based on the setting for the Panel Font size and the preview size.
- Extra small…Extra Large – the font size is set to the same as that of the Panels (using the same setting).
- Advanced Selection mode – enables the “advanced” mode of selecting files, for details see Operations with Multiple Files
- Single file keys work for multiple files too – turns on the mode in which work with groups of selected files is down with the same menu items/hotkeys that are used with single files (see the section “Alternate mode: using same shortcuts/menus for single file and for the group” above)
- If the selected file is not in the group of selected files single file shortcuts will work with – describes the program’s behavior with regards to operations over several files, if the current file isn’t in the group of selected files:
- Current file – works with the current file
- Selected file – works with the selected group
- Both – considers the current file to be a part of the group and works with all of it.
- Select and Advance action changes last file selection state – when Select-And-Move action is applied (to change the selection status of the current file and move to the next one) it's not obvious what to do when the current file happens to be the last one. By default nothing happens, but this setting allows to flip the selection status of this file.
- Apply automatic brightening to thumbnails – automatically increases the brightness of previews in Grid/Filmstrip modes if they’re too dark.
- Ignore folder paths on selection load – selection lists are simple list of files with full path, one file per line. With default settings, full path is checked against current visible files list, so selection lists are bound to specific folder. With Ignore folder paths… option on, only filename part is checked against current visible files list, so selection lists become folder-independent.
- Save associated JPEG/HEIC files to filelist – If enabled, filenames of paired RAW+JPEG/HEIG files are also saved with Menu - Select - Save selection.
- Center Filmstrip items – turns on Filmstrip automatic centering mode:
- No centering – never center.
- Edge items only – if the edge-most item is selected, it’ll be moved to the center.
- Always center – the active item will always be in the center.
Image Display
The settings in this group control the processing and the display of the images (Exposure, White Balance and Screen sharpening are tuned in separate preferences pages).
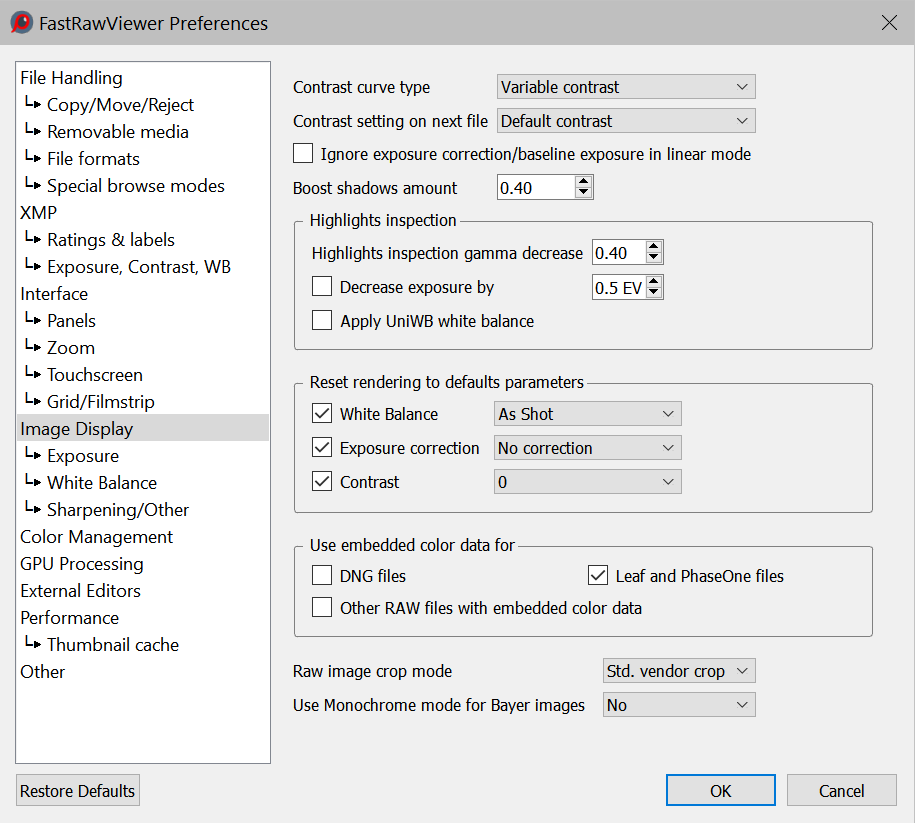
- Contrast curve – sets the tone curve to be used when displaying the image:
- Gamma 1.8, Gamma 2.2, sRGB, L* - sets one of the standard tone curves, typically used in image editing.
- Variable contrast – corresponds to the variable tone/contrast curve, see Adjusting image contrast section for details.
- Contrast setting on next file: Default contrast/keep from prev.file – which contrast setting to use when opening the next file.
- Ignore exposure correction/baseline exposure in linear mode: when turning on this setting, Menu – View – Linear mode display will turn off all forms of exposure correction, whether manual or automatic (hidden).
- Boost shadows amount – controls the additional gamma adjustment while in Boost Shadows mode, the range is 0.2 to 2.0.
- Highlights inspection – this group of settings controls the Highlight Inspection mode:
- Gamma decrease – the amount by which the Gamma for the image will be reduced.
- Decrease Exposure by – additional image darkening.
- Apply UniWB white balance – White Balance will be substituted with UniWB, thus avoiding any possible clipping caused by White Balance.
- Reset rendering to default parameters – sets the modes or values of white balance, exposure correction (actually, lightening), and contrast that will be used for Menu – Adjust – Reset image rendering to defaults
- White balance: As shot or one of 4 standard presets (daylight, auto, tungsten, camera auto)
- Exposure correction: No correction or ETTR (ETTR settings are selected on the Exposure tab).
- Contrast: values from -5 to U+5.
- Use embedded color data for – controls the use of color data embedded into RAW files and allows using that data instead of data that comes with FastRawViewer.
- Raw image crop mode:
- Max. visible area (exactly what you think it is)
- Std. vendor crop: uses the crop that is recommended by the camera manufacturer
- User crop: even deeper crop, for example
- DNG: set through the DefaultUserCrop tag (this is how camera crop works in Leica cameras)
- Fujifilm: set an aspect ratio that differs from the standard. In this case, RAW is recorded for the whole sensor, the "recommended crop" is unchanged, but there is an additional tag with the Aspect Ratio.
- Use Monochrome mode for Bayer images – turns on the black-and-white mode for color cameras. This mode is intended for modified cameras, where the color filter array is removed.
Available modes:
- None – Off
- Always – On for all files
- Detect – monochrome images are detected automatically, and if such an image is detected it will be processed as a monochrome (this mode is slower, because such an image will be processed twice, first as a color image; and after that, if it is detected that in fact it is a monochrome image, it will be re-processed).
Exposure

- Apply Adobe hidden exposure correction – switches ON the automatic exposure correction similar to the one used by Adobe RAW converters, such as Camera Raw and Lightroom. With this correction ON, same values in exposure correction will result in overall image brightness being similar between Adobe converters and FastRawViewer.
- Set hidden exposure correction to – allows setting a user-defined value for the hidden automatic exposure correction. Often this is not necessary, as FastRawViewer already comes with the corrections for all cameras supported in Adobe converters.
- Exposure correction on file open:
- No correction – no additional exposure correction (apart from the Adobe-style one, if it is ON) is applied when a file is opened, unless the correction is found in the accompanying XMP sidecar file.
- Autoexposure – automatic exposure correction is applied, according to the settings listed below.
- Keep from prev. file – the new file will be opened with the same exposure correction that was set for the previous file (it does not matter here how that exposure correction was set, manually or automatically).
- Auto Exposure – controls the automatic exposure correction (the one that is applied when ‘automatic correction’ action is performed).
- Fixed Exposure Shift – the exposure is shifted by the fixed value.
- ETTR-style autoexposure (shift histogram to the right) – positive exposure correction that forces the saturation of the given percentage of pixels (those saturated pixels are having value of 255 on the 8-bit scale); the percentage is controlled through Saturate up to %NN of pixels setting.
The amount of the positive exposure correction shift is limited by the ‘Limit to’ setting:
- Unlimited – no limit
- Hard limit – the limit is set to the given amount.
- Virtual ISO – limits the automatic exposure correction, taking into account the ISO setting in the camera. For example, if the current shot is taken at ISO 400 setting in the camera, while auto limit is set to ISO 6400 (the default value), the positive exposure correction is limited to (6400/400 =) 16 times, or, in photographic units, to 4EV.
- Manual exposure step size (small step/big step) – sets the step sizes for manual exposure adjustment change.
- The Over/Underexposure display section controls the over- and underexposure indications
- Exposure adjustments affect OverExposure display – when turning on this setting the change in exposure adjustment (both automatic and manual) will affect the display of overexposed areas.
- Under/Overexposure layer opacity – controls the perceived contrast of the highlighting for over- and underexposed areas.
- Use camera linearity limit to detect clipping – displays overexposure for RAW for the RAW values that are larger than the camera’s linearity limit as recorded in RAW file metadata (not all the cameras record it; if the limit is unknown, then the maximum possible value will be used).
- Underexposure detection limit NN EV below sensor saturation – sets the “usable dynamic range” of the camera with one value, the same for all ISO settings. Everything below this limit will be displayed as underexposed.
- ISO-based underexposure limit – the working range will be set by a kinked curve of the following type:
- For ISO 6-1600 – straight line going through the points @ISO 200 and @ISO 1600
- For ISO above 1600 – the dynamic range decreases by one photographic stop for each stop of ISO increase, but no less than the value set for @high ISO.
White Balance
This group contains all the white balance processing controls:
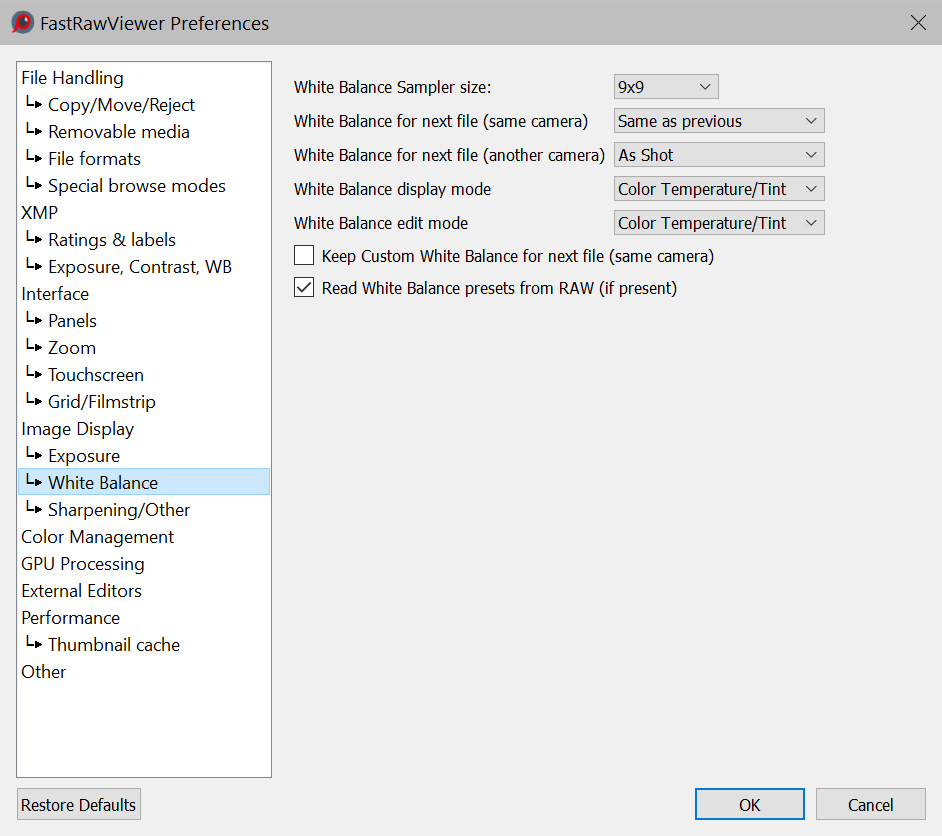
- White Balance Sampler size – for “click-on-gray” (Alt-Click) method, sets the size of the area used to evaluate the white balance
- White Balance for next file (same camera) – sets the white balance mode when opening a file coming from the same camera model as the current file. Choices here are:
- Same as previous – keep the current white balance choice.
- Camera Auto/As Shot – if the camera records the metered white balance (which may differ from that which is used during the shoot), then that balance is used. Otherwise, it will be As Shot.
- All others – the respective white balance mode will be in effect.
- White Balance for next file (another camera) – sets the white balance mode when opening
a file coming from a different camera model.
- White Balance display mode:
- Color Temperature/Tint – a mode commonly used in many RAW converters, including those by Adobe
- Mired/Tint – instead of correlated color temperatures, the value indicated is in Mired. Useful for selecting color filters to be used on the lens and on studio lights.
- WB Coefficients – the per-channel multipliers for white balance are indicated.
- Channel EV Correction – per-channel correction in EV (stops) for white balance are indicated.
- White Balance edit mode:
- Color Temperature/Tint – a mode commonly used in many RAW converters, including those by Adobe
- Channel EV Correction – per-channel correction in EV (stops) for white balance are indicated.
- Keep Custom WB for next file (same camera) – instructs FastRawViewer if the current white balance coefficients should be applied to the next file coming from the same camera model.
- Read White Balance presets from RAW (if present) – turns on reading white balance tables from RAW files.
Sharpening/Other
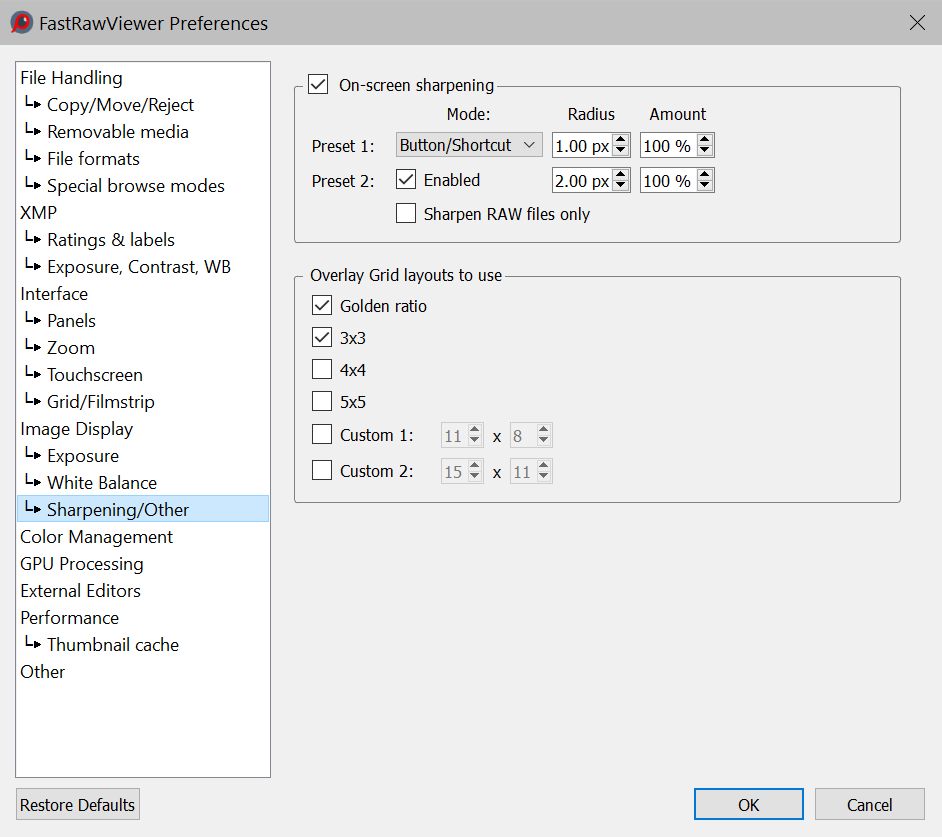
- On-screen sharpening – enables sharpening for display.
- Preset 1/Mode:
- Always on – sharpening for display is always on
- Button/Shortcut – turns on when the button is press.
- Preset 2/Enabled – allows one to use a second group of parameters for sharpening, thus cycling will be between Off-Preset1-Preset2 or Off-Preset1.
- Radius – the radius the Unsharp Mask filter, which closely correlates to the Radius parameter in Adobe Photoshop USM settings.
- Amount – the strength of the sharpening, same as Amount Photoshop USM amount.
- Sharpen RAW files only – if this setting is on, the sharpening for display will affect RAW files only.
- Overlay Grid layouts to use – sets the grids that can be overlaid through Menu – View – Overlay Grid
When setting custom grids, the first parameter sets the amount of steps along the long side of the image.
Color Management
This group of settings controls the appearance of the color on-screen in respect to color management:
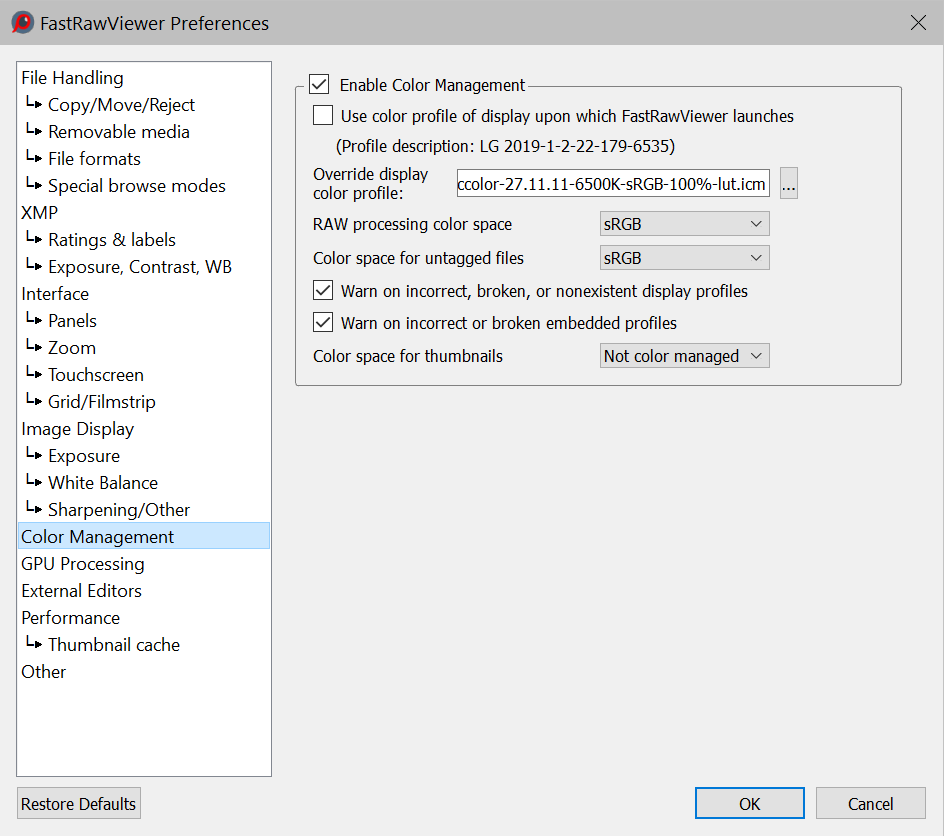
- Enable Color Management – turns on ICC-compatible color management.
- Use system profile (for monitor where program starts) – the ICC profile chosen in the system for that monitor where the program is being started will be used as the profile for the monitor.
- Display Color profile – allows one to specify a file with the ICC profile for the monitor.
- RAW processing color space – allows one to set a color space in which the last steps of the RAW data processing are done (the first steps are performed in the camera’s color space).
Lab TIFF files will be converted to the same color space when displayed in Single File View Mode. - Color space for untagged files – allows one to set a color space for JPEG/TIFF/PNG files for which the color space is not specified (not recorded in tags or ICCProfile sections).
- Warn on incorrect, broken or nonexistent display profiles – turns on a warning for when one tries to use an incorrect display profile.
- Warn on incorrect or broken embedded profiles – turns on a warning for incorrect profiles built into the JPEG data.
- Color space for thumbnails: sets the mode for color space for previews (thumbnails).
Lab TIFF files will be converted to the same color space when building previews. Previews for these files will be stored in the preview database (if it is in use) in RGB format. Because of this, when you change the color space for thumbnails, we recommend purging the preview database if it contains previews for Lab TIFF files.
GPU Processing
This group controls the video card modes and how the sharp areas of the image will be displayed.
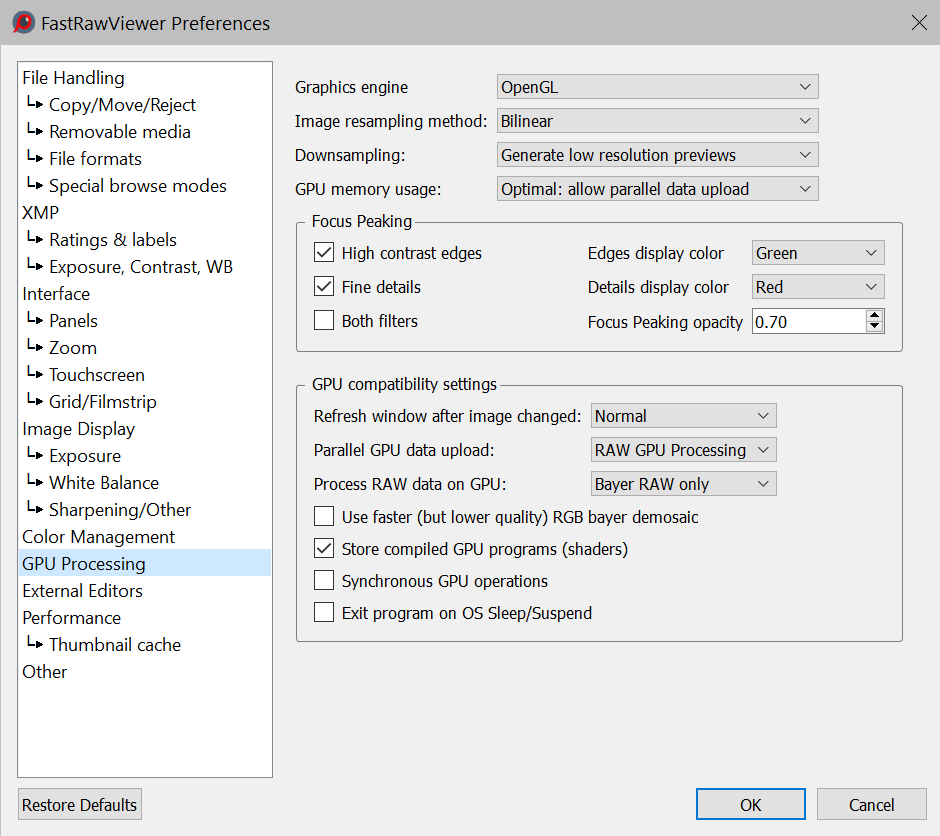
- Graphics Engine (Windows only): sets the method of using the graphics hardware acceleration: DirectX 9, DirectX 11 (Windows7 and newer), OpenGL, OpenGL emulator.
The last option can only be set through an external script, as it results in extremely low performance, and can be selected only for the purposes of testing.
- Image resampling method:
- No resampling – for large zoom factors, the image will look as if it is constituted of small square tiles. The fastest method.
- Bilinear resampling – pretty fast, mid-quality method
- Bicubic resampling – high-quality method, could be slow; a relatively fast vast video card is recommended.
- Downsampling options:
- None – no additional processing, the downsized image may have a low quality look.
- Generate low resolution previews – low-resolution previews are rendered in advance with the help of video card driver.
Requires additional memory for the graphic textures, compatible with all video cards.
- Suppress downsampling artifacts – suppresses the colored noise on the high ISO images. Not supported on all video cards.
- GPU Memory usage – video RAM
- Minimal – all unused graphic resources are immediately freed up, and allocated again if necessary. This is the slowest mode.
- Minimal+ – uses one set of graphic resources, when moving to a smaller image, video memory is not freed up.
- Optimal – two sets of graphics resources are used: the currently displayed image and the "next" one; when refreshing the window, the whole image is redrawn at once, and not piece by piece.
- Maximal – up to four sets of resources are used (RAW, embedded JPEG, external JPEG, and the currently refreshed), the second switch between RAW and JPEG is instantaneous.
- Focus peaking mode:
- High contrast edges – enables the outlines for contrasty details using color contouring. Edges display color sets the color for the contours.
- Fine details – enables the outlines for the areas with plenty of smaller sharp details using color contouring. Details display color sets the color for the contours.
- Focus Peaking layer opacity – controls the fading of the main image for the Focus Peaking contours to be visible better.
- GPU compatibility settings
This group of settings is helps with the cases when certain compatibility problems are encountered (for instance, the image is not completely refreshed):
- Refresh window after image changed – a choice of options to refresh the displayed image:
- None – no forced refresh, the fastest mode, but may not work with all hardware
- Normal – forced refresh of the window using “standard methods”
- Slight resize – the application window changes its dimensions slightly, to force OS to redraw it
- Parallel GPU data upload – enables parallel data loading to GPU, available only for OpenGL video mode. This can improve performance, depending on the GPU and the drivers.
- None – don’t use parallel data upload to GPU
- RAW GPU Processing – use only when processing RAW on GPU
- Always – use for all files.
- Process RAW data on GPU – process RAW data on GPU instead of CPU (for details, see Performance Settings):
- None – don’t use GPU for RAW data processing
- Bayer RAW only – use GPU for processing Bayer files
- All RAW files – use GPU for processing of all RAW files.
- Use faster (but lower quality RGB bayer demosaic) – use lower quality demosaicking, same quality as of the one used when processing RAW data on CPU.
- Store compile GPU programs (shaders) – on those video cards on which this is supported, compiled GPU programs will be saved on the disk during the first startup. Program will start faster ever after.
- Synchronous GPU operations turns on the synchronous mode of video card work (slower, but more reliable).
- Exit program on OS Sleep/suspend – forces the program to exit when the computer goes to sleep (that is to address the issue with some older OS being unable to correctly restart OpenGL operations after the wake up).
External Editors
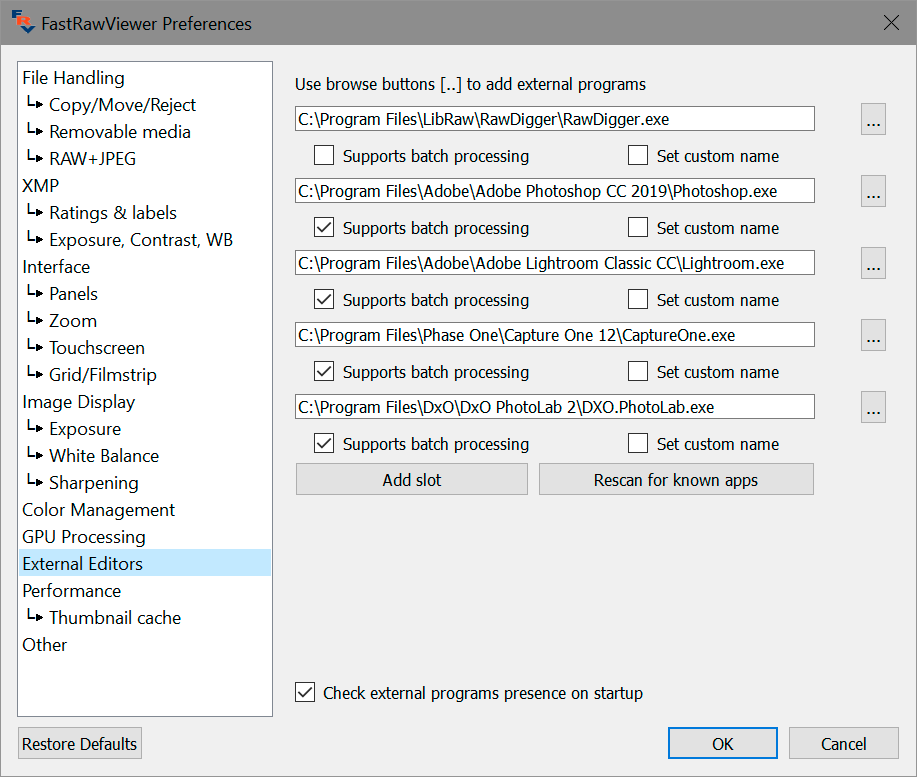
This window displays the paths to external programs. FastRawViewer can launch those, passing to them the name of the currently displayed file.
- Supports batch processing: if this checkbox is marked for the program, then this program will be included in both Menu and in the context menu for groups of files.
- Use […] buttons to lookup executable file on your system.
- Supports batch processing – this program supports the import of several files into it at the same time. Said programs will be displayed in the menu Run Program for file groups.
- Set custom name – allows one to set an arbitrary name for a program (said name will be used in the menu in place of the application file name of the external program).
- Add slot button adds additional slot for external program (up to 10).
- Rescan for known apps button starts a search for RAW-aware applications known to FastRawViewer. After the search is finished, a dialogue similar to the following is displayed:
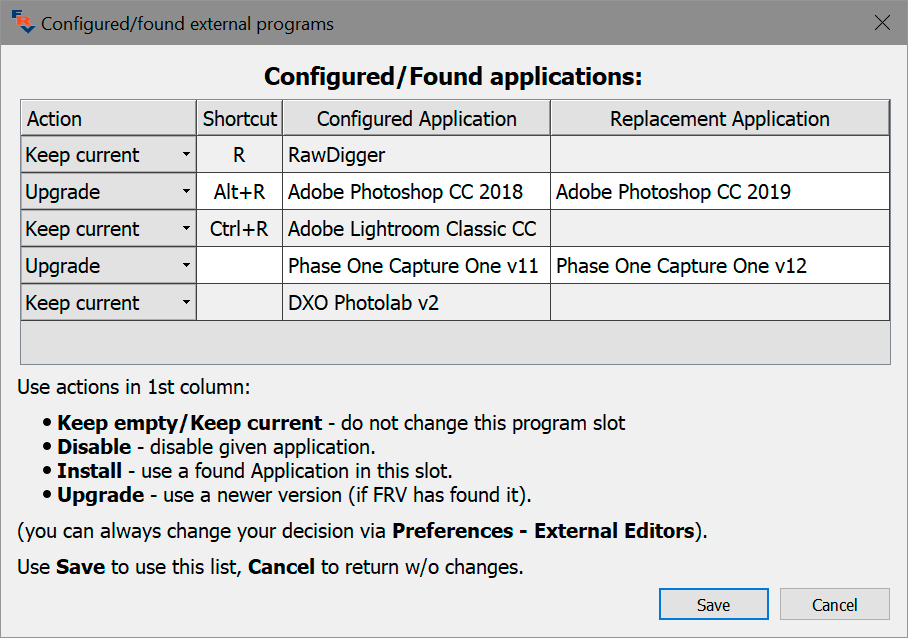
If, during the scan, some newer versions of applications are found, they will be displayed in Replacement Applications column, together with an option to renew (Upgrade) the settings for External Editors tab.
- Check external programs presence on startup enables check each program existence on FastRawViewer start.
If during the startup it was determined that some application is absent, you will be presented with a dialogue similar to the following:

If a “replacement” application was found, this replacement will be displayed in the Replacement Application column; thus allowing to renew the settings without resorting to manual editing.
Performance
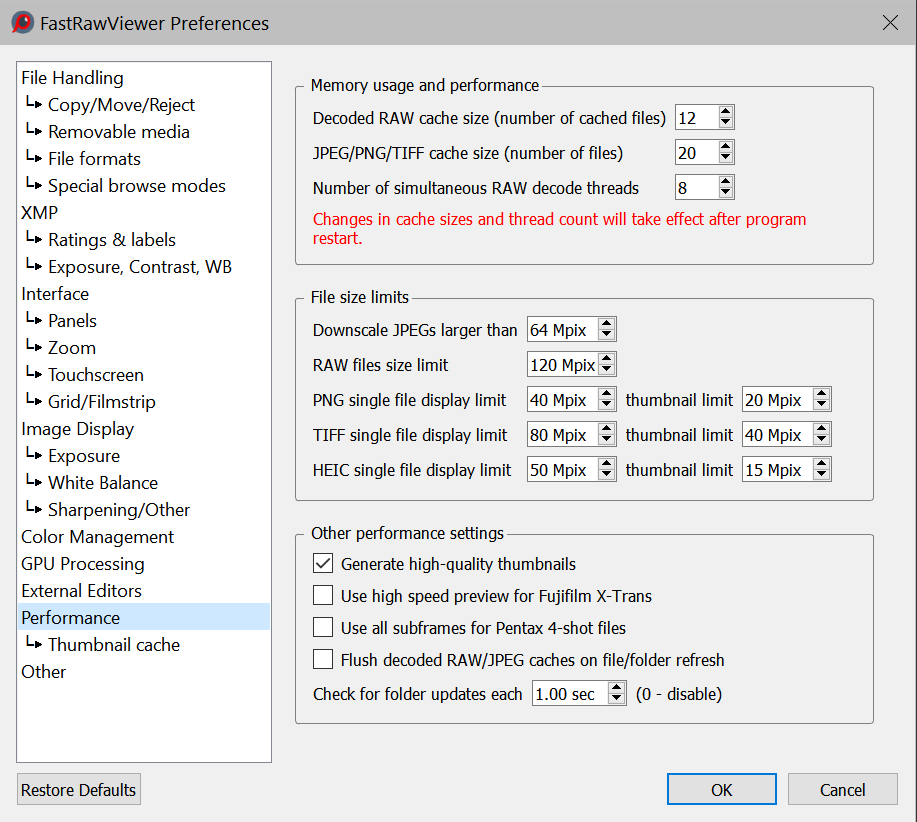
- Memory usage and performance section
- Decoded RAW cache size – the number of decoded RAW files that are kept in the operational memory (RAM) to boost the speed of the browsing.
- JPEG/PNG/TIFF cache size – the number of JPEG files that are kept in the operational memory to boost the speed of the browsing.
- Number of simultaneous RAW decode threads – the number of concurrent processes of RAW decoding.
Note: All changes made to this group of settings come into effect only after restarting FastRawViewer.
- File size limits section
- Downscale JPEGs larger than NN Mpix – JPEG files larger than the specified size will be down-sampled during the decoding process, so less memory will be required, while decoding and display will happen faster.
- Do not decode RAW files larger than NN Mpix – RAW data with a pixel count more than the specified will not be decoded; only an internal JPEG will be shown (if it exists)
- TIFF/PNG/HEIC single file display limit – TIFF/PNG/HEIC files above the set limit will be ignored in single view mode.
- PNG/TIFF/HEIC thumbnail limit – for files above the set limit, previews will not be created or displayed.
- Other performance settings section
- Generate high-quality previews – sets the preview quality. High-quality previews (the checkmark is set) are built noticeably slower.
- Use high speed preview for Fujifilm X-Trans – this preference turns on faster (but lower quality) processing for files created by Fujifilm X-Trans sensors.
This mode is recommended if you are not satisfied with the display rate of these files in standard mode.
Automatically turns on during the first start-up, and when resetting to default the preferences if the system has one of the following processors:- Intel Core2Duo and older.
- Intel i3-i7 1st generation with fewer than 4 cores.
- Use all subframes for Pentax 4-shot files – enables merging all sub-frames into one when working with Pentax frames shot in Pixel Shift mode.
- Flush decoded RAW/JPEG cache on file/folder refresh – if this setting is turned on:
- when using Menu – File – Reload – Reload current folder, the decoded file cache will be reset.
- when using Menu – File – Reload – Reload current file – the cache for the current file or file pair (if RAW+JPEG) will be refreshed
- Check for folder updates each – sets the refresh rate for the list of files in the current folder (if the folder changes, for instance other files are copied into it, then it won’t be reread very often).
Thumbnail cache
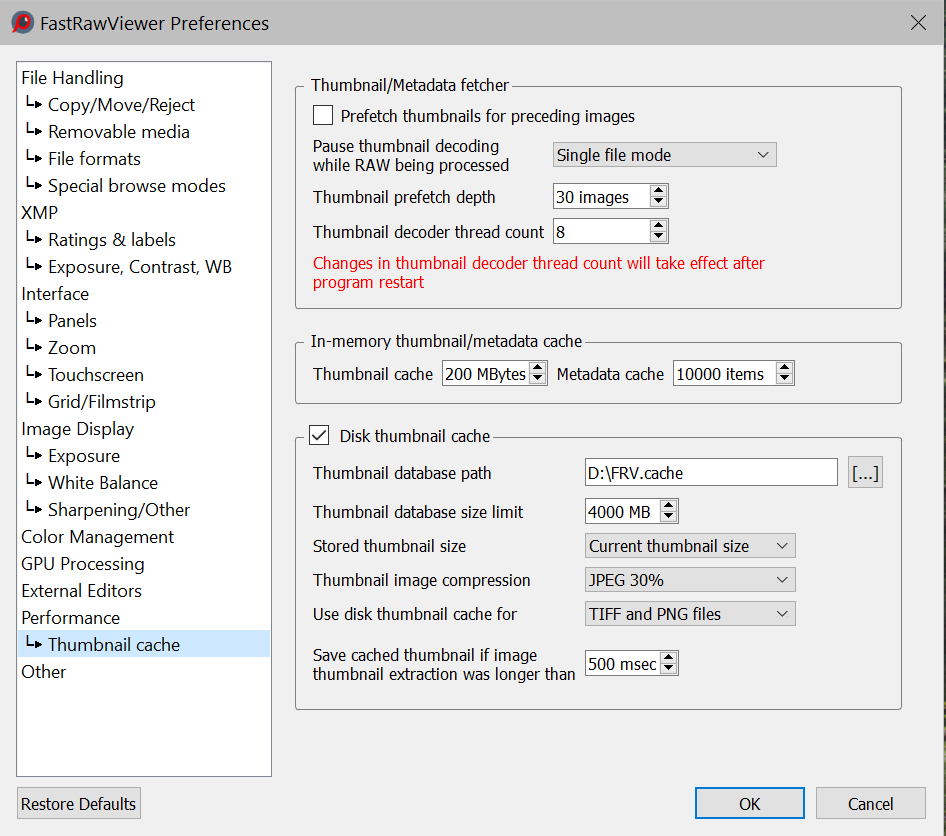
- Thumbnail/Metadata fetcher group
- Prefetch thumbnails for preceding images: to decode previews for the files “before” those visible on the screen.
- Pause thumbnail decoding while RAW being processed – this control allows one to set priorities between the decoding of preview files and the decoding of RAW data (these two processes compete for CPU resources and hard drive access):
- No – concurrency; Thumbnail decoding is not postponed while RAW decoding takes place.
- Single file mode – Thumbnail decoding is postponed in Single File View Mode until the RAW decoding is finished.
- Single file and grid modes – Thumbnail recording is postponed for any RAW decoding action.
- Thumbnail prefetch depth: how many files (relative to those viewed on the screen) to read ahead and decode previews.
- Thumbnail decoder thread count: how many parallel decode streams (threads) are enabled.
- In-memory thumbnail/metadata cache group
- Thumbnail cache size: maximum size of the cached previews in the memory (each preview is stored in 4-byte per pixel format, so standard 200x133 preview is about 100kb, so 200Mbytes cache limit translates to ~2000 images).
- Metadata cache size: the maximum number of files for which metadata will be stored in the RAM
- Disk thumbnail cache group
- Thumbnail database path – the folder with which will contain the FRVThumbs.db file
Default locations:
- Mac: ~/Library/Application Support/libraw-llc/FastRawViewer
- Windows: $HOME/AppData/Local/LibRaw LLC/FastRawiewer
- Database size limit – the maximum size of the database (see below), by default: 4000MB for 64-bit systems, 2000MB for 32-bit
- Stored thumbnail size – selects the size of previews that will be saved to the database:
- Current thumbnail size: the larger of the two sizes used in Grid and Filmstrip
- Maximum thumbnail size: the largest size available in FastRawViewer, 1600x1600 physical pixels for retina monitors, 800x800 for other monitors.
- Thumbnail image compression: compression type (uncompressed, JPEG-90%, JPEG-30%).
- Use disk thumbnail cache for:
- TIFF/PNG files: only thumbnails for TIFF and PNG files are checked for presence in disk cache/stored in that cache.
- All files – thumbnail cache used for all files
- Save cached thumbnail if image thumbnail extraction was longer than – this is the main parameter that selects for which files previews will be stored in the database.
Only those files, the building of previews for which will take greater than or equal to the amount of time set in this parameter will be stored in the database. Consequently, the only things that will go into the database are the previews that were built relatively slowly, and the database itself will grow slower. If you want to store previews for all files here, set the parameter to 0ms.
Other
This section contains other settings that cannot be grouped with any other preceding group:
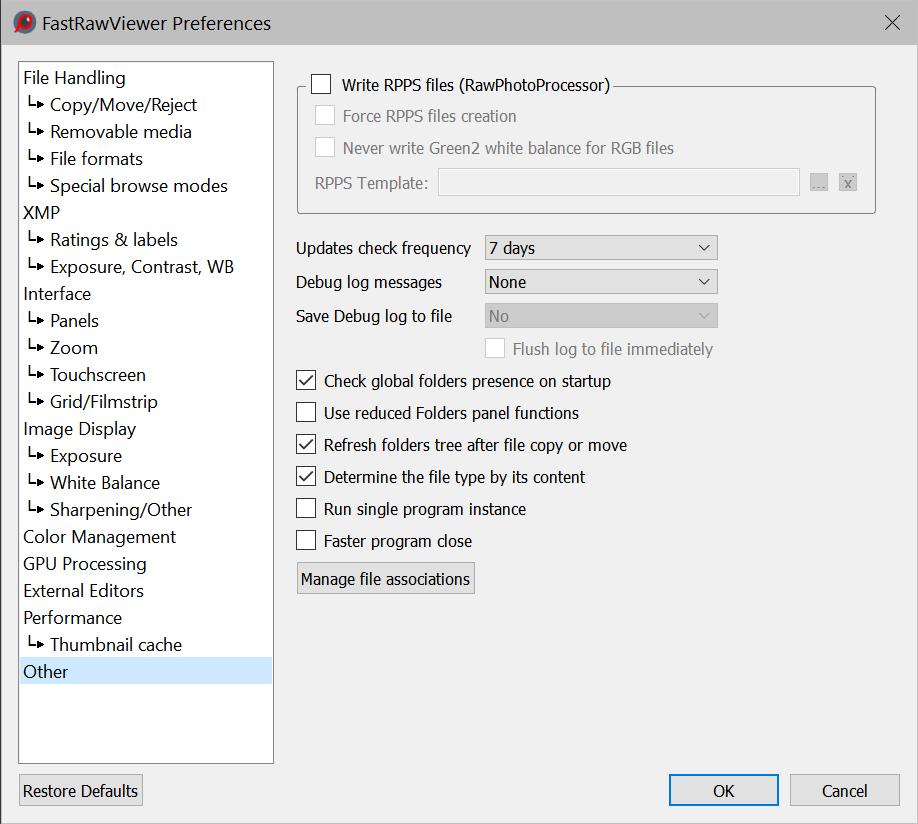
- Write RPPS files – saves an .rpps file (for RawPhotoProcessor) if manual changes of WB/exposure are applied to the image
- Force RPPS files creation – saves an .rpps file with automatic settings for WB/Exposure when a RAW file is opened.
- Never write Green2 white balance for RGB files – switches off the recording of the separate white balance coefficient for the second green channel.
- RPPS Template – the name of the file that will be used as a template while creating specific .rpps files (used if .rpps file does not yet exist for the raw file).
- Updates check frequency – this parameter schedules the checks for updates - at each program launch or once in every 1-3-7-15-30 days.
- Debug log messages – turns on the debug mode, the debug messages are available through Menu – Help – Debug log.
- Save Debug log to file – Debug log recording to text file:
Windows: UserProfileFolder/AppData/Local/LibRaw LLC/FastRawViewer/FRV_DebugLog.txt
Mac: ~/Library/Application\ Support/libraw-llc/FastRawViewer/FRV_DebugLog.txt
If the setting is set to some on state, Show Debug log in Explorer/Reveal in Finder appears as last item of Help menu.
Possible values for the setting:
- No – do not record log into file. If you’ll change to No from some Yes… settings, existing log file will be removed.
- Yes, remove on quit – log file is recorded, but removed on program successful close (but will be kept if program crashes).
- Yes, keep forever – log file recorded and not deleted, so it may grow indefinitely.
- Flush log to file immediately: (this is accessible if writing the log to a file is turned on).
This setting is intended to catch FastRawViewer crashes (the last things written to the log will not be lost due to the crash). In all other cases it should not be turned on, as it decreases efficiency (especially on slower disks).
- Check global folders presence on startup – checks for the presence of (and, if necessary, for write permission) the following global folders, if they're configured (in the File Handling and Copy-Move-Reject Preference sections):
- Start without filename - Specified folder
- Open folder dialog starts at - Specified folder
- Use global rejected folder - Subfolder for rejected files
- Copy/Move folder selector starts at - Specified folder.
- Run single program instance – (Windows only) turns on the “one instance” mode of the program. At an attempt of starting the second instance, the file is displayed in the already existing program window.
- Use reduced Folders panel functions: switches off some potentially incompatible with your applications / OS functions of the Folders panel, in particular:
- Monitoring of Removable media change (CD/DVD, USB devices).
- Monitoring changes in the folder tree structure.
- Editing the folder tree.
- Refresh folders tree after file copy/move: if enabled, folders tree in Folders panel will refresh after file copy or move.
- Determine the file type by its content: If checked (default): Non-RAW files type (TIFF/PNG/JPEG/HEIC) to be determined based on file header content.(note: this works only for Non-RAW file types /extensions/).
- Faster program close – (Windows only) turns on the fast program completion mode.
- Manage File Associations – (Windows-only, not supported in Legacy Windows version): activates the system dialogue to edit file association with FastRawViewer.

Additional Settings
A few of FastRawViewer’s settings are accessible only by running scripts that are installed alongside the program. These “hidden” settings are needed extremely rarely, and should be applied, as a rule, only once.
These settings are only read at program start, so if you apply scripts with FastRawViewer running, immediately close the program and restart it. If the program is not closed immediately, and you move to editing and saving the settings, the changes made by the script may be lost and require repeating the procedure.
Using Additional Settings Scripts: Windows
Scripts installed with the program are copied into the folder
C:\Program Files\LibRaw\FastRawViewer\Scripts. To open it, use Menu – Help – Auxiliary settings scripts:
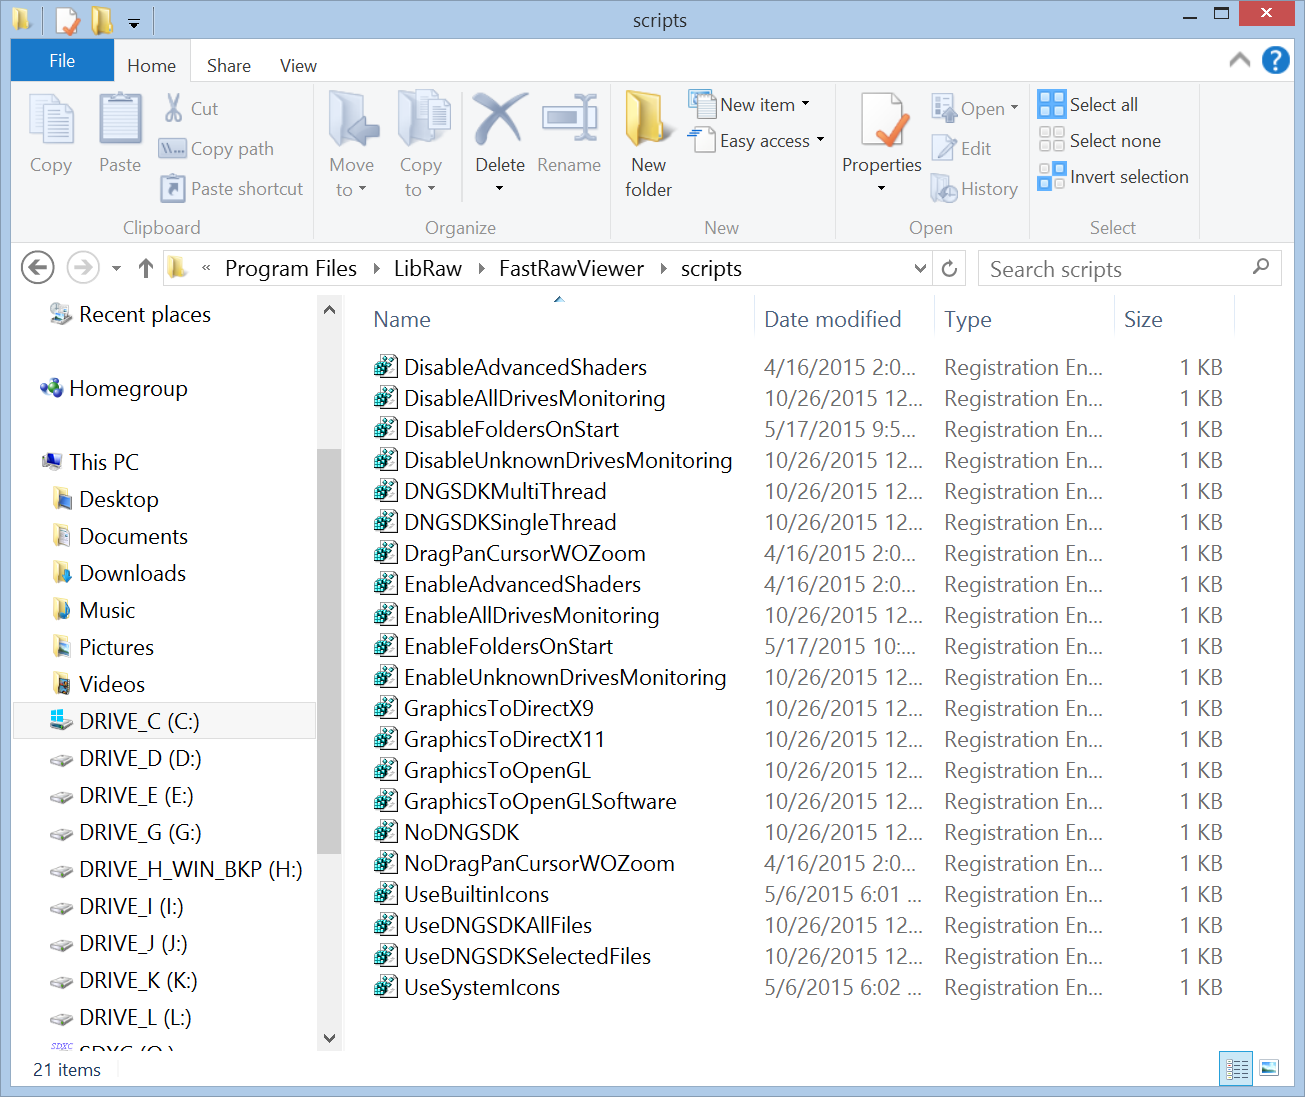
Select the necessary script and launch it (double click or press Enter).
Registry Editor will run, which will first display a Windows UAC message:
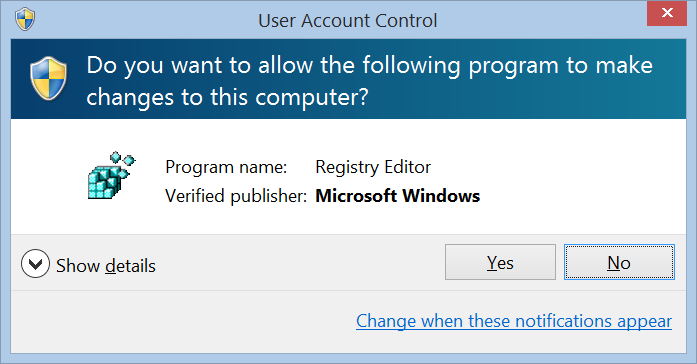
Press Yes to agree to the warning, after which Register Editor will warn you again:
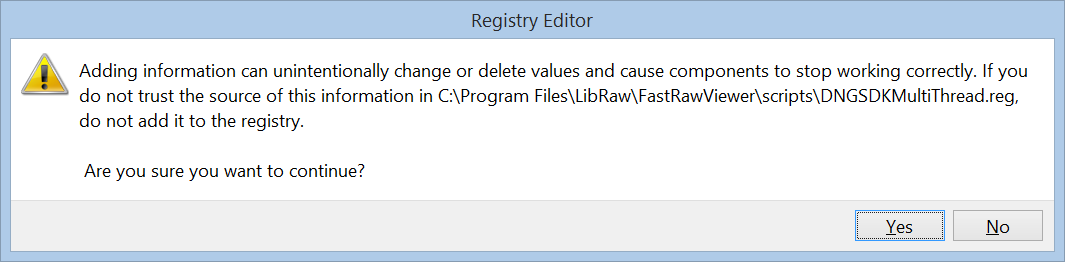
Once again confirm by pressing Yes, and Registry Editor will inform you of your success:

Using Additional Settings Scripts: Mac OS X
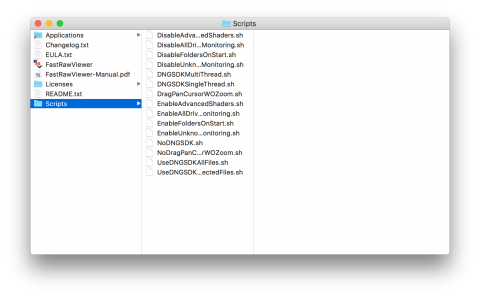
The OS X version of FastRawViewer contains the scripts in the application’s resource folder.
To use the scripts:
- Use Menu – Help – Auxiliary settings scripts
- The Scripts folder will open:
- Open the Terminal program
Applications – Utilities – Terminal. - Drag the needed script onto the Terminal window, and you will see the full path to the script you are about to execute.
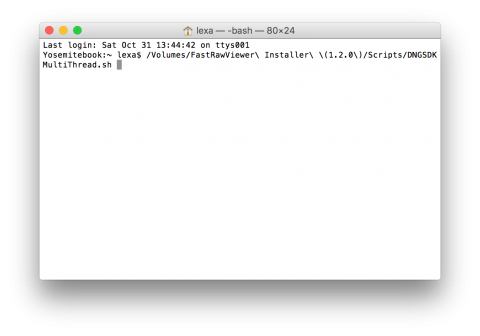
- Switch to the Terminal window and press Enter. The script will be executed without any output to the Terminal window; if there’s some sort of message, it means that there was an error.

List of Additional Settings
|
Script filename |
Description |
|
|---|---|---|
|
Advanced Troubleshooting |
|
|
|
Windows: choosing the program graphics acceleration method |
|
|
|
GraphicsToDirectX9 GraphicsToOpenGL GraphicsToDirectX11 |
Sets the graphics “engine” DirectX9, OpenGL, or DirectX11 |
|
|
WindowsCheckForRemoteSession NoWindowsCheckForRemoteSession |
Enables detection of Windows terminal session. If detected, video mode will be set to DirectX 9 |
|
|
Turning resource-intensive graphics operations on and off |
|
|
|
EnableAdvancedShaders DisableAdvancedShaders |
Turns on (default)/off resource-intensive graphics operations:
These scripts are for both Mac and Windows, however for all modern Macs, it is not necessary to turn off resource-intensive operations – the efficiency of the graphics adapters is good enough to use those. Switching them off may be necessary for Windows platforms using low-end graphics (chipset Intel graphics, the oldest and weakest graphics processing cores). |
|
|
Use16BitFloatingPoint No16BitFloatingPoint |
Use / don’t use 16-bit floating point data while processing RAW data on GPU |
|
|
UseOEUEOnGPU NoOEUEOnGPU |
Use / don’t use GPU to create over- and under-exposure maps |
|
|
Controlling the Folders panel |
|
|
|
EnableFoldersOnStart DisableFoldersOnStart |
Enable (default value) turns on the default behavior of the Folders panel:
Disable: FastRawViewer starts with a closed Folders panel. It can be opened through Menu – Panels – Folders. This setting is intended, first of all, as a test in extraordinary situations – in a few rare cases, the monitoring of the removable media status and/or the use of the folder/disk system icons leads to FastRawViewer not being able to work. |
|
|
ExpandCurrentFolder NoExpandCurrentFolder |
Enables auto-expansion of current folder in Folders panel |
|
|
UseBuiltinIcons UseSystemIcons |
Allows one to switch the Interface – Use built-In file/folder icons setting without launching FastRawViewer. This is intended for the case when the additional icon provider that is built into the system isn’t working (this has been known to happen, for example, with some versions of Dell Backup) and FastRawViewer cannot be launched to change these settings because the program crashes during the communication with the icon provider. |
|
|
DriveStatusAsyncQueryOff |
Turns on/off asynchronous status checks of changeable media |
|
|
UseBottomBarFontPixels |
Windows-only: sets font size on the bottom line in pixels, not in points. This is intended for cases when two displays with very different resolutions are being used. |
|
|
DisplayNetworkSharesVolumeLabel |
(Windows only) Controls network volumes name display:
|
|
|
Advanced Tune |
|
|
|
Using Adobe DNG SDK |
|
|
|
UseDNGSDKAllFiles UseDNGSDKSelectedFiles NoDNGSDK |
Use DNG SDK for
|
|
|
DNGSDKSingleThread |
Use/do not use DNG SDK in multi-thread mode. |
|
|
DngUseColorMatrix |
Type of embedded color data used to display DNG files: ColorMatrix or ForwardMatrix. |
|
|
EnableRawDecoding |
Enables (default)/disables RAW data decoding. If disabled, FastRawViewer will show embedded/external JPEGs only. If disabled, it can be turned on temporarily by -enableraw command-line switch. |
|
|
DNGShowEnhancedImage |
Hidden configuration parameter DNGPreferLargestImage, it is a bit field:
Hidden configuration script DNGShowEnhancedImage will set both bits to 1, so Enhanced DNG will be preferred image to display. DNGShowStandardImage script will revert the change back. |
|
|
TIFF format support |
|
|
|
AdditionalTIFFExts
|
The list of additional extensions (apart from .tif and .tiff) that will be interpreted as an indicator of TIFF files. Changing this setting:
|
|
|
TIFFCMYKasGray |
Switches on the display of CMYK-TIFF files, they will displayed in Grayscale |
|
|
Controlling the HEIC decoder |
|
|
|
HeicDecoderDefaults |
The HeicDecoderDefaults script sets the standard / automatic values for the following parameters: HEICDecoderPool1Threads – the number of threads that the file decoder runs for immediate display task (by default this is 0, automatic optimization; the number sets the amount) HEICDecoderPool2Threads – the number of threads that the file decoder runs for prefetch HEICDecoderPool2Size – the number of decoders used for prefetch HEICDecoderPool3Size – the number of single-thread decoders used for decoding the preview HEICDecoderStartThreshold – the size of the queue for the prefetch/preview decoder upon which additional decoders are started. |
|
|
Controlling the Filmstrip/Thumbnails panels behavior |
|
|
|
EnableUnknown DisableUnknown EnableAllDrivesMonitoring DisableAllDrivesMonitoring |
Turns on/off the monitoring of any changes in the current folder on:
|
|
|
FilmstripCenterOn NoFilmstripCenterOn |
Turns on (default)/off the centering of the highlighted Filmstrip element when changing the contents of the current folder. |
|
|
RoundedThumbnails |
Turns on/off the rounded corners for the Thumbnails in the Grid/Filmstrip. |
|
|
RefreshFolderAfterProgramRun |
Intended for more flexible processing of a situation where an external program creates files and you want those files to be either visible or invisible to FastRawViewer. Values:
|
|
|
WheelScrollDefault |
Sets the default mouse wheel scroll step for all scrolling lists (folders, thumbnails in Filmstrip and Grid View, EXIF table). If one wants to increase/decrease the contrast – copy the script, and edit it (change the default value to wheel step needed) and run it. |
|
|
FilmstripDefaultOpenDelay |
File selected by Filmstrip panel navigation is not opened immediately. This delay allows arrow keys Filmstrip navigation without CPU/disk overload (not every intermediate file will be opened). Default delay is 30 milliseconds. If one wants to increase/decrease this delay – copy the script and edit it. |
|
|
FileArrivalDefaultDelay NoFileArrivalDelay |
Designed to prevent FastRawViewer from attempting to display files that are not yet fully copied into the current folder. FastRawViewer
Scripts that control the delay:
|
|
|
ShiftClickSelectionModeDefault |
This script assigns a standard value (0) to the ShiftClickSelectionMode parameter, which modifies the program’s behavior while selecting a range of files using Shift-Click. To change parameter’s value you need to edit the script before apply. This parameter is a bit field of 3 bits:
|
|
|
File Processing |
|
|
|
TryJPEGasRAW NoJPEGasRAW |
Attempts to decode files with a JPEG extension the same as for RAW files. This setting is useful for cameras with modified Firmware (the DiagRAW hack and old versions of the CHDK hack) because these cameras save RAW files with JPG extensions. |
|
|
UseGPSStatus IgnoreGPSStatus |
Check GPS Status field (default) or ignore it and display GPS coordinates regardless of status. |
|
|
ExposureRangeDefault |
A script for setting the range of changes in “exposure”. The script sets the default values as (-5…+8), if you need to change it, copy the script somewhere, edit it, and run it. |
|
|
OEDetectionDefault OEDetectionHistogram OEDetectionManual |
OEDetectionMethod allows one to change the algorithm for detecting overexposure. Default - invokes the default method, which searches for the rightmost hump on the histogram. Histogram - the algorithm looks for a one-bin wide peak in the histogram highlights (the bin width in FastRawViewer histogram is 1/20 EV). Manual - a manual setting, the value is taken from the OEManualLimit parameter. |
|
|
CoolscanNEFGamma |
CoolscanNEFGamma sets the Gamma value for processing Nikon Coolscan NEF files. The value is multiplied by 100, that is for Gamma 2.2 use 220; for Gamma 1.0 use 100. The default value is 220. There are no scripts to edit this, please set this value into the registry manually. |
|
|
EnableRotationWithoutXMPDisableRotationWithoutXMP |
Turns on the option of rotating in Single View mode while recording this to XMP is disabled. The orientation isn’t recorded anywhere.
|
|
|
EnableDetectDNGfromTiff DisableDetectDNGfromTiff |
Turns on the detection of DNG files converted form RGB Tiff. When such files are detected
|
|
|
Alternate keyboard shortcuts handling |
||
|
AlternateKeyHandler NoAlternateKeyHandler |
Alternate keyboard handler (Windows only) – turns on the alternative keyboard shortcuts processing mode. Turn on only if there are problems with the processing of keyboard shortcuts (this happens when using utterly non-standard keyboard layouts, for instance when switching between Qwerty и Dvorak). |
|
|
Performance |
||
|
SetProcessingMaxParallel |
By default, FastRawViewer uses all of the available processing cores to process RAW data. Setting the Prefs.ProcessingMaxParallel parameter to a smaller value (taking HyperThreading into account) may increase the performance if there are many cores while the RAW files are relatively small. |
|
|
UseAVX2 |
Turns on/off the use of AVX2 instructions where for those computers where this instruction set is supported. By default, this is turned on. |
|
|
UseMMappedIO |
Bit field:
lowest bit in each 8-bit set defines RAW reading, other bits are reserved for future (JPEG, PNG,TIFF, etc). UseMMapedIO script will set all bits to 1, NoMMapedIO wil revert these bits back to zero |
|
|
Other settings |
||
|
DragPanCursorWOZoom NoDragPanCursorWOZoom |
Turns on (default)/off the display of the Drag and Pan cursors in the case when the image fits completely in the Window and there is nowhere to Drag/Pan. |
|
|
PrintSizeDefaults |
Default settings for Print Size line in EXIF panel: PrintSizeUnit – 0: inches, 1: centimeters, 2: millimeters |
|
|
UseLegacyOpenGL UseModernOpenGL |
Switches graphics engine usage mode.Try Legacy mode if you experience problems with single view display. |
|
|
EnableNextPrevQueue DisableNextPrevQueue |
Enable (default mode): if a user issues a new command to move to the Next/Previous file while FastRawViewer was still executing the prior Next/Prev File command, this new command is queued and will be executed as soon as the prior one is completed. This allows for fluid browsing through files with just the Spacebar depressed, but can become uncomfortable if very large files are present, as reading and processing such files takes time. Disable: the new command to move to Next/Previous file will be ignored while the current command is in effect, and transition to the current file is not completed. |
|
|
AlternateXMPWrite NoAlternateXMPWrite |
Turns on alternate XMP write mechanics, use only if you experience problems with standard method. |
|
|
UseBottomBarFontPixels NoBottomBarFontPixels |
Turns on bottom bar font size setting via pixels (DPI-independent), not points (DPI depended). Use if you have multiple monitors with very different resolution and OS is unable to deliver resolution data to FastRawViewer application. |
|
|
EnableLargeJumps DisableLargeJumps |
When this is turned on, the Menu adds the items Menu -> File -> Jump +2 files (+3 files, -2 files, -3 files) and default hotkeys: Ctrl-Alt-RightArrow (move +2), Ctrl-Shift-Alt-RightArrow (+3) and similar for left arrow to move -2/-3. The size of the jump can be controlled through the Registry/Defaults Large2JumpStep and Large3JumpStep settings. The EnableLargeJumps script sets these settings to 2 and 3, respectively. If you need other values (for example, your standard bracketing step is 3 and 5 shots), you will need to copy the script somewhere where it can be edited, change the values, and launch it (or change the values manually through Registry Editor/defaults). The changed values take place after FastRawViewer has been relaunched. If the step for "large steps" is set to 0, then the corresponding menu points/hotkeys are deactivated. |
|
|
ForceWindowSizeRestore |
Enables (second) forced main window size restore after main program window made visible. |
|
Support of non-standard cameras
FastRawViewer can be used for the display and analysis of images from “engineering” cameras, which are saved in the form of “sensor data dumps” without any other additional metadata.
A series of such cameras are already directly supported by the application (FastRawViewer contains an internal table with the necessary data); to support other (arbitrary) sensors, one has to add a description of the structure of the sensor’s data into the Windows Registry (on Windows) or OS X defaults (on Mac OS X).
To do this one must:
Windows: prepare a registry-script with content similar to the following:
[HKEY_CURRENT_USER\Software\LibRaw LLC\CustomCameras]
"Camera01"="24096096,4008,3006, 0, 0, 0, 0,0,148,0,0,Dalsa, FTF4052C 4:3,0"
And run it in Windows Explorer.
OS X: run a command in the Terminal, similar to the following one-liner:
defaults write com.libraw-llc.CustomCameras "Camera01" "24096096,4008,3006, 0, 0, 0, 0,0,148,0,0,Dalsa, FTF4052C 4:3"
In both cases:
Camera01 (or Camera02 … Camera64) – the “number line” in the table, up to 64 records of this type are supported.
The line “24096096,4008,3006, 0, 0, 0, 0,0,148,0,0,Dalsa, FTF4052C 4:3,0” defines the format of the camera’s data and consists of 14 fields separated by commas (a note for engineers: the format of this line is completely analogous to the line in the “sensor dump” table’s description in dcraw.c with the one difference being that the CFA filter’s format is set in base 10):
- The exact size of the file in bytes (in this example – 24096096). This is the only criterion by which FastRawViewer recognizes a data “format”, files of a different size will be ignored.
- The width of the sensor in pixels. Put the entire width, including the “black frame” in this field.
- The height of the sensor in pixels, including the black frame.
- The width of the black frame at the left edge of the sensor (in pixels)
- The width (height) of the black frame at the top.
- The width of the black frame at the right edge.
- The width (height) of the black frame at the bottom.
- Additional parameters for the file decoding subprogram (see below).
- The Bayer filter CFA format, with the byte field taking one of the following values:
- 22 – BGGR
- 97 – GRBG
- 73 – GBRG
- 148 – RGGB
- 180 - GMYC
- The amount of unused bit data (for example, if 14-bit data is recorded in a 16-bit format)
- Additional metadata, bit mask.
- Bit 0 – find a .JPG file with the same name and read the EXIF data from it.
- Bit 1 – filter (average neighbors) for pixels with values of zero
- Bits 2-4 – the orientation of the image (0 = do not rotate, 3 = 180, 5 = 90CCW, 6 = 90CW)
- Camera manufacturer
- Camera model
- The offset of the beginning of the sensor data from the beginning of the file (the value range is 0-65534, the special value 65535 means that “the rows are going in the opposite direction”).
8, 10, 12, and 16-bit data formats are supported, the number of bits is calculated as (the size of the file minus the offset from the beginning of the data)/number of pixels.
Depending on the bit-ness of the data, the 8th field (“additional parameters for the file decoding subprogram”) can accept the following values for 10-bit data:
- 1: “4 pixels in 5 bytes” packing is used
- 0: “6 pixels in 8 bytes” packing is used
For the cameras that are supported through this method, the data needed for proper color transforms is (obviously) missing in FastRawViewer. As a result:
- the color displayed will be "raw", that is the saturation is low and hues are inaccurate;
- only Auto WB is available in drop-down;no calculation of CCT and Tint
Backing up the Settings
Windows: to back up the settings, please use the BackupSettings.cmd script, which is installed in the same C:\Program Files\LibRaw\FastRawViewer\scripts\ folder as the scripts described above.
As a result of running this script, an FRV-backup folder will be created in your Documents folder. This FRV-backup folder will contain three files containing a copy of your program’s settings:
- Preferences.reg – for the settings which are controlled through the Preferences
- Shortcuts.reg – the settings for the keyboard shortcuts
- LastUsedSettings.reg – this contains the automatically saved settings such as a list of Recent Files/Recent Folders, window position, etc.
To restore settings from the backup copy:
- Quite FastRawViewer
- Double-click the file with the backup copy of the settings you want to restore – this will import them into the Windows Registry.
Mac OS X: the settings are stored in ~Library/Preferences/com.libraw-llc.FastRawViewer.plist
All of the standard backup procedures for Macintosh (TimeMachine, etc.) will save and restore those settings without any trouble.