Performance Settings
Depending on the characteristics of your computer, the most important ones being
- Amount of RAM.
- Number of processors and cores per processors.
- Type and performance of the video card.
You may need to tune the performance settings of FastRawViewer to be more comfortable.
FastRawViewer is optimized for work with files on modern high-speed storage devices: SSD drives, disk arrays (RAIDs), fast flash cards (UHS-I and similar in fast USB3 readers).
When using slower media, additional optimization of FastRawViewer may be necessary, because the default settings will not be optimal.
Settings for Different Types of Data Storage
Sequential and “Random” Browsing
While you are moving sequentially from one file to another (using Menu – File – Next File or by selecting the next file through the Filmstrip or Grid), FastRawViewer is decoding the next file ahead, so as to make the transition to the next file faster.
When you are browsing through the files in a “random” manner, that is selecting files which are two files ahead or two files behind, the program can’t predict what will be the next file to process.
Because of this, it is recommended that one browse the shoot in a sequential manner, which is only logical as in most cases, one wants to look through all of the shots that one made. As was already mentioned for sequential browsing, decoding looks ahead, working in the background, making the whole process smoother, without any delay for reading and decoding files.
Hard Disk Drives (HDD) and Hybrid drives (HDD with SSD cache)
Hard disk drives, cannot read the data from multiple locations at once: the delays are caused by the time spent on the positioning of magnetic heads.
Accordingly, when using HDDs for optimal performance of FastRawViewer it is necessary to decrease the amount of parallel reads:
- Preferences - Performance - Memory usage and performance - Number of simultaneous RAW decode threads
recommended values for HDD: 2-3 - Preferences - Performance - Thumbnail cache - Thumbnail decoder thread count.
Set 1-3 for HDD (the higher, the more priority will be given to the preview generation over the other functionality of FastRawViewer). - Preferences - Performance - Thumbnail cache - Thumbnail prefetch depth
This parameter can be lowered (down to zero), which will lessen the load on the HDD.
Flash Cards and Network Volumes
Like HDDs, portable media and network volumes work slower than modern SSD storage devices. FastRawViewer can additionally limit the parallel functionality when working with such devices.
Default preferences are intended for work with today’s typical storage media: Gigabit Ethernet network and flash cards of “average speed” in USB3 readers; for slower devices the default settings ought to be changed:
For Network volumes:
- When using a WiFi-network:
Lower the preferences values.
Preferences – Removable Media – Prefetch depth on network volumes
to 2-3. - When using fast network/NAS (1Gb/s and faster, in NAS with 4 and more disks in RAID):
Raise the preferences values.
Preferences – Removable Media – Prefetch depth on network volumes
to 6-8.
For Flash cards:
- Slow cards (USB2 readers, Class 6 cards and slower):
Lower the preferences values.
Preferences – Removable Media – Prefetch depth on removable media
to 2-3. - Fast cards (USB3/SATA readers, UHS-I/CFast cards):
Raise the preferences values.
Preferences – Removable Media – Prefetch depth on removable media
to 6-8.
TIFF/PNG/JPEG Handling
The event that triggers the decoding of JPEG files is defined in Preferences - File formats – Non-RAW files decode priority, separately for each type of RGB files:
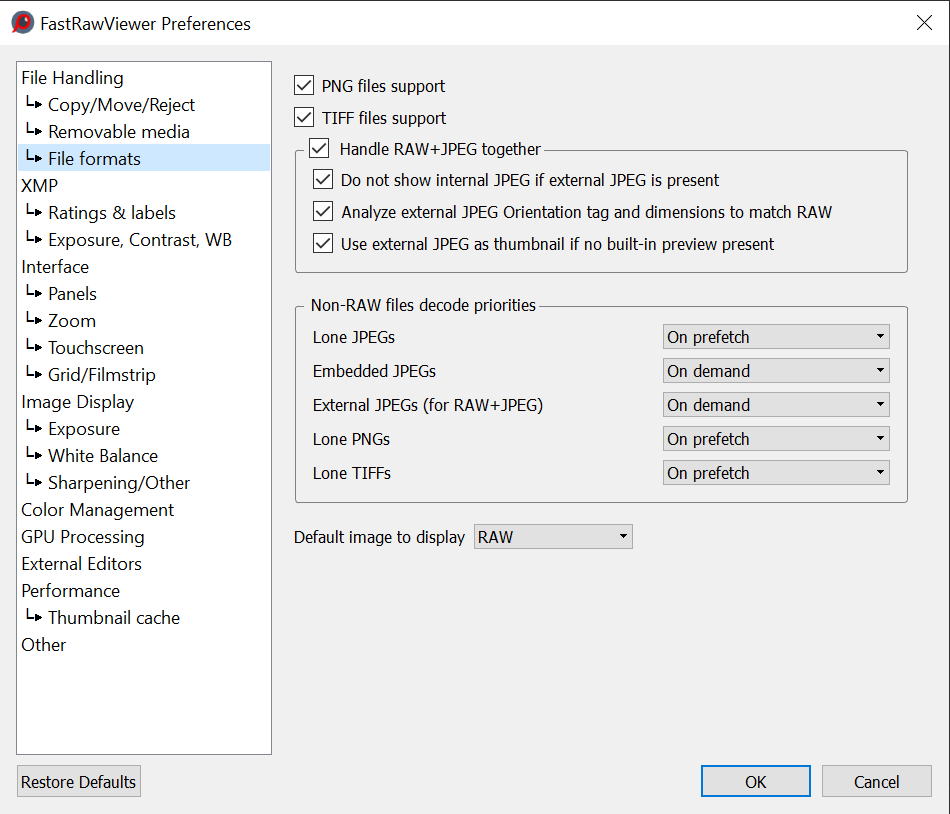
- None – do not decode at all, so this "representation" will be inaccessible;
- On demand – the decoding will happen during switching from RAW to JPEG;
- On file open – the decoding will happen at the moment of file load (this is how it was in all the previous versions);
- On prefetch – the decoding will happen during the file prefetch (this option is available only on 64-bit versions of FastRawViewer).
Depending on how often you look at embedded JPEGs or external JPEGs paired with RAW, you can select one of the following settings:
- Always or often – “On prefetch”
- Rarely or almost never – “On demand”.
For files not accompanied by RAW (Lone JPEGs, Lone PNGs, Lone TIFFs) only two options are available, naturally: On file open (as it was before) and On prefetch; other options don’t make sense. Because On prefetch is implemented only for 64-bit versions, 32-bit version doesn’t have a tunable setting for Lone files
The “On prefetch” mode uses a lot of memory, for example: 20 Mpix JPEG takes up 3-4 MB before unpacking, and 80 MB unpacked (as RGBA); that means a 20-file cache of such JPEGs will take up 1.6 GB instead of 60 to 80 MB.
Customizing Display Modes
FastRawViewer uses the advanced features of modern video cards to display images. In particular, zooming in and out is performed using video card processor, GPU. Depending on the particular set of features and performance of your video card, you may wish to tune the settings controlling the display:
FastRawViewer uses the advanced features of modern video cards to display images and can use a GPU for all the stages throughout the cycle of RAW data display. Depending on the particular set of features and performance of your video card, you may wish to tune the settings controlling the display:
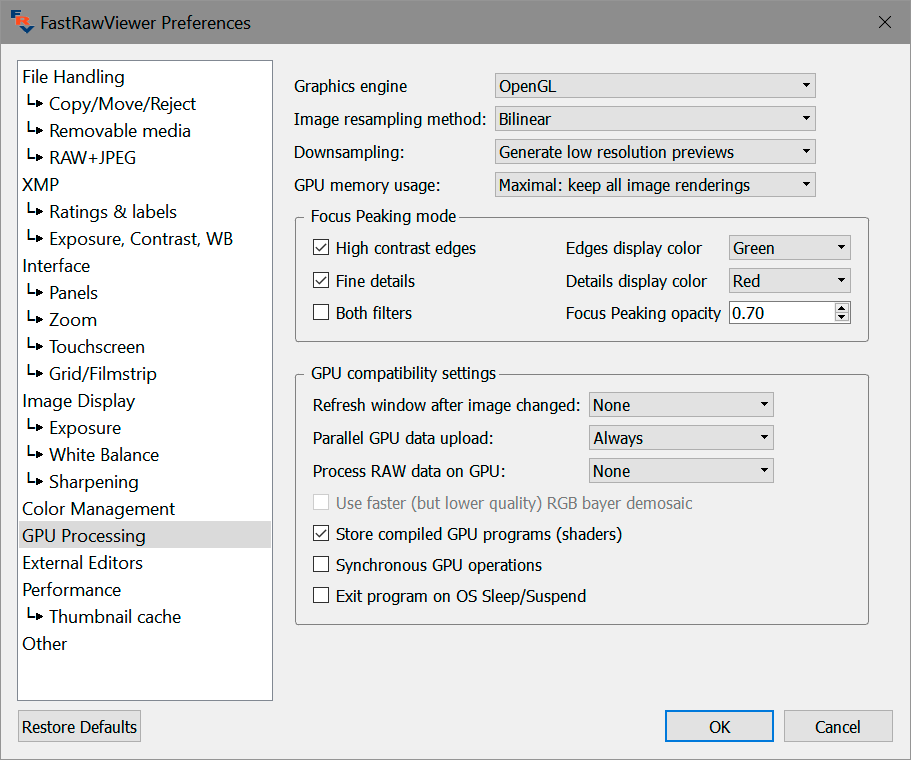
Graphics Engine: video mode (Windows only)
Three video modes are supported, DirectX 9, DirectX 11, OpenGL.
If RAW data is processed on GPU (see below) DirectX 9 mode is guaranteed to be the slowest, while OpenGL mode is most of the cases (but not always) the fastest one.
Unfortunately, due to the multitude of GPU, driver version, OS combinations, it is impossible to provide some sort of universal recommendations. If RAW data is to be processed on a GPU, try switching between DirectX 11 and OpenGL, if it is to be processed on a CPU – try all three video modes.
GPU Memory Usage: video RAM
- Minimal/Minimal+ modes – those use as little video memory as possible, but they are guaranteed to be the slowest. Use if the GPU has 512MB or less of video RAM.
- Optimal mode – provides a balance between performance and video RAM usage.
- Maximal mode – the fastest one, this mode is recommended if more than 2 GB of video RAM is available.
Process RAW data on GPU: controls processing of the RAW data on the GPU
- None – all processing is performed on the central processor (CPU), video card is loaded with fully prepared RGB images.
- Bayer RAW only – only Bayer RAW data will be processed on the GPU (and a higher quality demosaicking will be used, see De-Bayering (demosaicking): CPU and GPU modes)
- All RAW files – all RAW data will be processed on the GPU.
When RAW data is processed on a GPU:
- Adjustment to white balance, lightness/exposure, contrast have nearly instant effect
- Better demosaicking
- However, the first time the file is displayed (on file open) it can be slower, as more data is loaded into the GPU.
Note: Consequently, the optimal set of parameters depends on the hardware and software (drivers); but it also depends on your preferred workflow: if you are using inspection tools heavily and/or adjusting rendering parameters often enough, especially if going through iterations, processing on GPU will save you time even if the video adapter is a slow one and the delay associated displaying the file for the first time is longer.
Image Resampling method – sets the method to be used for calculating zoom-in (going above 100% view):
- No resampling – for large zoom factors, the image will look as if it is constituted of small square tiles.
- Bilinear resampling – fast, mid-quality method.
- Bicubic resampling – high-quality method, a relatively fast vast video card is recommended.
Preferences – GPU Processing – Downsampling options – sets the method for zoom-out calculations:
- None – no additional processing is involved.
- Generate low resolution previews – most compatible method, but relatively slow.
- Suppress downsampling artifacts – we recommend turning this on when you are viewing a noisy image (high ISO, underexposure, deep shadows bumped, etc.)
Not all of the above-listed modes are available on all video cards. If you have an older video-card, bicubic resampling and artifact suppression may not be available at all.
Default settings are optimized for low performance (older) video cards, but if you happen to have one of modern cards (including those based on Intel HD4xxx and higher), we recommend changing the settings in the following way:
- Turn on Preferences – GPU Processing – Image resampling method – Bicubic.
- Set Preferences – GPU Processing – Image downsampling to None or to Suppress downsampling artifacts.
In this case, the amount of the data transferred into the video card is minimized, and the image display is faster.
Other video adapters’ compatibility parameters
In some cases (older video cards, buggy drivers) you may encounter equipment compatibility problems. In this case, you may need to use the compatibility options under the Preferences – GPU Processing – GPU Compatibility settings section:
- Synchronous GPU Operations turns on a slower but more stable mode operation for the misbehaving video cards.
- Refresh window after image changed – sets the mode for forced refresh of the screen
- None – don’t use forced window refresh, the fastest mode
- Normal – window refresh using standard methods
- Slight window resize – the screen refresh is implemented through the slight resize of the window. You may want to turn this mode on if the images on the screen are not redrawn properly.
- Exit program on OS Sleep/suspend – some versions of Windows XP video card drivers perform an incorrect wake up and FastRawViewer crashes when the computer wakes up after Sleep/Suspend. In this case, you will need to use this mode and start FastRawViewer again each time the computer wakes up.
- Refresh window after image changed – sets the mode for forced refresh of the screen