Metadata: Ratings, Labels, Title, and Description
Creating and Reading XMP Files
FastRawViewer records all “changes” into separate sidecar XMP files (analogous to Adobe Bridge). The following can be saved/is read from these files:
- Image orientation (see below, the “Changing Image Orientation” section).
- White Balance in FastRawViewer and Adobe formats (see below “White Balance”).
- Exposure adjustment in the FastRawViewer and Adobe formats (see below, “Working with Exposure”).
- Ratings and marks (please see below).
- Title (title) and description (description) of an image (see below).
If a folder contains files with the same name (for example, the source CR2 file and the result of its conversion to DNG), then, while recording an XMP file, a naming conflict may happen: it is necessary to record filename.XMP for filename.CR2 file, but a filename.XMP already exists in the folder, for filename.DNG file. In this case, FastRawViewer will issue a warning:
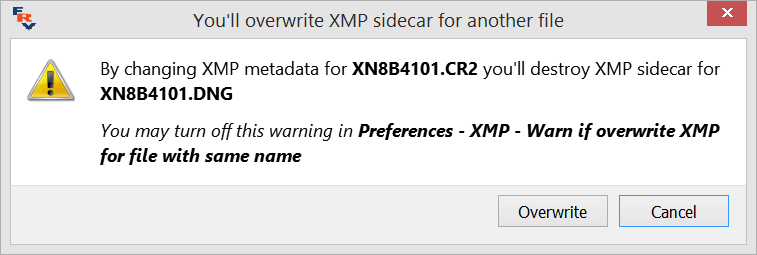
To switch this warning off, unset the setting: XMP - Warn if overwrite XMP for file with same name.
If the default settings are in use:
- When the file is displayed in “Grid View” mode, the sidecar XMP files (those having the same name as the current by with a .XMP extension) are read.
- When the file data is changed, both XMP sidecar files and XMP blocks embedded into RAW files (for those RAW file formats where such XMP blocks exist: DNG files mainly, but also some other formats) are read, and the most recent XMP data is chosen using the modification date.
- Only manual changes are recorded into XMP files (for instance, image orientation or exposure are changed from automatic to something else).
This behavior can be changed with the following settings:
- Preferences – XMP – Use XMP – turning off these settings leads to a complete disregard of XMP files: they are not read, written, and not moved together with RAW files.
- Preferences – XMP – Read Only XMP – blocks any recording of XMP files. Data (ratings, labels, white balance, exposure correction) will be read and used for display, but any changes to it will not be saved.
- Preferences – XMP – Force XMP file creation – turns on the creation of XMP files, even if nothing was changed manually. The parameters which were (automatically) set up when opening the file will be set as the parameters in the XMP file.
Exposure compensation and white balance are written to newly created XMP files according to the setting of Adobe Process Version in Preferences – XMP – Exposure, Contrast, WB - Adobe process version for newly created XMP files.
To set color labeling scheme to be compatible with CaptureOne, set Preferences – XMP – Ratings & Labels - Write photoshop:Urgency tag with color labels (for old PhaseOne C1). This setting turns on the recording of the XMP-tag photoshop:Urgency, which is used by old versions of CaptureOne to recognize and set color labels.
XMP sidecars and embedded XMP blocks
XMP data can be found both in an external file (a sidecar, with the .XMP extension) and in files of certain formats (DNG, CR2, JPEG). If both ways, a sidecar as well as an embedded block, are used for a certain image file, then FastRawViewer picks the newer one, using the xmp:MetadataDate tag.
Unfortunately, several programs, ignoring the standard, do not record that tag. In this case, one can set the preferences to always select the XMP sidecar by using Preferences – XMP – If both embedded and sidecar XMP exists: Always use sidecar.
When working with JPEG files, XMP data can be recorded not just as separate sidecar files, but also in the form of data blocks embedded into the JPEG files themselves (this setting has been added because certain programs, for example, Adobe Bridge, ignore XMP sidecars for JPEG files.
As with any operation that modifies image files, recording XMP could theoretically damage the file itself (if, for example, a bad card reader is being used), so when turning on the above-described setting, the user is given an additional warning. When using this option, if the JPEG file previously had an XMP sidecar file, said sidecar will be deleted after recording an XMP block inside the JPEG.
When using RAW+JPEG mode, one can turn on the setting RAW+JPEG mode: embed XMP block into JPEG. If it’s turned on, then aside from writing XMPs for RAW (as an XMP sidecar), the same XMP block will be written into the associated JPEG file (if there was a different XMP block in the JPEG file, it will be replaced, not combined).
XMP sidecar files are supported for file formats other than RAW (TIFF, PNG, HEIC)
The overwhelming majority of applications that work with graphic formats do not support XMP sidecar files for TIFF, PNG, HEIC/HEIF files.
Because of this, XMP support for the above-listed formats in FastRawViewer is turned off by default. To turn it on, use the following settings in Preferences – XMP:
- Use XMP for TIFF files
- Use XMP for PNG files
- Use XMP for HEIC/HEIF files
When turning on these settings, FastRawViewer:
- Will read both embedded XMP blocks and Sidecar files (with priority set by the setting If both embedded and sidecar XMP exists).
- Will record XMP sidecar files.
- Will allow file rotation (the orientation will be recorded in the XMP: Orientation tag).
Rating and color labels will work, including using them for sorting and filtering.
Rules for naming XMP sidecar files
In operating systems that are supported by FastRawViewer (Windows, macOS/Mac OS X), the most common file systems are usually case-insensitive (filename.ext and filename.EXT are considered to be the same file); however, in some instances this is not true, and then files with the same names typed in characters of different case are considered to be different files.
Under FastRawViewer's default settings, FastRawViewer tries to find an XMP sidecar as a file named Filenane.xmp, then Filename.XMP; if such a file is found, then the rendering parameters that were set / adjusted in FastRawViewer will be recorded back into it. If such a file is absent, then while recording the rendering parameters an XMP sidecar file with the name Filename.xmp will be created.
To support compatibility with other applications, which write either Filename.xmp or Filename.ext.XMP (.ext.xmp), there is a setting called Preferences – XMP – XMP Files naming scheme, which controls the selection of both a unique naming system (Filename.XMP or Filenam.ext.XMP) and an order for searching for an existing file (.XMP, then .xmp or vice versa).
What happens when you use several applications simultaneously to modify XMP files
FastRawViewer, when it’s running, stores XMP data in memory cache. If the XMP data was modified by some external application, the changes will not be automatically recognized in FastRawViewer.
To make such changes visible in FastRawViewer, you need to explicitly trigger the re-reading of XMP data:
- Menu – File – Reload – Reload current file (by default assigned to Ctrl-F4 hotkey) – will re-read the current file, opened in Single File view mode, if it exists;
- Menu – File – Reload – Reload current folder (by default Ctrl-Shift-F4) – will re-read the contents of the current folder, including the XMP and EXIF data, and will also reload the current file, if it exists.
Under the default settings, Menu – File – Reload re-reads only XMP files, while image files will be taken from the internal FastRawViewer cache. To “see” the changes made in an edited file by some external program (this is applicable, primarily, to JPEG/TIFF/PNG files), the setting Preferences – Performance – Flush decoded RAW/JPEG cache on file/folder refresh will have to be turned on.
FastRawViewer records any changes to XMP data immediately, without any delay. For other applications to recognize those changes you may need to perform some extra actions.
In particular, when using Adobe Lightroom with FastRawViewer, one needs to take the following into account:
- Adobe Lightroom ignores XMP files while importing from a flash card (whether it is through card reader or by directly connecting a camera to a computer).
Should you need to import changes made in FastRawViewer to Adobe Lightroom, please copy the files to a hard drive first (you can do this using FastRawViewer and selecting only the images you need to copy; corresponding sidecar files, if present, will be copied automatically). Nevertheless, we suggest copying the files to a hard drive before setting ratings, labels, and/or changing any RAW processing parameters, to avoid any corruption of the data on the card caused by sudden losses of power, disconnections, or hardware malfunctions. Again, you do not need to copy everything from the card: you can use FastRawViewer to select the images that you want to copy. - Adobe Lightroom ignores XMP sidecar files for JPEG files. In the case of JPEG files, for Adobe Lightroom to acknowledge changes made to XMP data it needs to be embedded into the JPEGs. To do so, please use Write XMP blocks to JPEG files mode, as described above.
- If RAW files are already imported into an Adobe Lightroom catalog, you need to ensure some additional settings to XMP sidecar export and to explicitly trigger the synchronization while importing XMP files:
- To import changes to XMP files, made in other programs, including FastRawViewer:
- Select a file or a group of files for which you want to refresh XMP data in a Lightroom catalog.
- Use Menu – Metadata – Read metadata from files, or the context menu which appears on the right-click, selecting Metadata – Read metadata from files.
- To automatically record the XMP data changes you’ve made in Adobe Lightroom to sidecar XMP files, please use the Adobe Lightroom setting Catalog Settings – Metadata – Automatically write changes into XMP
- If the above setting in Adobe Lightroom is off, or the XMP file has been changed by an external application, Lightroom will not record XMP files automatically. To trigger synchronization manually, please use Menu – Metadata – Save Metadata to files or the respective choice from the context menu.
- To import changes to XMP files, made in other programs, including FastRawViewer:
Compatibility with RawPhotoProcessor (.rpps files)
FastRawViewer can create basic .rpps files (those contain conversion settings for RawPhotoProcessor).
The following parameters are recorded:
- Exposure compensation.
- White Balance.
This option is controlled through Preferences – Other – Write RPPS files checkbox. Another checkbox, Preferences – Other – Force RPPS files creation, forces the creation of .rpps files immediately after a RAW file is opened in FastRawViewer, with automatic exposure compensation and current white balance recorded as initial settings.
To import such .rpps files for further use, while in RawPhotoProcessor navigate to Menu - Settings - Import Multiple settings and select both RAW and .rpps files in the folder that you wish to process. The settings in .rpps files will be imported into RawPhotoProcessor History and the corresponding RAW files will be opened using the parameters you've set in .rpps files.
Ratings and Labels
FastRawViewer can set XMP ratings and XMP labels that are compatible with Adobe products (and other programs which support XMP).
Ratings are set as a number from 1 to 5. The setting is changed via Menu– XMP Metadata or by pressing the 1…5 buttons in the XMP Metadata panel, or by pressing the buttons 1…5 in the XMP Metadata panel, or with the hotkeys (default keys are Alt-1...Alt-5).
To clear the rating, please press [X] button in the upper row of the XMP Metadata panel, or you can also use Menu – XMP Metadata – No Rating or the hotkey (Alt-0).
For the compatibility with Adobe Bridge FastRawViewer supports Reject rating (-1). To enable this, set Preferences – XMP – XMP – Ratings & Labels - Use XMP Reject rating to ON (this is also switched on automatically if XML Label style: Adobe Bridge is selected).
As the result, the button [R] is displayed in the row for setting the rating, and the action Reject appears in the Label menu.
Color labels are named with text, and 4 styles of labels are supported:
- Adobe Bridge style (Select, Second, Approved, Review, To Do).
- Adobe Lightroom style, color marks (Red, Yellow, Green, Blue, Purple).
- Adobe Lightroom ‘Review Status’ style (To Delete, Color Correction Needed, Good to Use, Retouching Needed, To Print).
- Custom user labels.
You can select the appropriate label style through Preferences–XMP – XMP – Ratings & Labels - XMP Label Style section. For the Custom style you can also edit the names for the labels.
Setting and changing the label for the image is performed through Menu– XMP Metadata or by pressing the colored squares in the XMP Metadata panel, or using hotkeys (Alt-6-Alt-9). To delete the label, press the [X] button in the row for setting the label, or use Menu – XMP Metadata – Clear Label.
When turning on the Read Only XMP mode, labels and ratings are read from XMP files, but the program prevents any changes to them.
In Preferences – XMP - Ratings & Labels one can turn on the Visual Feedback on rating/label change setting. If this is done, visual feedback will be given in the form of a contrasting notification when changing a rating/label, occurring for about 1 second.
Title and Description
FastRawViewer can record the title and description of the image in XMP files.
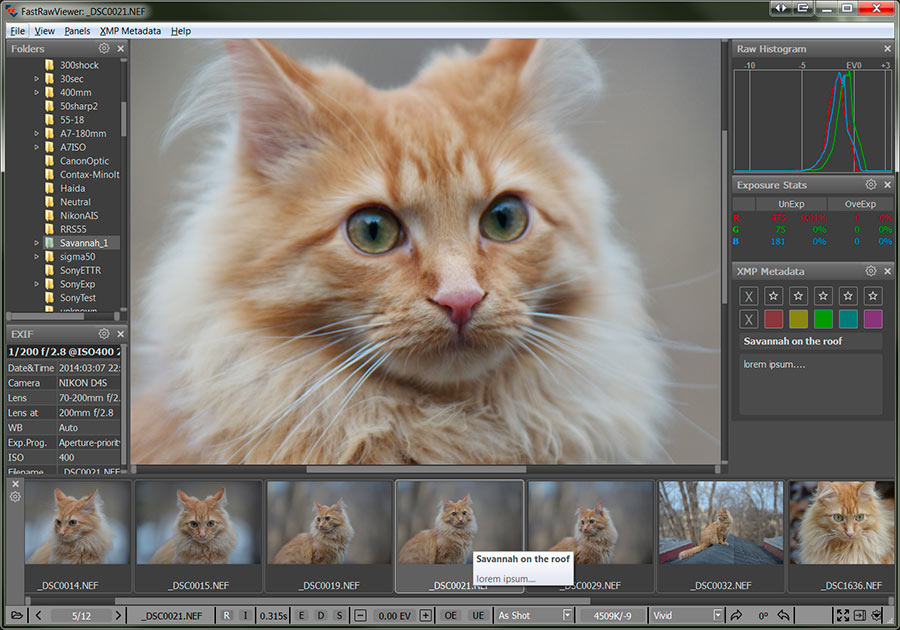
To call up the editing dialog, use Menu – Metadata – Edit Title/Description or the corresponding macro (Alt-D), or double-click on the title or description field in the XMP Metadata panel; this summons the editing dialog:
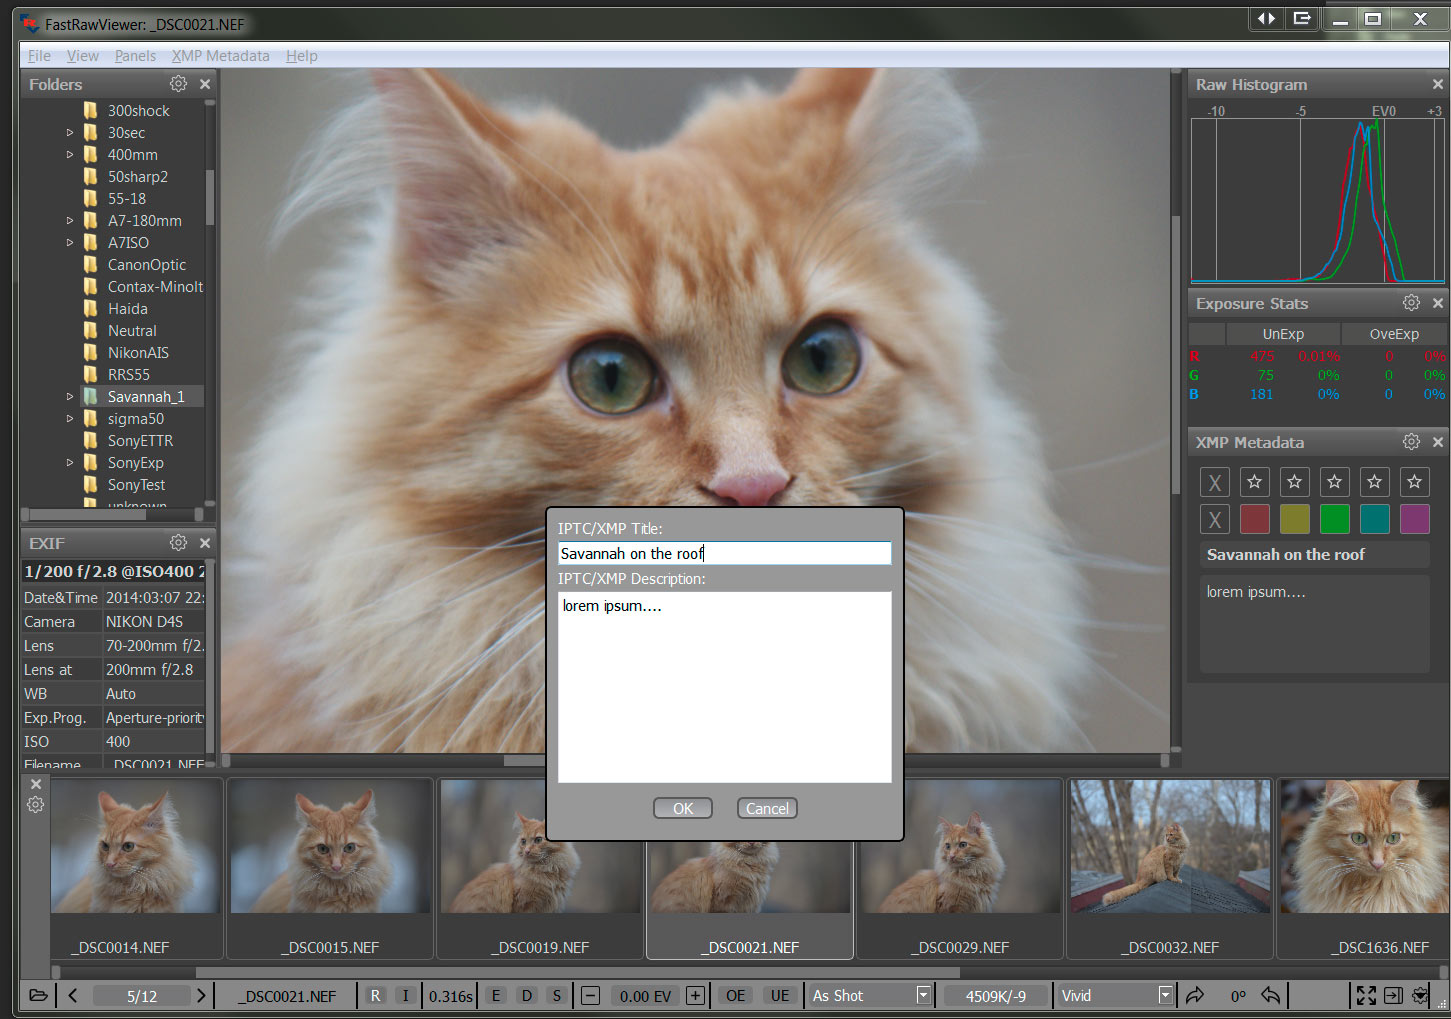
After editing the name and description they are shown in:
- The floating tooltip in the Filmstrip/Thumbnails panel.
- The XMP Metadata panel: