Working with Exposure
FastRawViewer offers several tools to analyze the exposure on a photograph, recommend exposure adjustments during a shooting session, and select exposure adjustment during RAW conversion:
- RAW-histogram.
- Over/Underexposure statistics.
- Showing the areas of over- and underexposure on the image.
- Automatic setting of positive (lightening) exposure adjustment.
- Manual Exposure adjustment setting.
Histogram
The RAW-data histogram is created based on the unmodified (disregarding any exposure adjustments metadata) RAW data from the file:
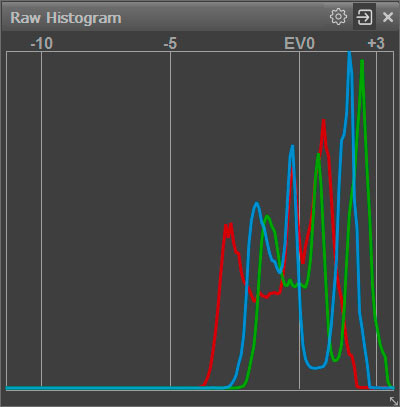
Horizontal Scale:
- EV0 – the level that corresponds to the middle gray. If exposure adjustment has not been applied, it’s set to 3 photographic stops below the saturation level of a camera.
- -5 – the level that corresponding to the level of the underexposure indication (see below).
- +3 (when exposure adjustment is turned on it can be +2 or +1) – extreme highlights.
- The leftmost mark of the scale is the level that corresponds to the value of “1” in the RAW data.
The histogram step on the horizontal axis is 0.1EV, so there will always be a “comb” in the shadows, as there are less possible levels than 10 levels per stop.
When applying exposure adjustment (see below) the histogram itself does not change – instead the horizontal axis shifts. During a positive exposure adjustment, the EV0 level shifts in the direction of the shadows (because the shadow sections shifts to brighter ones – closer to middle gray), correspondingly the other vertical marks move as well (and if needed, the numbers for the marks change as well). During a negative exposure adjustment, the axis shift is in the opposite direction.
With this, the underexposure level indicator stays in place because the quality of the shadows doesn’t change with the change of exposure compensation.
Exposure Statistics
For RAW data, the exposure statistics are calculated for each channel. These statistics are displayed in the Exposure stats panel, which by default is located in the right side of the program window.
If no positive exposure compensation was applied (that includes automatic exposure correction, please see below “Hidden Adobe exposure compensation”), the table consists of three columns: the name of the Raw “color” channel, the percentage of underexposed pixels, and the percentage of overexposed pixels:

For the shot above, the statistics table shows that:
- Underexposure (UnExp) is 2.45% in the Red channel, 0.29% in the Green channel, and 1.78% in the blue channel – those pixels are in the underexposure zone, that is 8EV (with standard settings) below the saturation point for the camera.
- Overexposure (OvExp): no overexposure.
8EV is a standard value for the photographically usable dynamic range. You can change it to match your particular camera through Preferences – Image Display - Exposure – Underexposure detection limit.
The underexposure indication limit (meaning the dynamic range of the camera) can be set even more flexibly, depending on the ISO settings. For this, one needs to turn on the Preferences – Image Display - Exposure - ISO-based underexposure limit setting and set three parameters for the camera: underexposure level (dynamic range) for ISO 200, ISO 1600, and “for high ISO.”
Calculating the Underexposure Limit (dynamic range) will happen in the following manner
- For ISO values of 1600 and lower, down to ISO 6, the linear change is such that the line passes through the value for ISO 200. In other words, the line passes through two user-defined points: ISO 1600 and ISO 200.
- For ISO settings 1601 and above, the dynamic range decreases by one stop for each stop of ISO setting increase, but the limit is always greater or equal to the value that is entered for high ISO.
If positive exposure compensation was applied to the image the table may contain an additional column OE+Corr, indicating the number of pixels, which will be above the maximum value after the exposure compensation is applied.
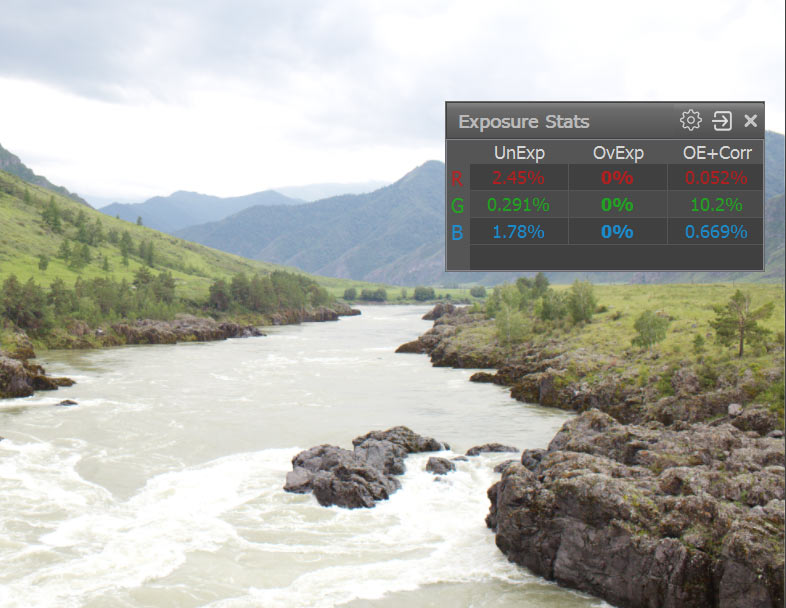
After the positive exposure compensation was applied as in the shot above, 10% of “green” pixels are above the maximum, most probably because the value of the exposure compensation is a little bit overboard.
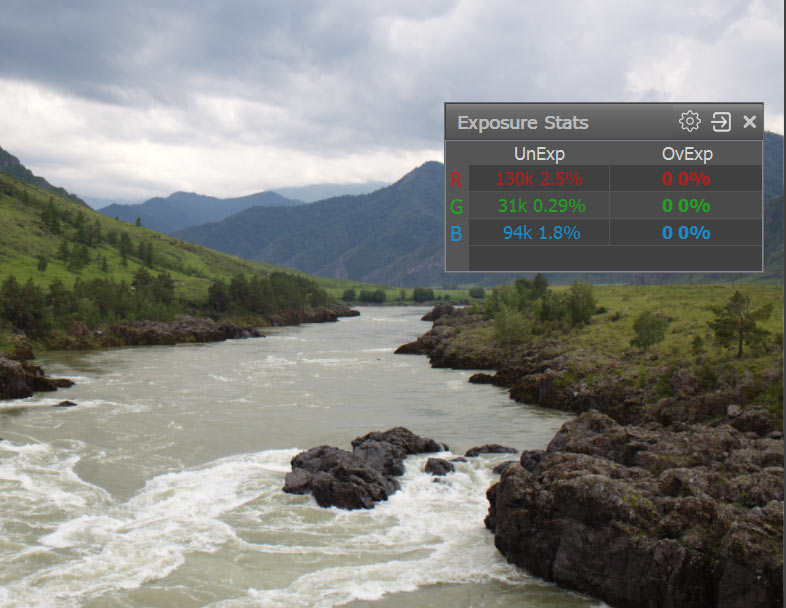
For a fast review of a significant number of files, it may be convenient to keep the OE+Corr column always on. This way, you won’t be distracted by the changes in the size of the panel. This can be done by going into the Exposure Stats panel’s settings (gear icon) and checking Always display OE+Corr column.
In the same settings menu, you can also enable the count of the number of over- and underexposed pixels by checking Show pixel counts:
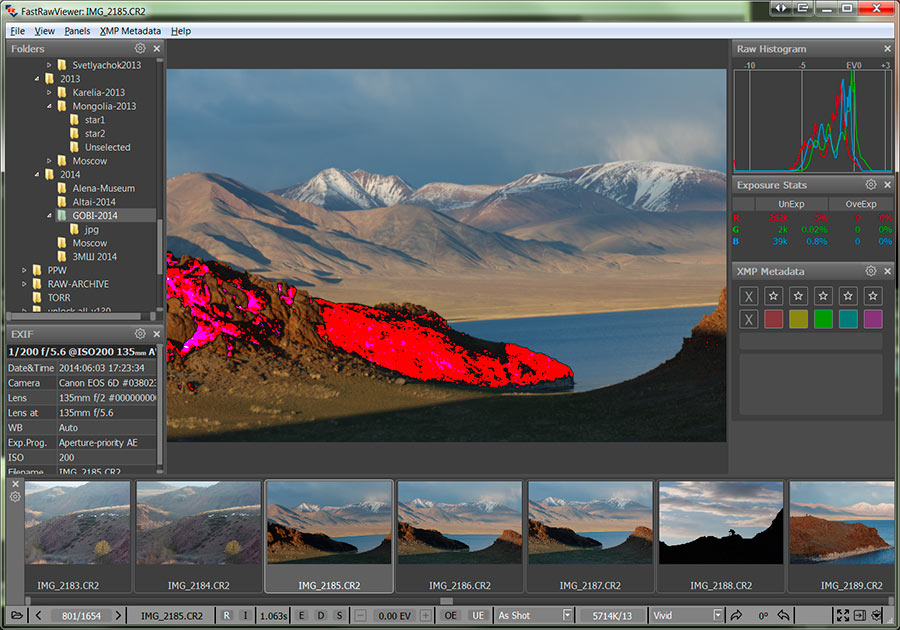
Spotlighting the Areas of Over- and Underexposure
The over/underexposure areas can be identified using a colored overlay.
Spotlighting the overexposure zones can be turned on and off through Menu–View–Overexposure Display (or by pressing the O key on the keyboard):
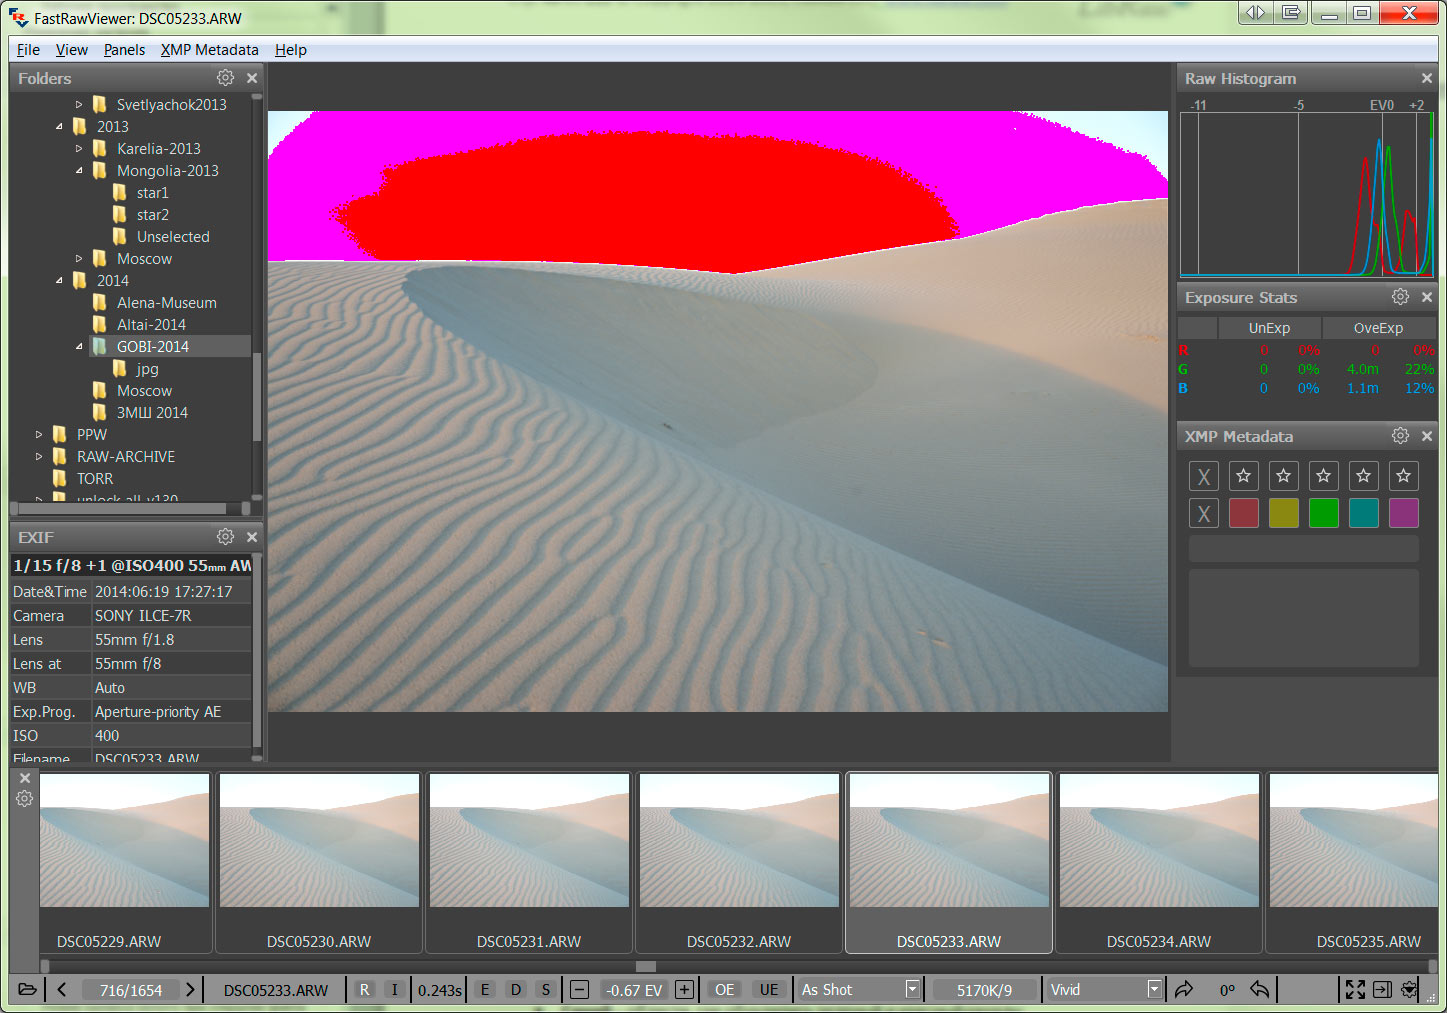
If some pixels of a channel hit the overexposure limit the values for such pixels are clipped. FastRawViewer is using the following color scheme to spotlight the areas of overexposure:
- Magenta – areas where the green channel is clipped.
- Cyan – areas where only the red channel is clipped.
- Yellow – areas where only the blue channel is clipped.
- Blue – areas where both green and red channels are clipped.
- Green – areas where both blue and red channels are clipped.
- Red – areas where both blue and green channels are clipped.
- Black – areas where all 3 channels are clipped.
For this image, we see the blown-out green channel on almost the entire sky over the sand dune; while on the central portion of the sky the blue and green are both blown out. More likely than not, recovering the sky’s tone normally via Highlight recover won’t be possible.
With standard settings, the positive exposure adjustment has the effect on the overexposure area display: the areas shown are the ones that would be overexposed, if we had taken the shot with this exposure compensation on the camera. This behavior can be changed by turning off the setting Preferences – Image Display - Exposure – Exposure adjustments affects OverExposure display, in this case only those areas that are overexposed (clipped) in the RAW file itself will be shown as the overexposed areas (obviously, the exposure adjustment in FastRawViewer has no effect on the content of RAW files).
Viewing the underexposure zone can be turned on and off through Menu–View–Underexposure Display (or by pressing the U key on the keyboard):
Like in the previous, the underexposed pixels are spotlighted with saturated colors:
- Blue – where the blue channel is underexposed.
- Red – where the red channel is underexposed.
- Green – where the green channel is underexposed.
- Magenta – where both red and blue channels are underexposed.
- Cyan – where both green and blue channels are underexposed.
- Yellow – where both green and red channels are underexposed.
- White – where all three channels are underexposed.
Exposure adjustments do not affect the display of underexposure areas (or underexposure statistics).
For this shot, part of the foreground is underexposed; also, one can see areas with the red channel underexposed (red), and, also areas where both red and blue channels are underexposed (magenta).
Unlike for overexposure, which is determined fairly unambiguously in digital cameras (by the “blowout” of one or more channels, the channel histogram pressed to the right edge and having a characteristic spike), the limit of the unacceptable underexposure area cannot be exactly determined, because it depends on
- Planned print size.
- Planned shadow boost in the current shot.
In FastRawViewer, the limit that controls the underexposure warning is set by the user themself in the preferences (Preferences – Image Display - Exposure – Underexposure detection limit). The default value (8EV) is fairly conservative, and works pretty well for low ISO settings, 100-800 ISO. In the case of using high ISO, or strict demands to the image quality, this parameter may to be set lower (to 6-7EV, and sometimes even lower), according to the technical requirements for the resulting image.
Exposure correction
Adobe 'hidden’ exposure correction
By default, an exposure correction equal to the one that is automatically applied by Adobe converters is also applied when a RAW file is opened in FastRawViewer (for more details, please see https://photographylife.com/adobes-silent-exposure-compensation).
As a result, the overall brightness of the rendition on the screen is a close match to a JPEG preview; and, given the contrast curve in Preferences is set to 'Variable Contrast' and contrast is set to default, it also matches the rendition in Adobe converters with all the sliders there being set to '0'.
The application of this standard exposure offset can be switched off via Preferences – Image Display - Exposure – Apply Adobe hidden exposure correction.
To «roll out» hidden correction in Adobe tools (Camera Raw, Lightroom) use Preferences – XMP – Exposure, Contrast, WB – Force Adobe software to match FastRawViewer brightness (exposure). This setting is enabled only if Apply Adobe hidden exposure correction setting is turned off.
Automatic exposure correction
If Shift-A is pressed, or Menu – Adjust – Auto Exposure Correction is enabled, FastRawViewer calculates and applies automatic exposure correction in such a way, that 1% of the total amount of pixels in the image are pushed to saturation (receive the value of 255 on the 8-bit scale).
The following settings for the automatic exposure correction are user-adjustable:
- Mode:
- Fixed shift by the given amount of stops (EV), the value is controlled through Preferences – Image Display - Exposure – Auto Exposure – Fixed Exposure shift.
- Automatic calculation of the exposure compensation to shift the histogram ‘to the right’, controlled through Preferences – Image Display - Exposure – Auto Exposure – ETTR-style autoexposure (shift histogram to the right).
- Fine-tuning of the automatic exposure compensation:
- Saturate up to NN% pixels – controls the per cent of the pixels that will reach the saturation as the result of the automatic exposure correction.
- Exposure shift limits:
- Unlimited – no limit, goes all the way to the setting for Saturate up to NN% pixels
- Hard limit – no more than the number of stops set in this field.
- Virtual ISO – the limit depends on the ISO setting that was used to take the shot:
- If the shot was taken at ISO in-camera setting higher that this limit, the maximum exposure correction is 0.
- For the shots taken at lower than this limit ISO setting in camera, the maximum value for the exposure correction is equal to the difference
(in stops, EV) between the ISO setting in the camera and the limit set (for example, if the limit is set to ISO 6400, and the shot was taken at ISO 1600, the maximum amount of exposure correction is 2EV).
To switch off the exposure correction, making it 0 (or, if Apply Adobe hidden exposure correction is ON, making it equal to that value of hidden correction), press the ‘A’ key on the keyboard. Second press of ‘A’ will restore the previous correction.
Manual Exposure Correction
- Increase exposure adjustment: Menu – Adjust – Adjust exposure correction – Increase Exposure (Alt-Plus/Alt-Shift-Plus keys) or the + button in the lower bar of the window. Shift-Click on bottom bar button will use larger step.
- Decrease exposure adjustment: Menu – Adjust – Adjust exposure correction – Decrease Exposure (Alt-Minus/ Alt-Shift-Minus keys) or - button in the lower bar of the window. Shift-Click on bottom bar button will use larger step.
The amount of exposure adjustment change per click / key press can be set through Preferences – Image Display - Exposure – Manual Exposure step size for small/big steps separately.
Recording of the exposure correction to XMP files: Interaction with Adobe Programs
Exposure adjustment is recorded in XMP-file in the FastRawViewer format (if reading/recording XMP is on).
Moreover, exposure adjustment in a format that is compatible with Adobe (Bridge, Camera Raw, Lightroom) is recorded in XMP as well. This recording can be turned off through Preferences – XMP – Adobe Compatible Exposure and White Balance.
Exposure Adjustment when Browsing to the Next File
If the value of the exposure correction can be read from an XMP file (the priority is given to the value recorded in FastRawViewer format, and if it is not found, we take the value from the record in Adobe format), it will be applied when the file is displayed.
If XMP file does not exist, or the exposure correction records are absent in it, exposure correction will not be applied (however, if Apply Adobe hidden exposure correction is ON, it will still be applied). This behavior can be altered through the setting
Preferences – Exposure – Exposure correction on file open:
- No correction (default) – exposure correction is not applied.
- Autoexposure – Automatic exposure correction will be applied, according to the respective settings for this type of correction.
Keep from prev. file – same value of the exposure correction, as it was set for the previous file is applied. If the file is the first one opened during this session, no exposure correction is applied.
Forcing Adobe tools to render tones accurately
Some photographers prefer to start processing RAW from neutral settings as was suggested about 10 years ago by Dan Margulis. There is also the question of the default silent clipping of highlights in raw converters, which sometimes is confusing and you may want to disable it.
For example, with Adobe CameraRaw and Adobe Lightroom we have:
- Hidden lightness adjustment (correction for baseline exposure) which makes the lightness of the rendered midtone accord with the lightness of the midtone in the out-of-camera JPEG. This is described in Adobe hidden exposure correction section (above);
- An S-curve, adjustments to blacks, overall brightness, and contrast, as well as some other basic tone-mapping parameters are applied, to enhance the rendering and make it more pleasing right out of the box. If the scene has high dynamic range, strong saturated colors, or if some serious image editing is planned, then that enhanced view may be not the best starting point.
Our experiments show that we can achieve pretty good linearity using just a few simple overrides over the default settings if we start with Adobe process 2010 aka Process Version 2 (and convert to more recent PV later, if needed). Essentially, all that is needed in PV2 is to select the linear tone curve and set all the basic adjustments, starting with Exposure, to zero.
If you want to switch to highly linear mode, you need to adjust Preferences:
- Set Image Display - Exposure - Apply Adobe hidden exposure correction setting to not checked.
- Image display - Contrast curve type: set to any fixed contrast one: sRGB, gamma 1.8, 2.2, L* (gamma 2.2 is recommended for proper lightness match)
- XMP - Exposure, Contrast, WB - Adobe process version: set to Version 2 (2010)
- XMP - Exposure, Contrast, WB - Force Adobe software to match FastRawViewer brightness: set to checked.
This will result in silent "exposure boost" / baseline exposure being rolled back in Adobe CameraRaw/Lightroom, preventing false clipping indications and allowing one to regain the highlights that were not truly clipped. - XMP - Exposure, Contrast,WB - Write linear curve to XMP: set to checked.
If this setting is enabled, Adobe-compatible exposure and white balance tags will be written with the following additions and amendments:- the curve will be set to Linear (both name and values)
- tag crs:Shadows will be set to 0
- tag crs:Contrast will be set to 0
- tag crs:Brightness will be set to 0
- tag crs:ProcessVersion=5.7 will be forced
- tags crs:ToneCurvePV2012, crs:ToneCurvePV2012Red, crs:ToneCurvePV2012Green, crs:ToneCurvePV2012Blue will be deleted
Enabling these settings will not automatically rewrite existing XMP files or create new XMP files if they are absent. To set new XMP parameters for the linear mode or to roll back Adobe's "exposure boost", you need to do the following after enabling appropriate settings:
- either check "Force XMP files creation" (Preferences -> XMP - Force XMP files creation) and open the files where you want the new settings in FastRawViewer.
- or open the files where you want the new settings in FastRawViewer and at the Bottom Bar change the White Balance or Exposure; clicking twice on "Exposure correction on/off" to switch it off and then back on should do the trick.